The Sewing Pattern Tutorials: 2. sizing charts and fitted measurements


The pattern envelope: sizing charts and fitted measurements
This Sewing Pattern Tutorials is a new year-long FREE sewing course where we will demystify dressmaking patterns. We’ll begin with the basics so that if you are new to sewing you can join in from the start. We also know that lots of you want to learn new sewing skills so as the year progresses we’ll begin to cover more complex topics so that you will finish with the skills needed to deal with fitting problems too. In each post we will also have a sewing jargon busting section explaining any terms used that might be confusing. In the first few posts we will explain what all the information on the back of the pattern envelope means and in this post we focus on sizing charts and fitted measurements. Catch up on previous posts in the series here.
What is the difference between a sizing chart and fitted measurements?
On the pattern envelope there is usually both a sizing chart and fitted measurements. The sizing chart helps you to decide which size you should cut out and is usually standardised across patterns for that pattern designer. The fitted measurements give you the actual measurements of the pattern and the size the made up garment will be. The difference between these two measurements is called ‘ease’.
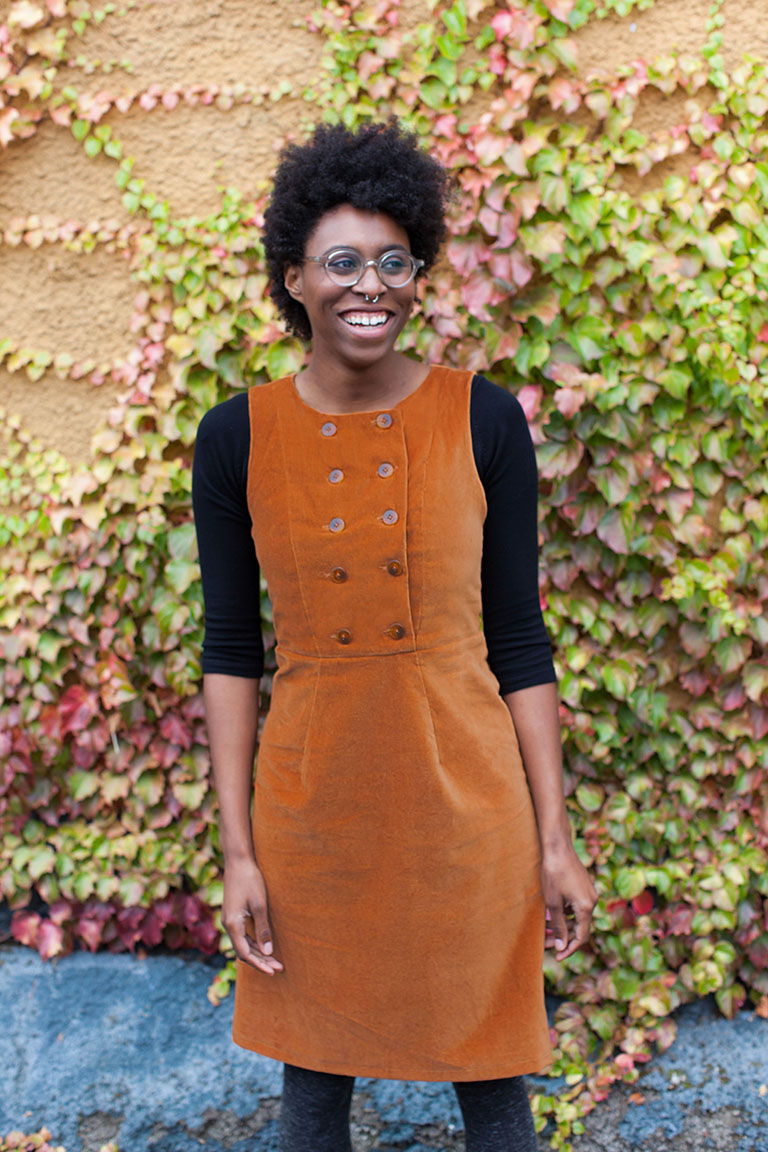
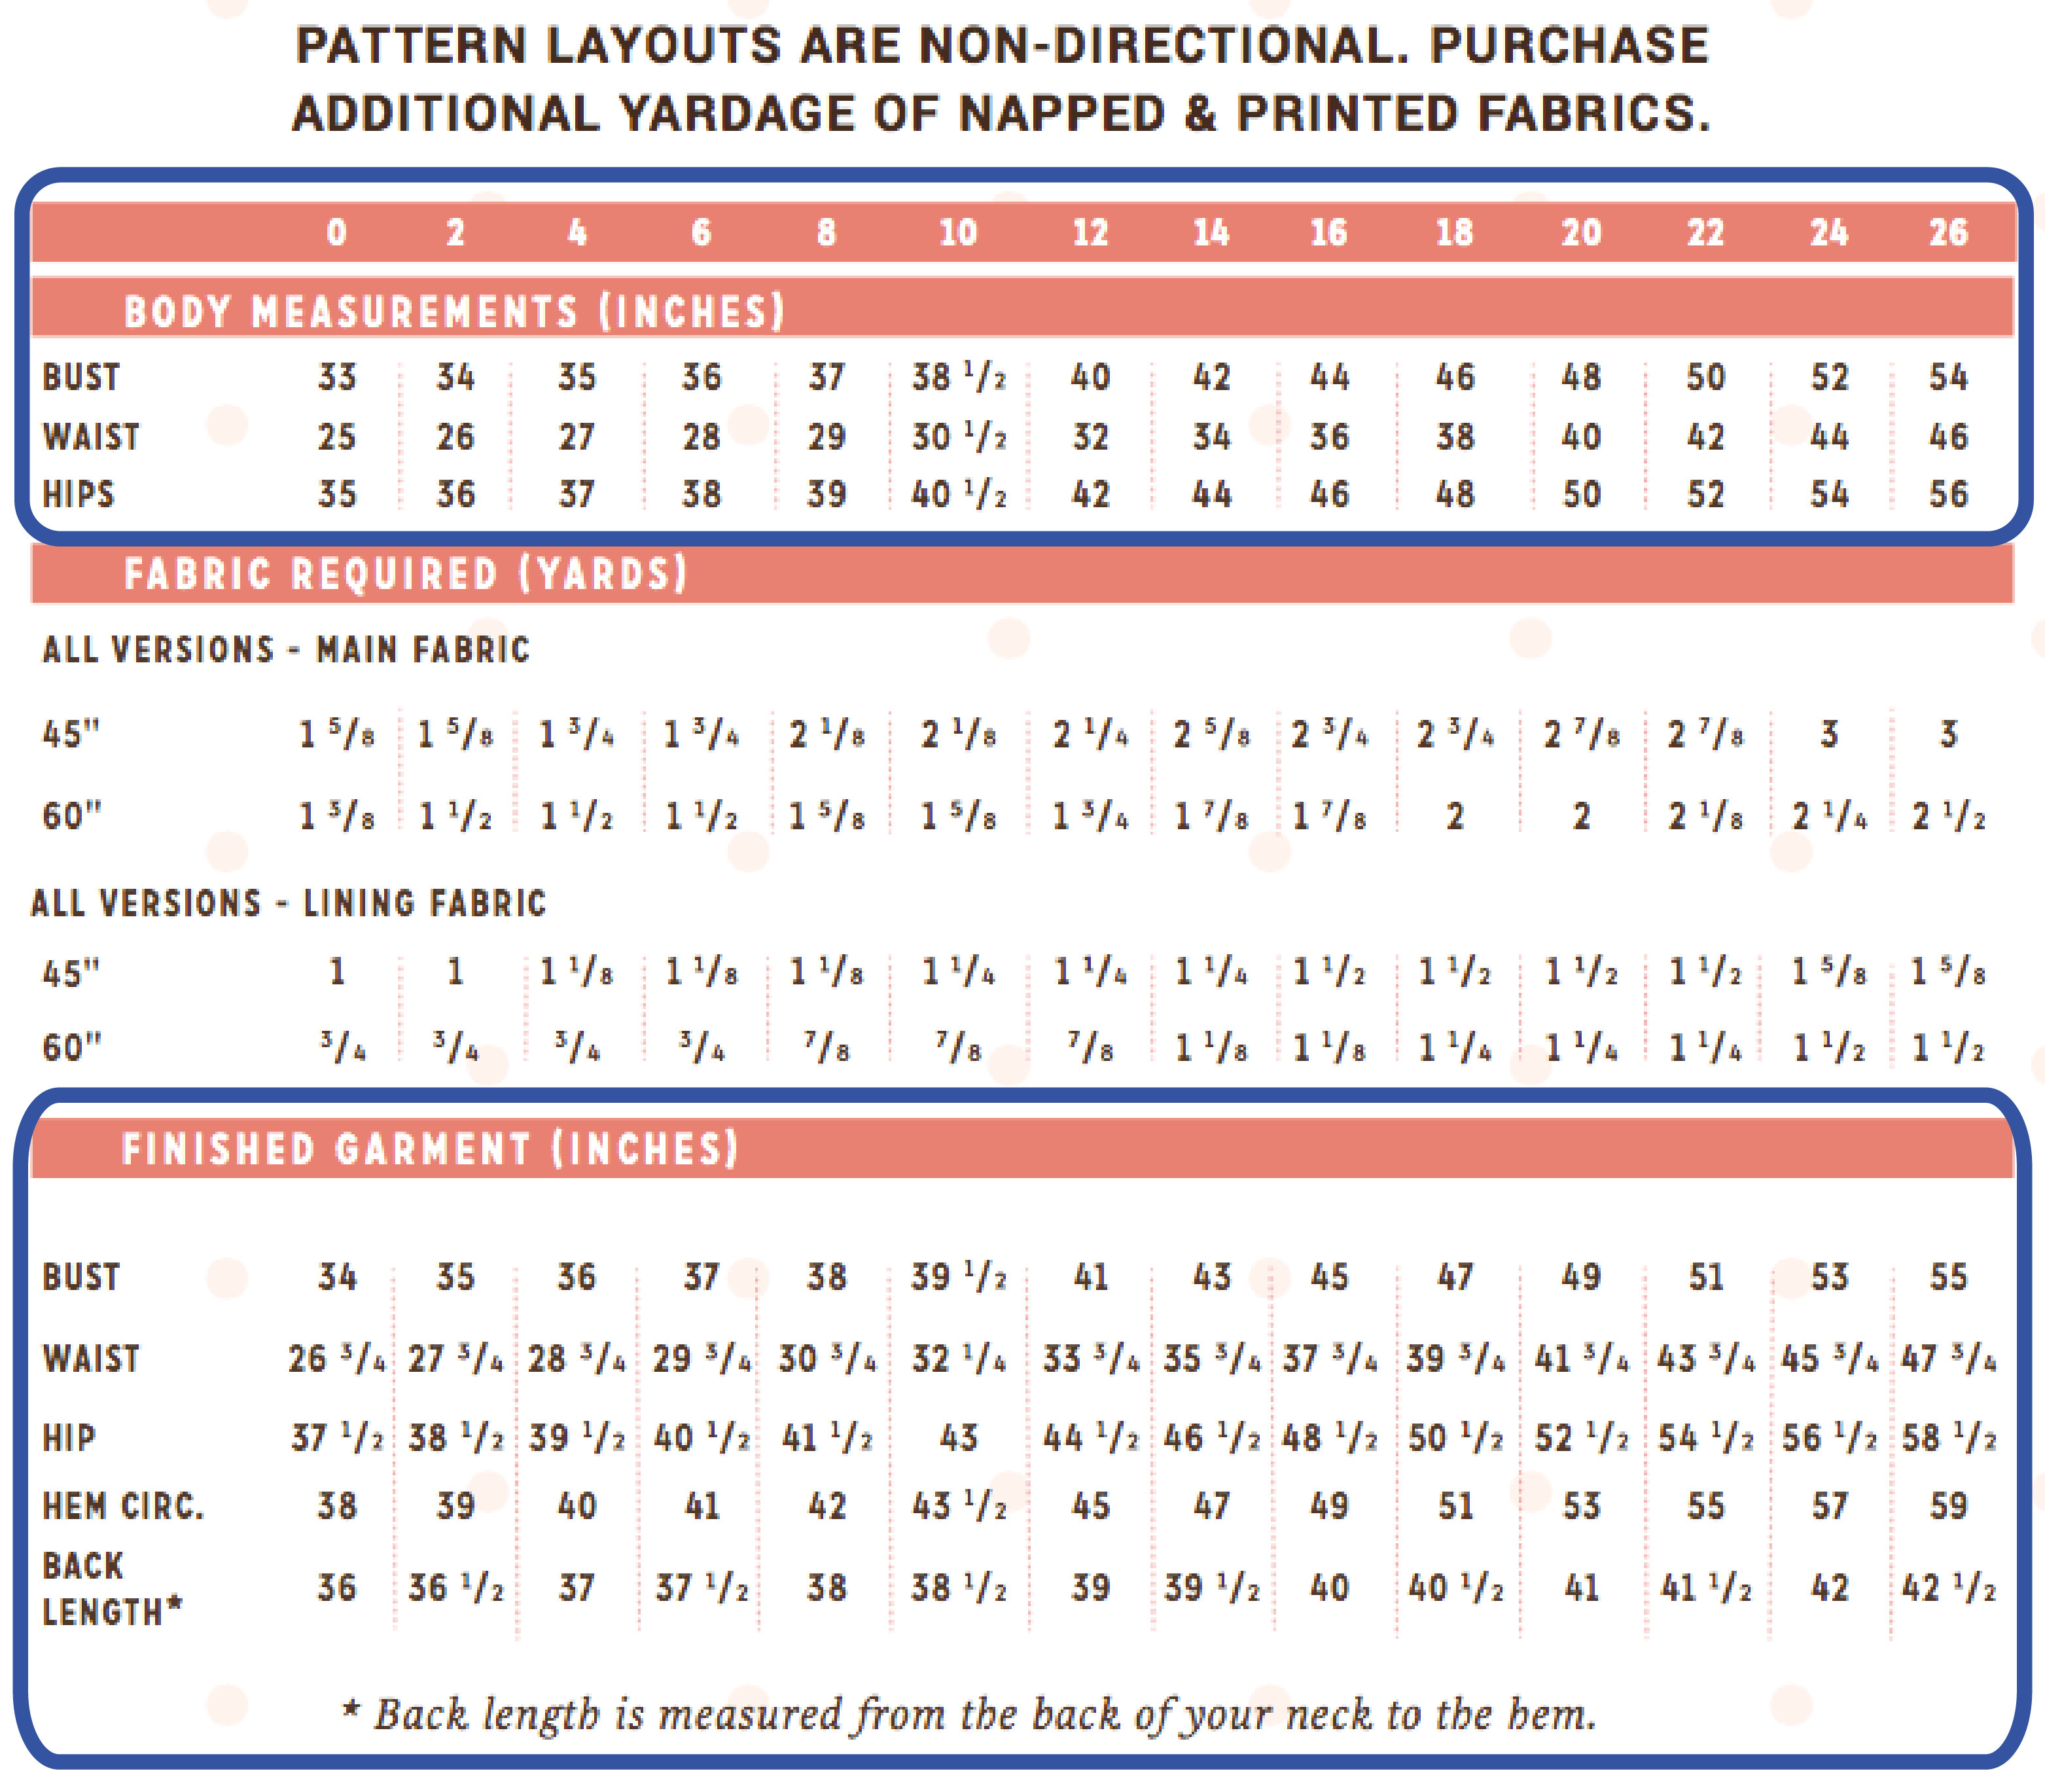
This is the sizing chart for the Colette Phoebe dress. As an American company the size range from 0 – 26 is different to UK, Europe and elsewhere. See our conversion chart below as a guide for converting dress sizes.
There are corresponding finished garment sizes and also the circumference of the hem (if you measured the hem all the way around) plus back length (although you would need to measure the back of neck to waist and waist to hem separately to work out if you needed to shorten or lengthen these sections).
For this dress their is 1″ ease at the bust, 1 3/4″ ease at the waist and 2 1/2″ ease at the hips.
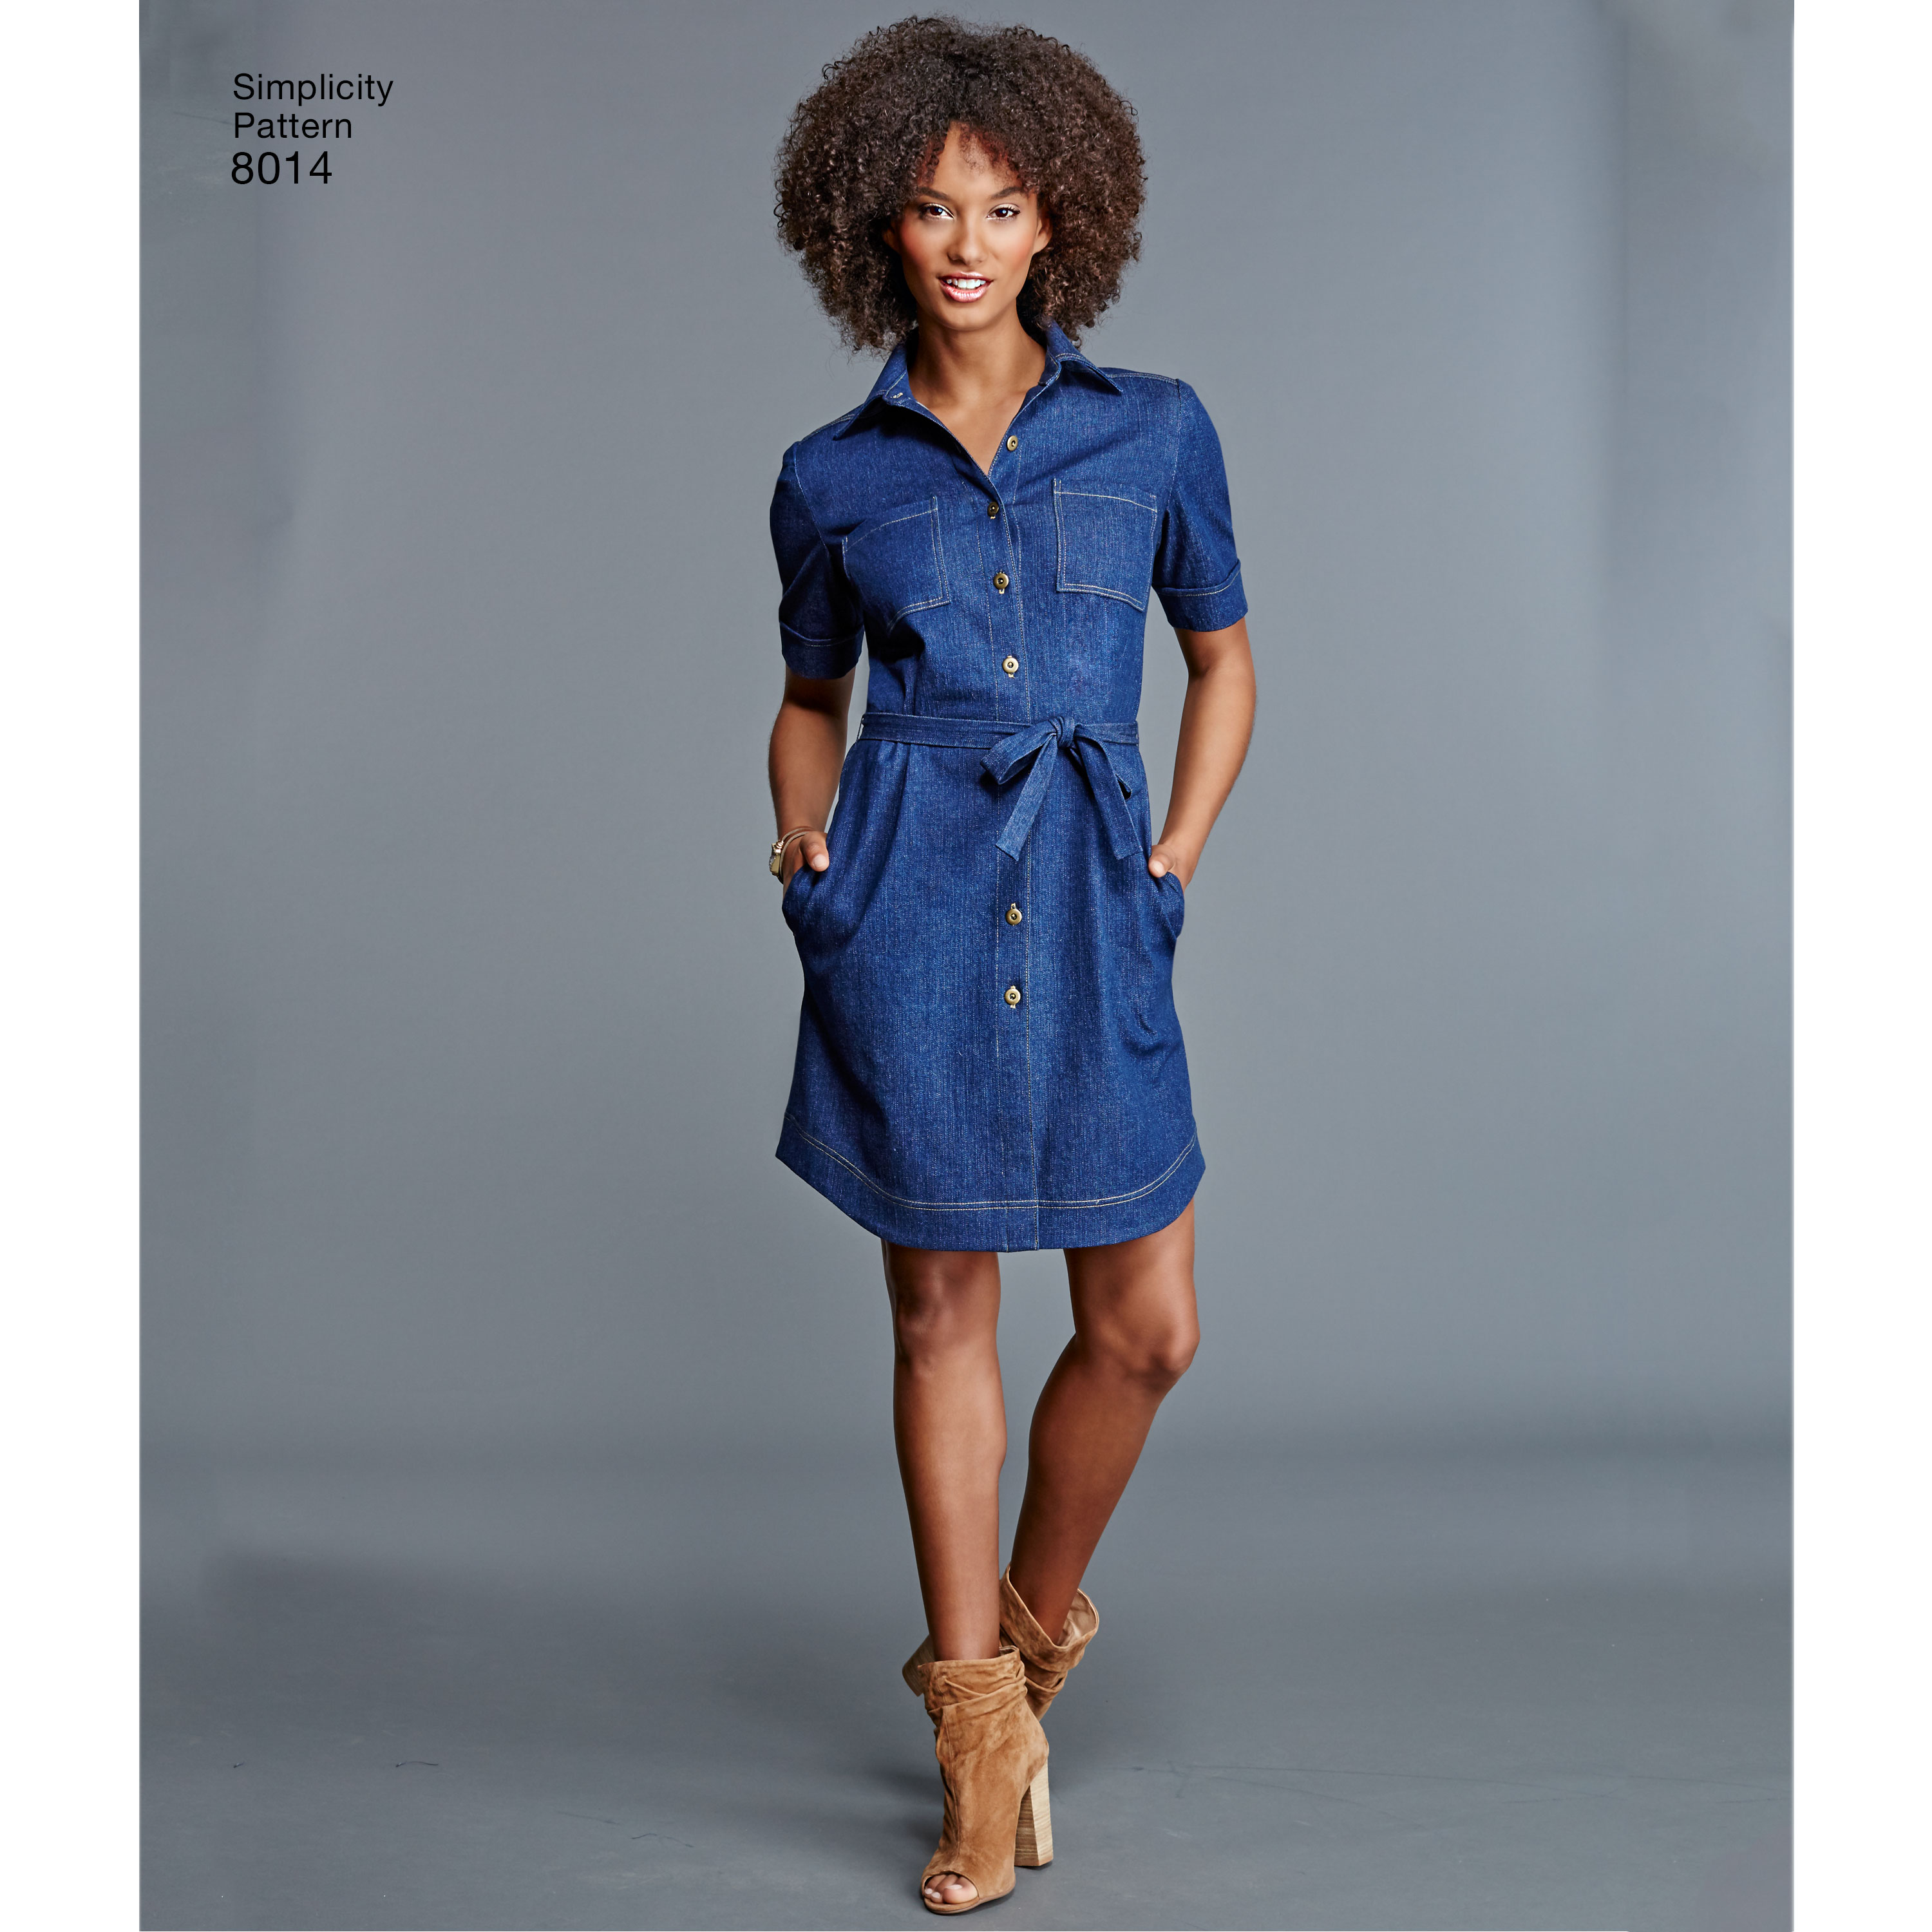
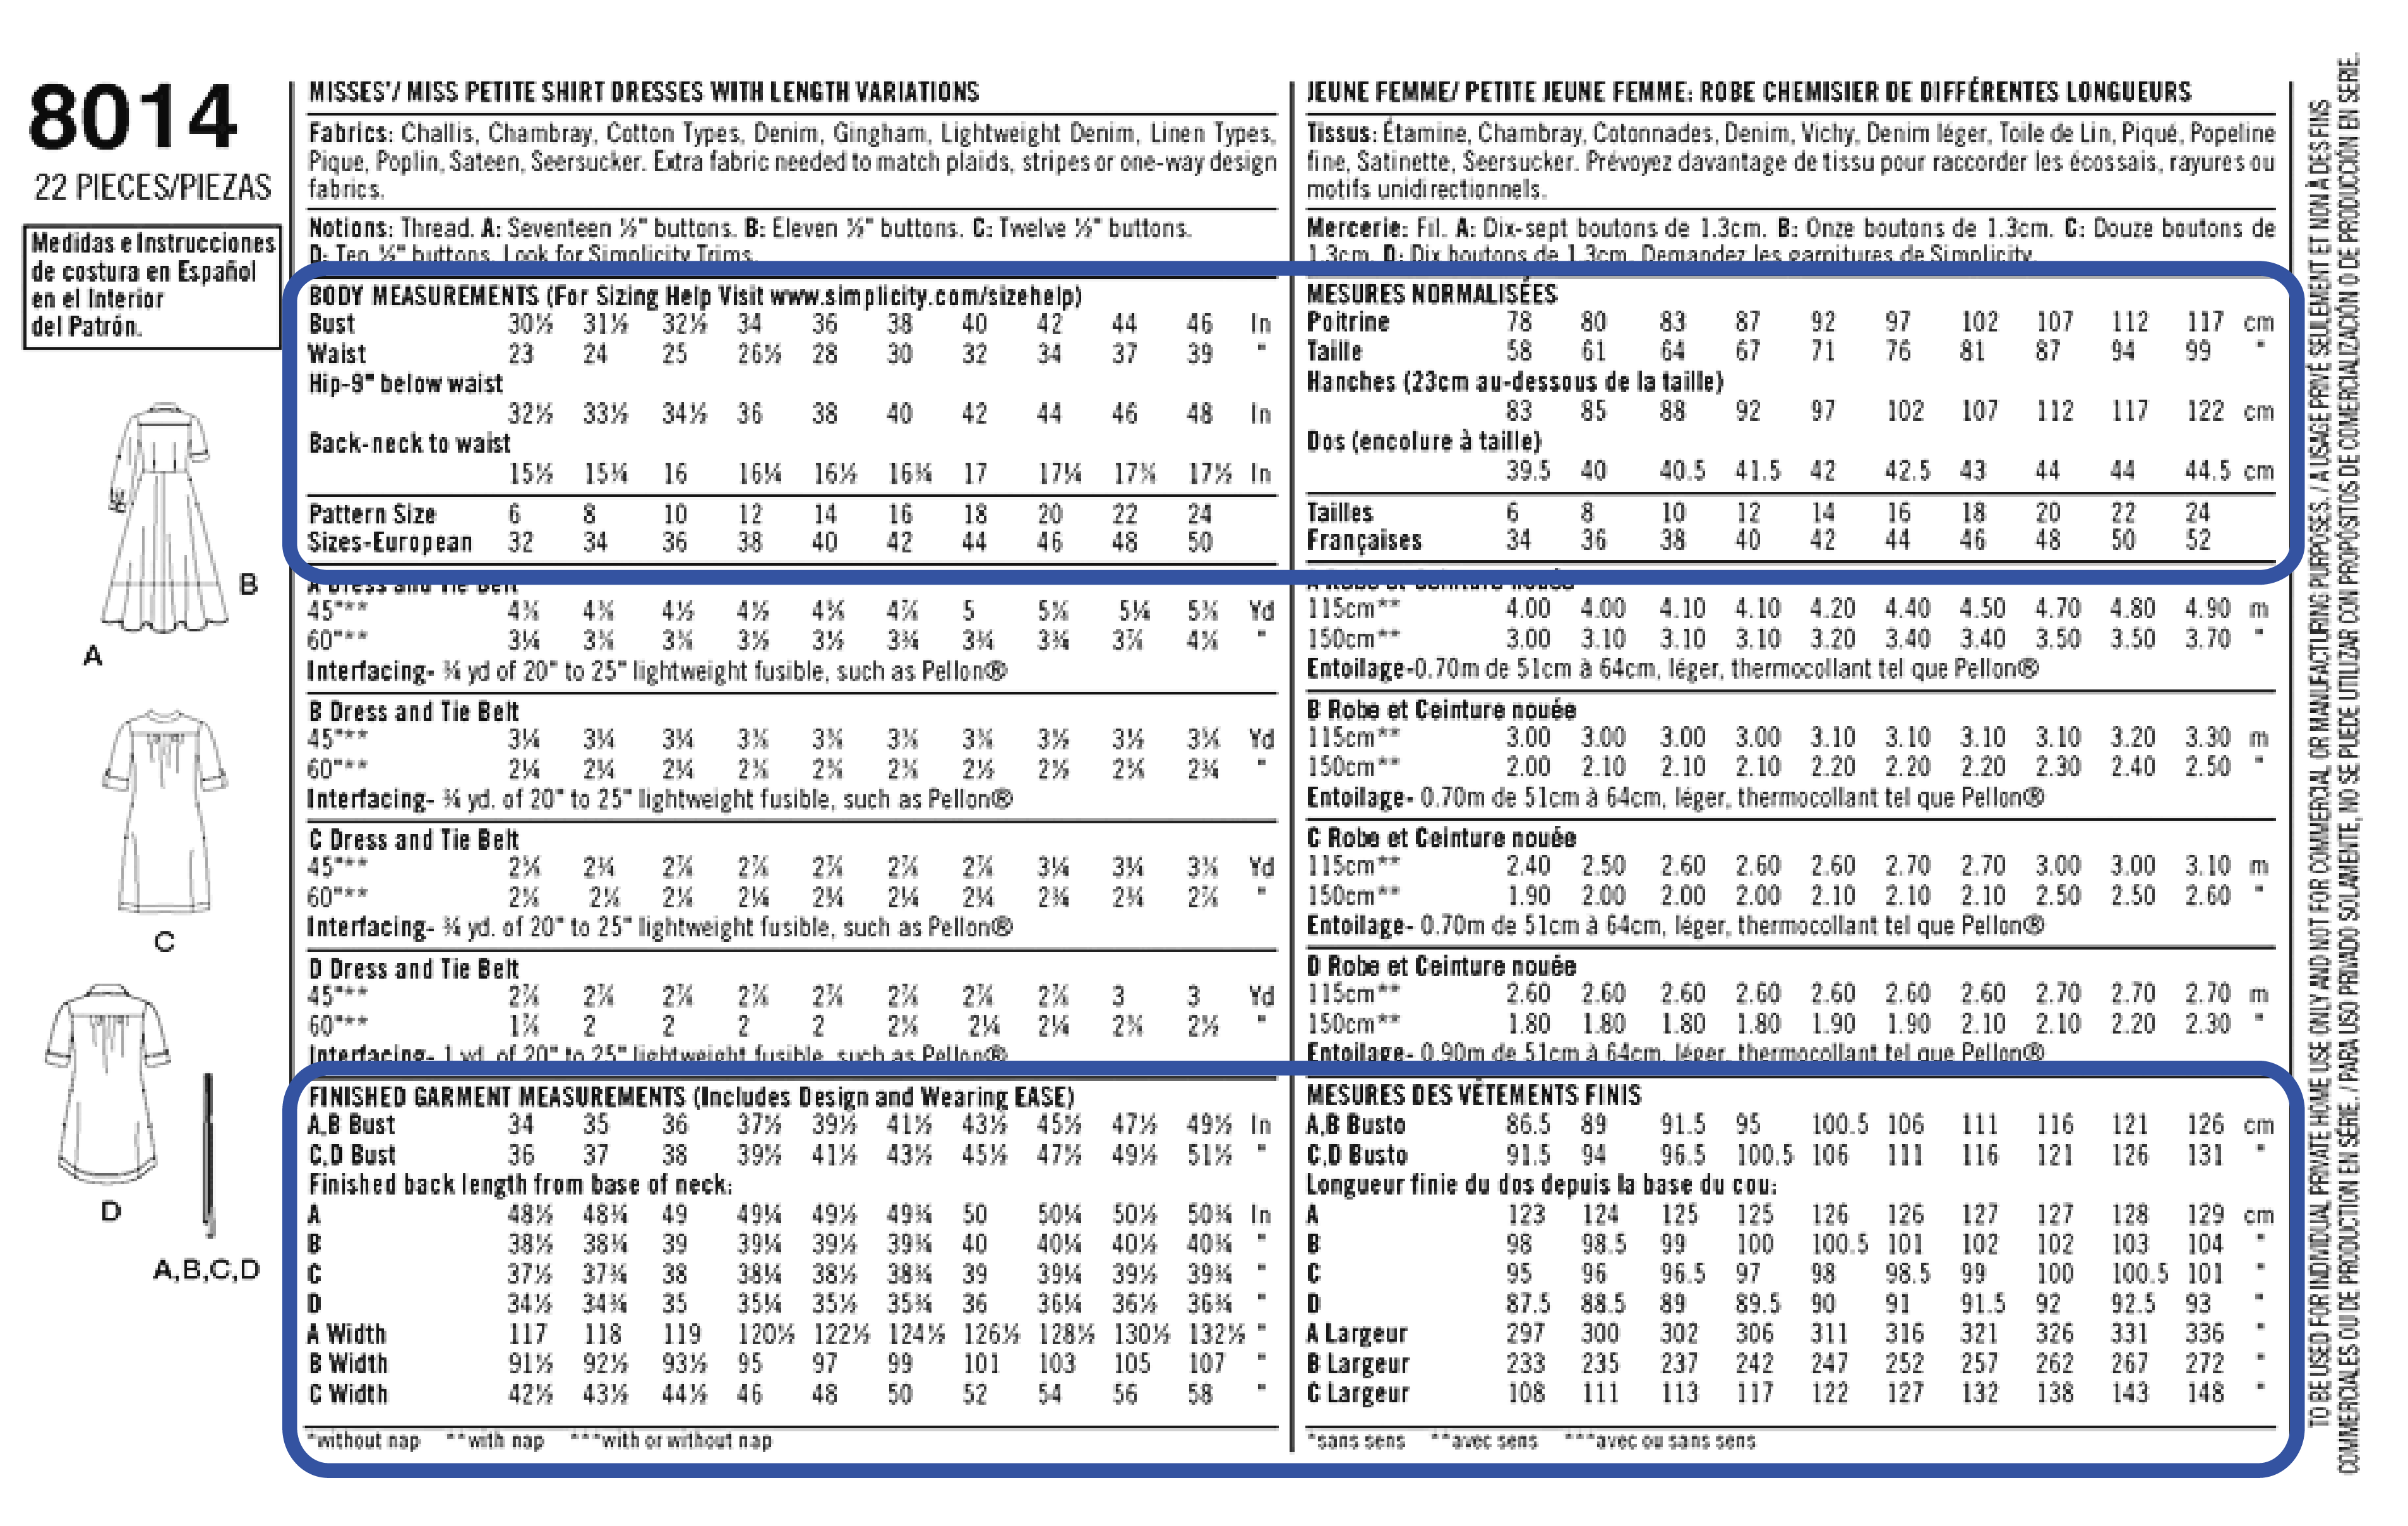
This is the sizing chart for the Simplicity 8014 dress. It gives two sets of measurements in inches (for American and the UK) and cm (for Europe) with corresponding fitted garment measurements.
The fitted garment measurements are divided into the different styles included with the pattern as they have different amounts of ease. It only includes fitted measurements for the bust and this is followed by finished back length measurements for the different versions.
How do I measure myself?
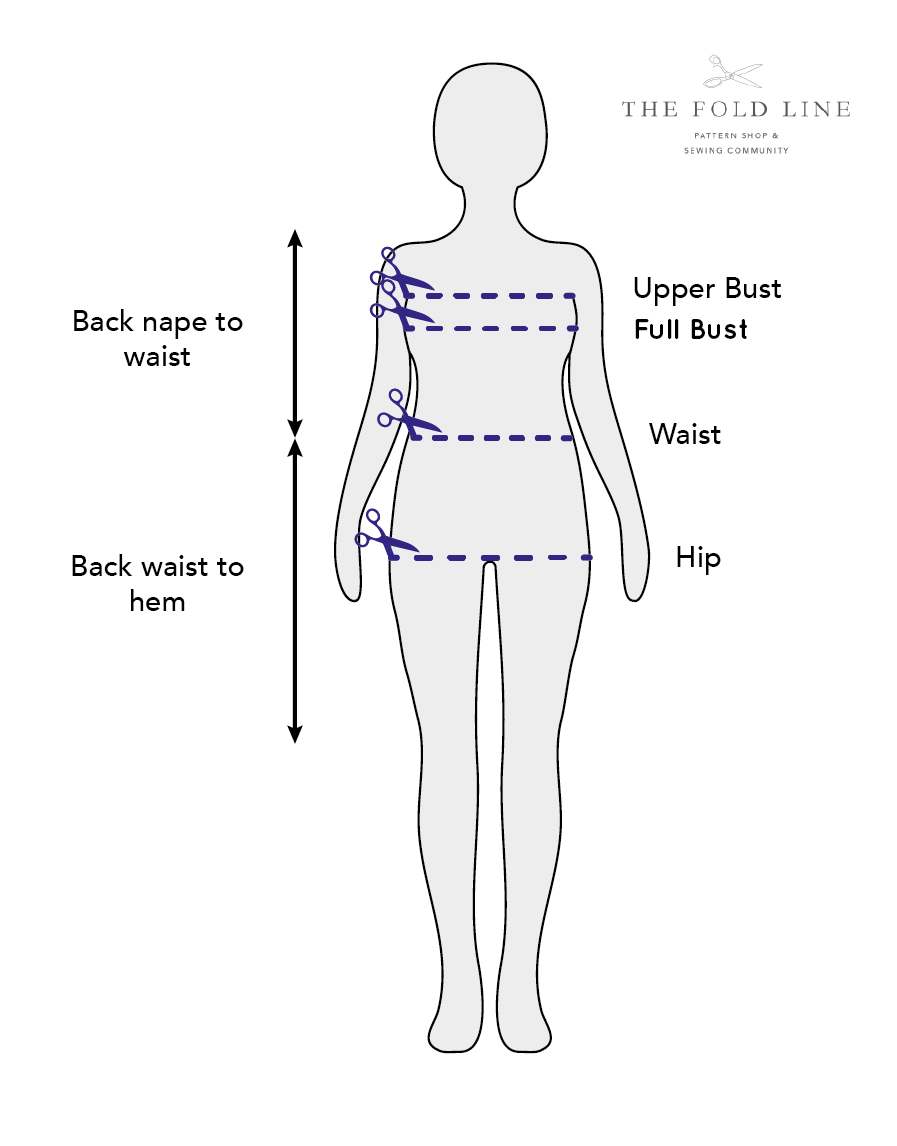
Download your body chart here to keep a note of your body measurements. The key three body measurements for patterns are Full bust, Waist and Hip. You might also need to take your Upper Bust measurement to do a bust adjustment (we will cover this in a later post). To make other alterations it will also be useful to know the length from your nape (back of neck) to waist and back of waist to hem.
Full bust– The bust measurement is taken around the fullest part of your bust, this is often around the nipples. To make sure your measurement is accurate take a breath to make sure don’t pull too tight.
Waist– The waist is the point between the ribs and hips. If you are having difficultly pin pointing the exact spot, bend your body to the side – where your body forms a natural gap is your waist. Again take a couple of breaths and try not to breath in. Also make sure you are standing up straight. You should be able to fit one finger behind the tape measure so it’s not too tight.
Hip– The hip is the widest part of your bottom and often lower down than you think (rather than on the hip bone). Use a mirror to help you keep the tape measure straight around your body.
Note your measurements down in centimetres and inches so you can use different sizing charts.
How do I know which size I am? What happens if I fall between one or more sizes?
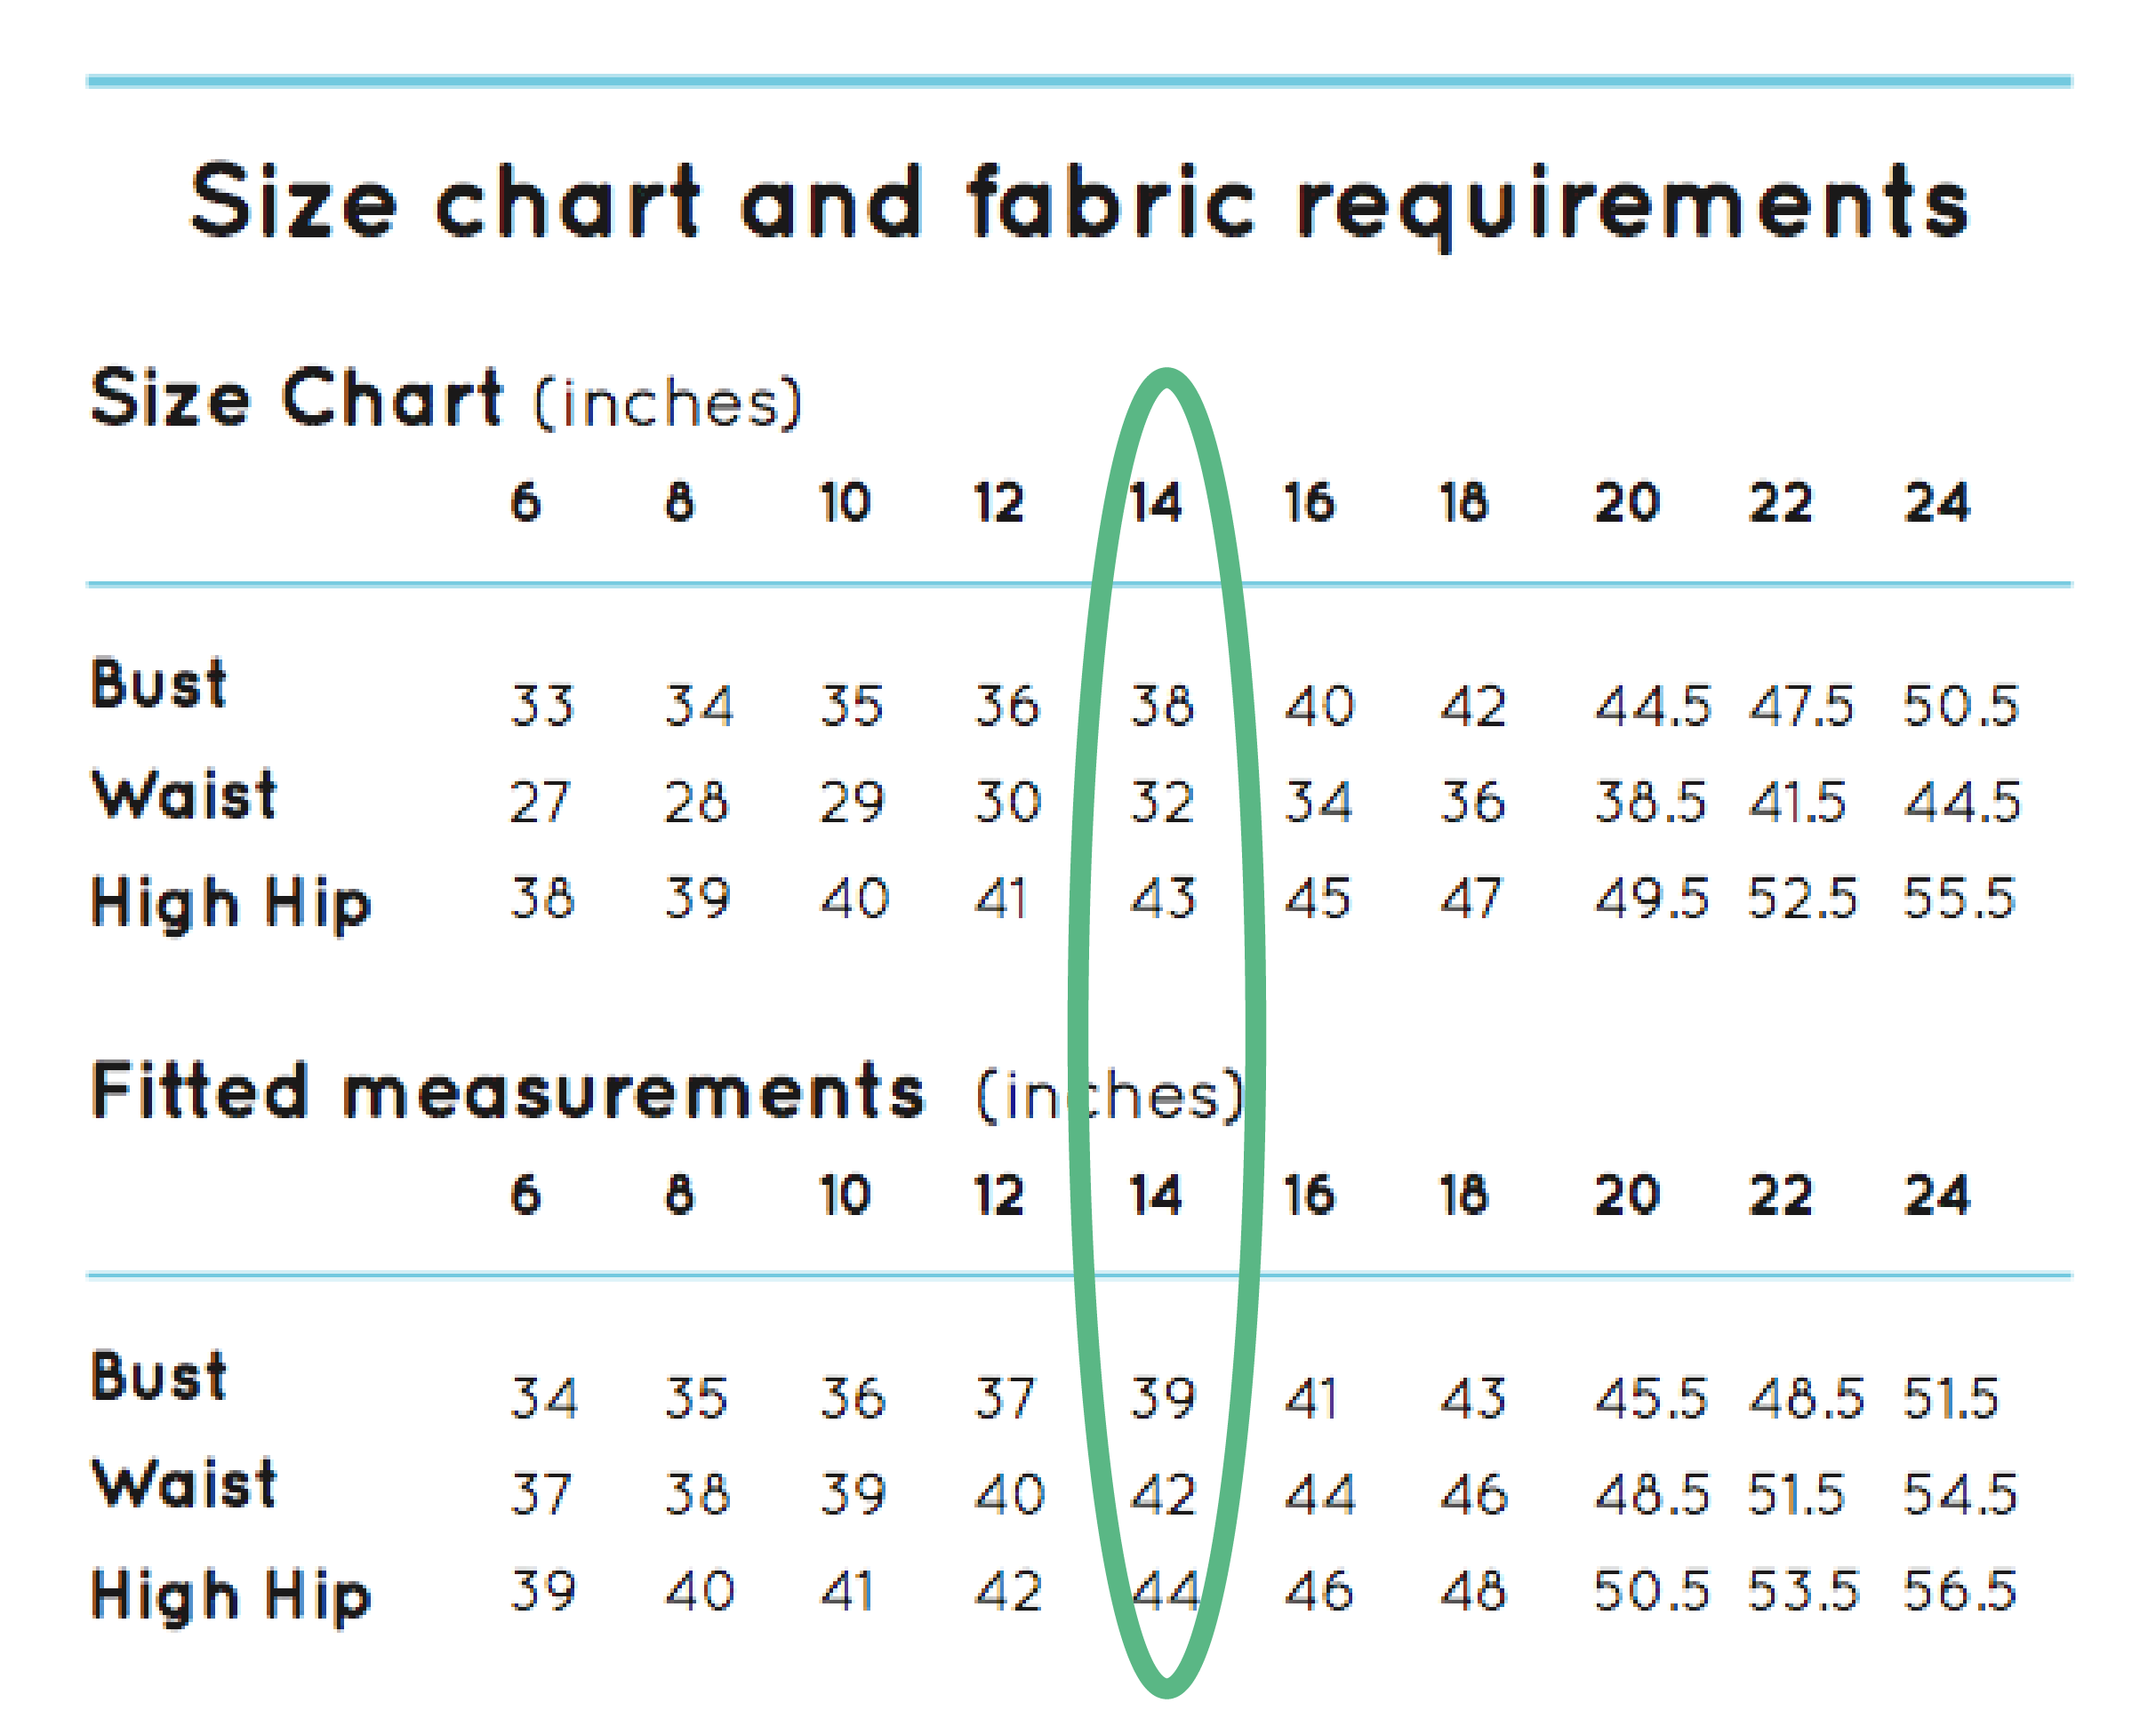
The sizing chart is there to help make this easier as it factors in ease. The trouble is that I don’t think anyone actually matches the measurements on the sizing chart so it can be confusing. You also might want to have more or less ease at the bust, waist or hip for personal preference too. Let’s look at the example below of a sizing chart from the Hello Sailor! top.
If your body measurements are Bust 38, Waist 32 and Hip 43 then you would be a size 14. This would give you 1″ ease at the bust (39″-38″), 10″ ease at the waist (42″-32″) and 1″ ease at the hip (44″-43″). It is not true for every pattern and designs differ but as a general rule, 1″ ease or more at the bust, waist and hips gives you enough room to move about. In this example their is 10″ ease at the waist, which tells you that it is not fitted to this part of the body. Also the measurements increase from 39″ (Bust), to 42″ (Waist) to 44″ (Hip) and this means the style will be A-line as the size increases going down the body.
If you aren’t an exact match to these measurements the best thing to do is to find the closest size. Let’s look at an example to explain what you can do when you don’t match the chart (which is basically everyone!)
If you have the measurements: 39″ bust, 31″ waist and 45″ hips you fall across sizes 12, 14 and 16. At the bust 39″ is an inch more that 38″ (for a size 14) so a solution to this would be a Full Bust Adjustment (increasing the bust area of the pattern by an inch). Alternatively if you cut a size 16 at the bust, which has a fitted measurement of 41″ you would have 2″ ease at the bust, rather than one inch (41″ – 39″). You might prefer this, particularly if you have a larger bust. It’s important to remember though that extra ease will look different in alternative fabric types. In a cotton 2″ inches of ease might not look very flattering because the fabric is structured whereas the drape of a rayon would be much less noticeable.
With a 31″ waist this falls in between sizes 12 and 14 but because there is already a lot of ease (10″) at the waist, another inch won’t affect the fit. If the style of the garment was to be fitted at the waist, you could grade between the pattern lines for sizes 12 and 14 at the waist to keep the one inch ease. You would achieve this by starting at a size 14 at the bust and drawing a line in between sizes 12 and 14 gradually until it reaches the waist (we will cover grading between sizes in a later post).
With a 45″ hip this is a size 16 on the chart. In this situation it would be best to grade from the waist size by drawing a line finishing at a size 16 at the hip/hem. By making all these adjustments to the pattern for your size, you can be sure to be creating a pattern that will give you a much better fit with an equal amount of ease across the bust, waist and hip areas for the pattern style.
Are all sizing charts the same?
Sizing charts do differ between country and designer. For example some sizing charts only have fitted measurements and you need to interpret these charts factoring in your own ease. Sizing charts in the UK/Australia, Europe and America use different numbers (see more on this below).
The big commercial pattern company brands, such as Butterick, Vogue, McCalls, Kwik Sew, Simplicity and New Look often have two separate sizing charts because they sell patterns in different size packs. For example a design might be split into sizes 8 – 14 in one packet and size 16 – 22 in another different packet, look out for the sizing on the front of the package, particularly when you are buying these section hand.
Tip: vintage pattern sizes usually do not correspond to modern day sizing, for example a size 8 in the 1940s is not equivalent to a size 8 today. It’s always best to use the actually measurements in the size chart for old patterns.
Tool to convert sizing charts
Download your Sewing sizing chart here which converts dressmaking sizes for different countries and also measurements from inches to centimetres.
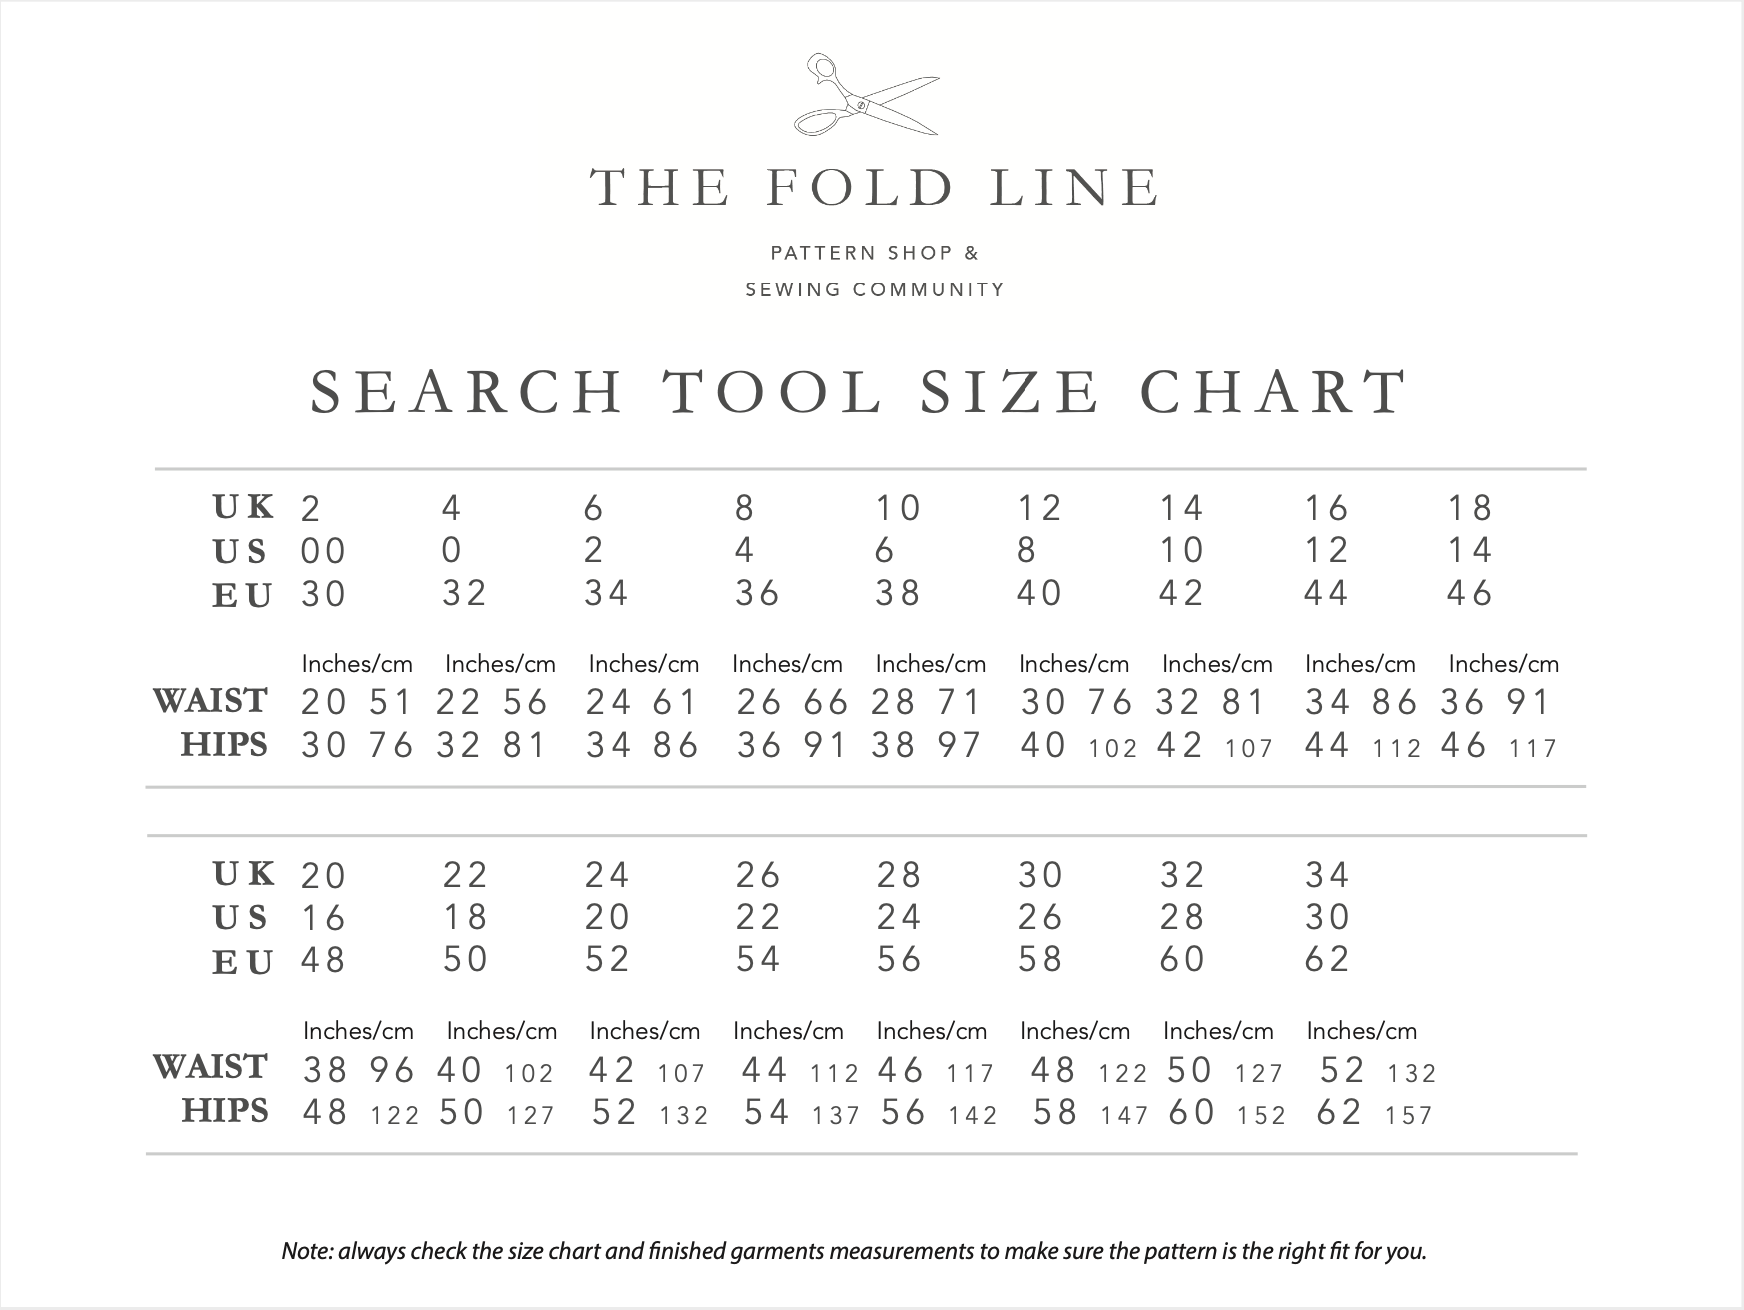
To make it as easy as possible to find your next make we have also created this basic size chart to use as a reference when searching for sewing patterns in our shop. Using the Waist and Hip measurements below, choose the size that is closest to your own body measurements to help you find sewing patterns in our sewing pattern shop.
This basic size chart has been used to standardise the wide range of sewing patterns available from independent and commercial designers. Almost every designer uses a different size chart and this can be confusing when you are trying to find a sewing pattern.
Sewing jargon explained
What is ease?
Ease is important because if you wear a garment that is your exact body measurements it will be difficult to move in! Ease means the garment will be bigger than your body measurements and comfortable to wear, it’s also known as ‘wearing ease‘. Different styles will have a different amount of ease at the bust, waist and hips. For example, a pencil skirt is fitted at the waist so won’t have any ease, therefore the sizing chart and fitted measurements will be the same at the waist. A full skirt will have lots of ease at the hips so the fitted measurement will be larger than the sizing chart at the hip. This is called ‘design ease‘, which refers to ease included in the pattern to change the design and shape.
What is negative ease?
Negative ease is the term given for stretch fabrics including knits and Lycra. Knits and Lycra do, by their definition, stretch when pulled and this gives different design opportunities and styles for garments made from these fabrics. The fitted measurements for a garment made from knit fabrics will have smaller numbers than the body measurements. This isn’t because the garment is too small and won’t fit you but because the fabric will stretch when you wear it, comfortably around your body, for a close fit.
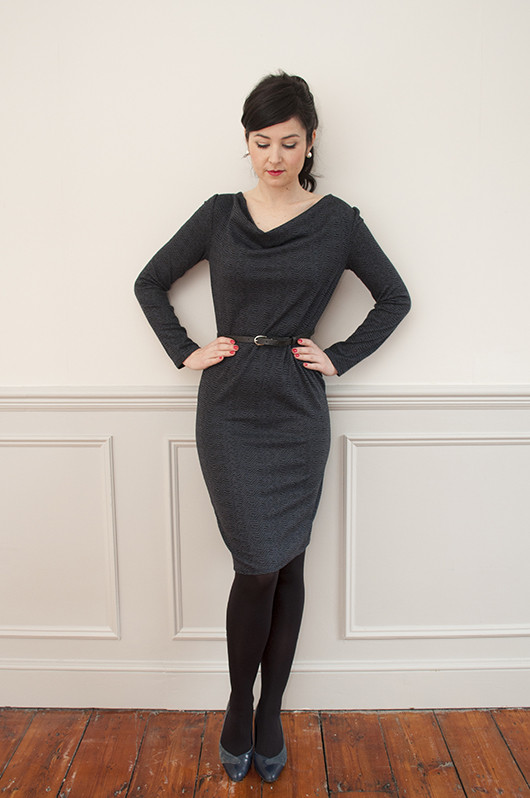
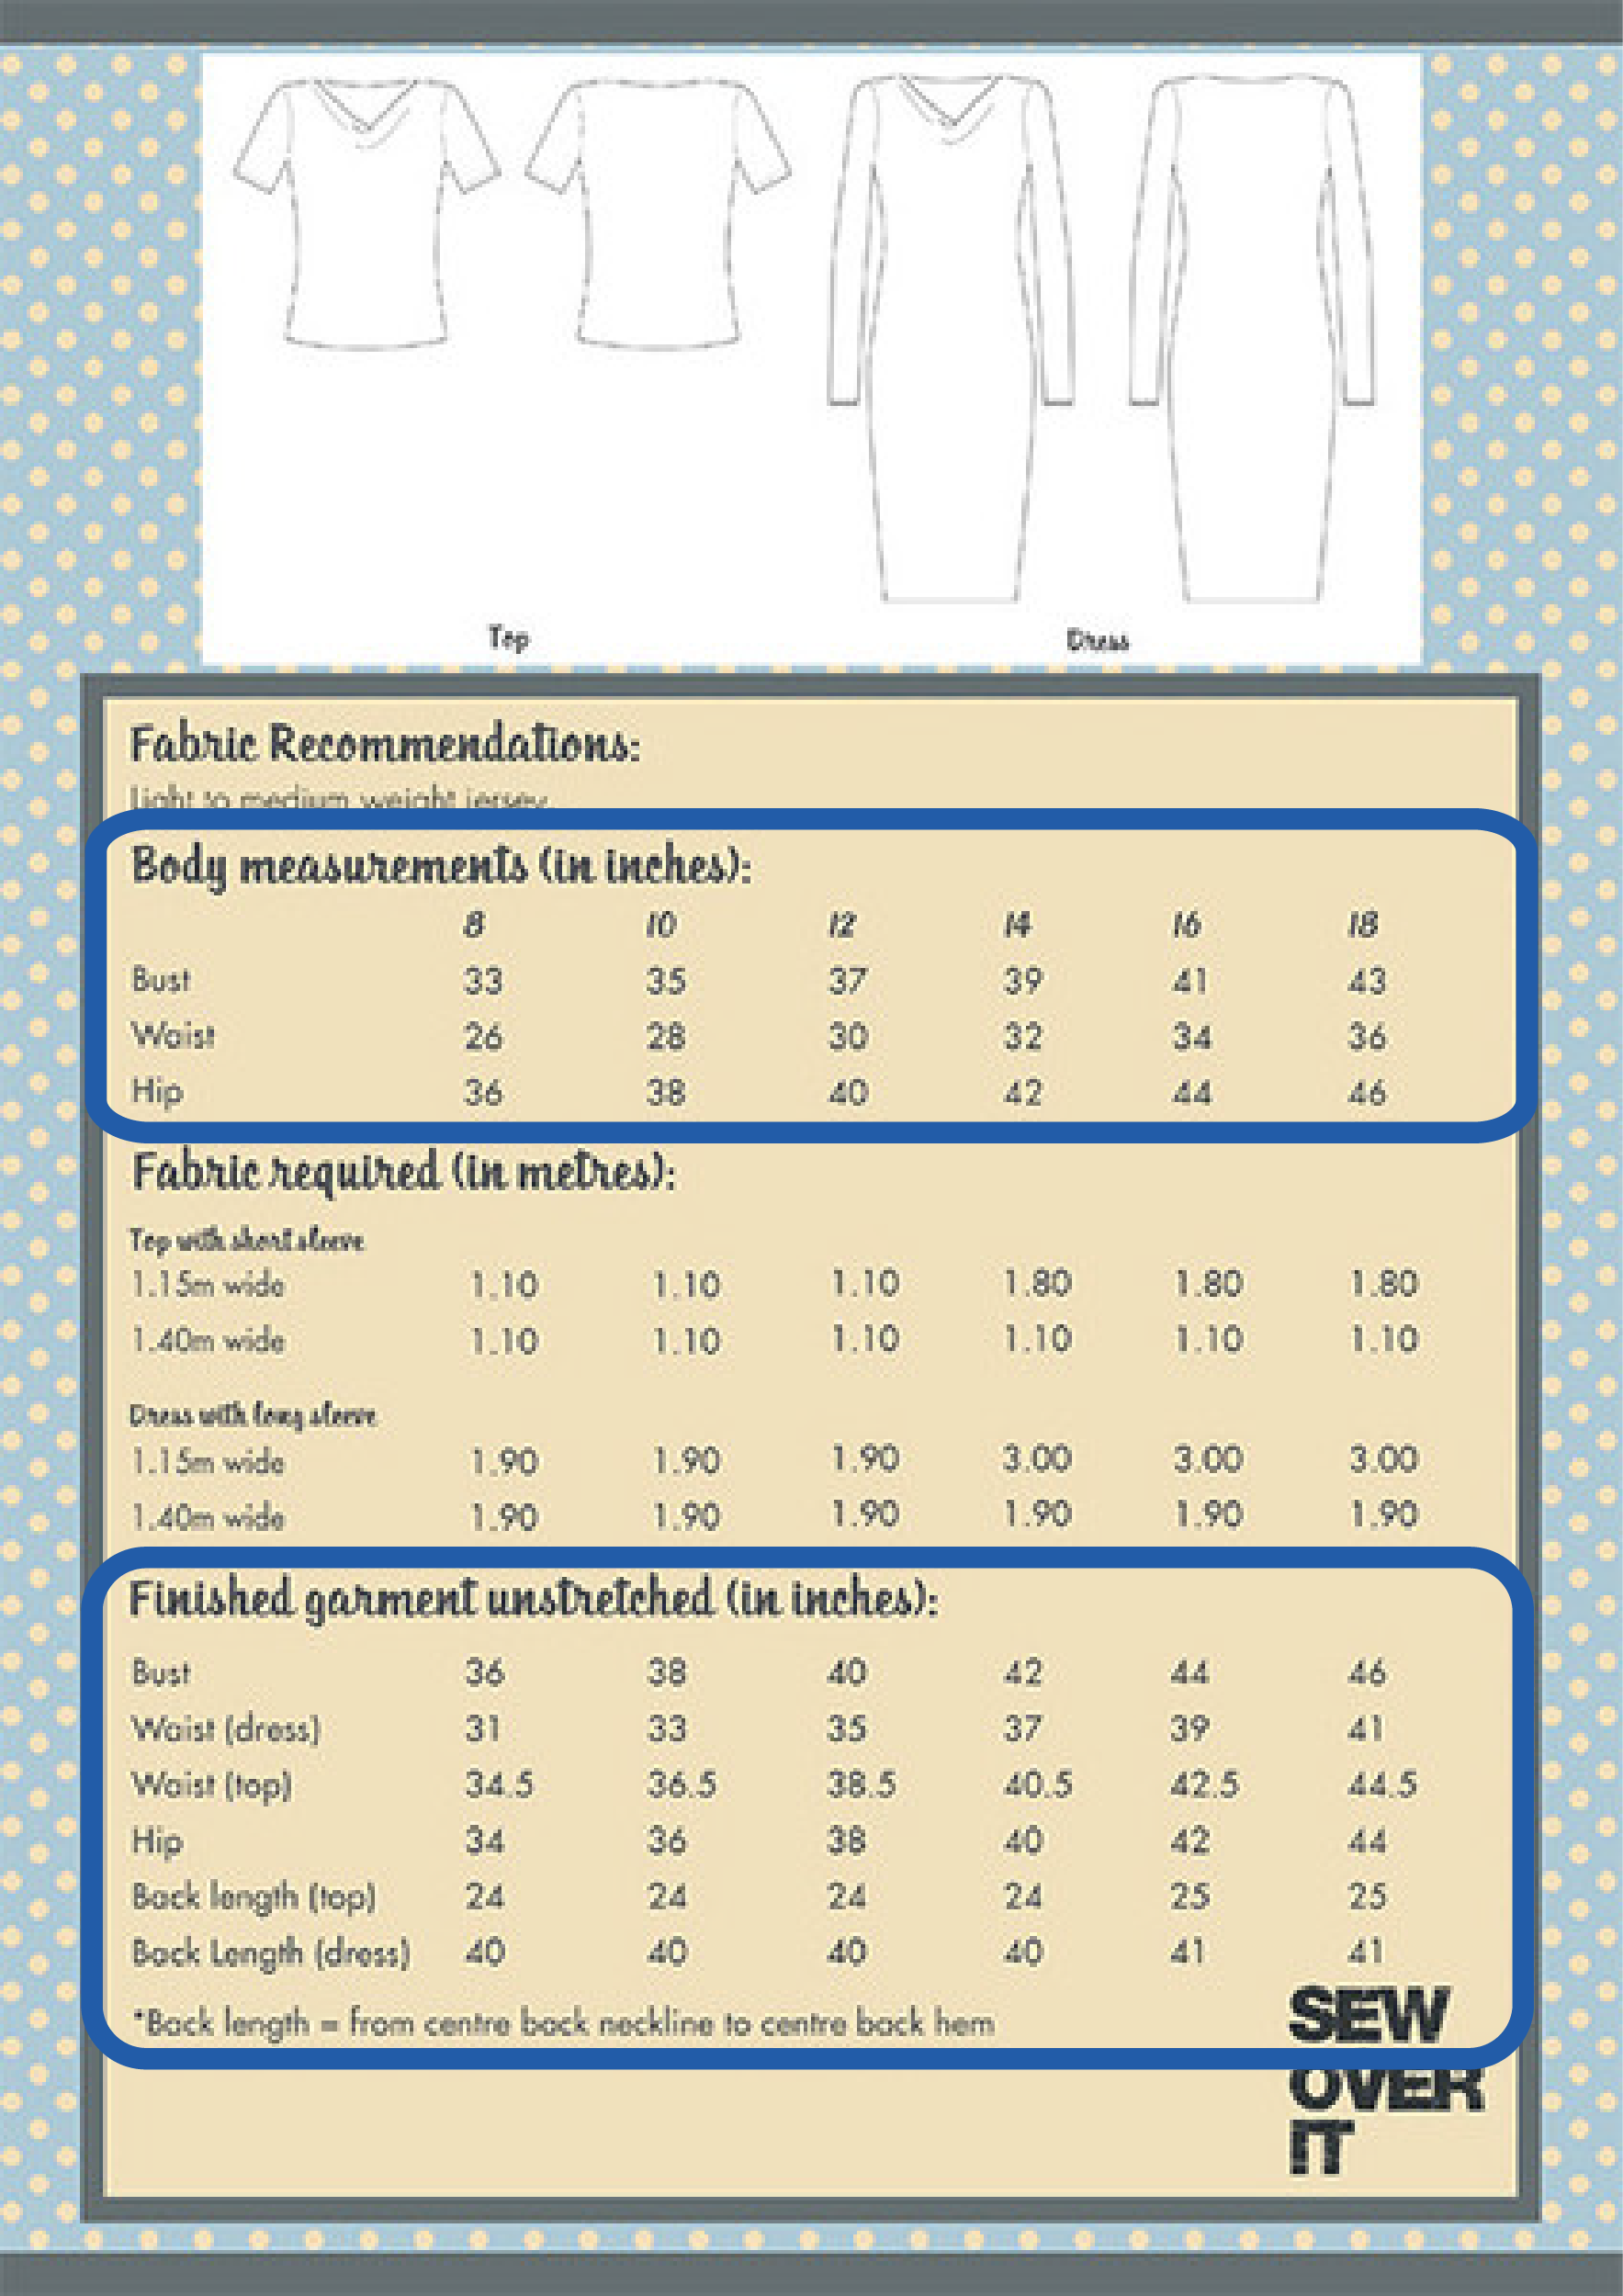
Take a look at this example of the Sew Over It Cowl dress, where, for a size 14 at the hip the body measurement is 42″ but the fitted garment measurement is 40″, this results in -2″ of negative ease. This means at the hip the fabric will stretch around your body for a close fit.

