Tessuti Fabrics

Tessuti Fabrics Richmond Coat

Regular price £30.00 GBP
Sale price £30.00 GBP Regular price £30.00
Tax included.
Earn 1 Point on this purchase. Learn more

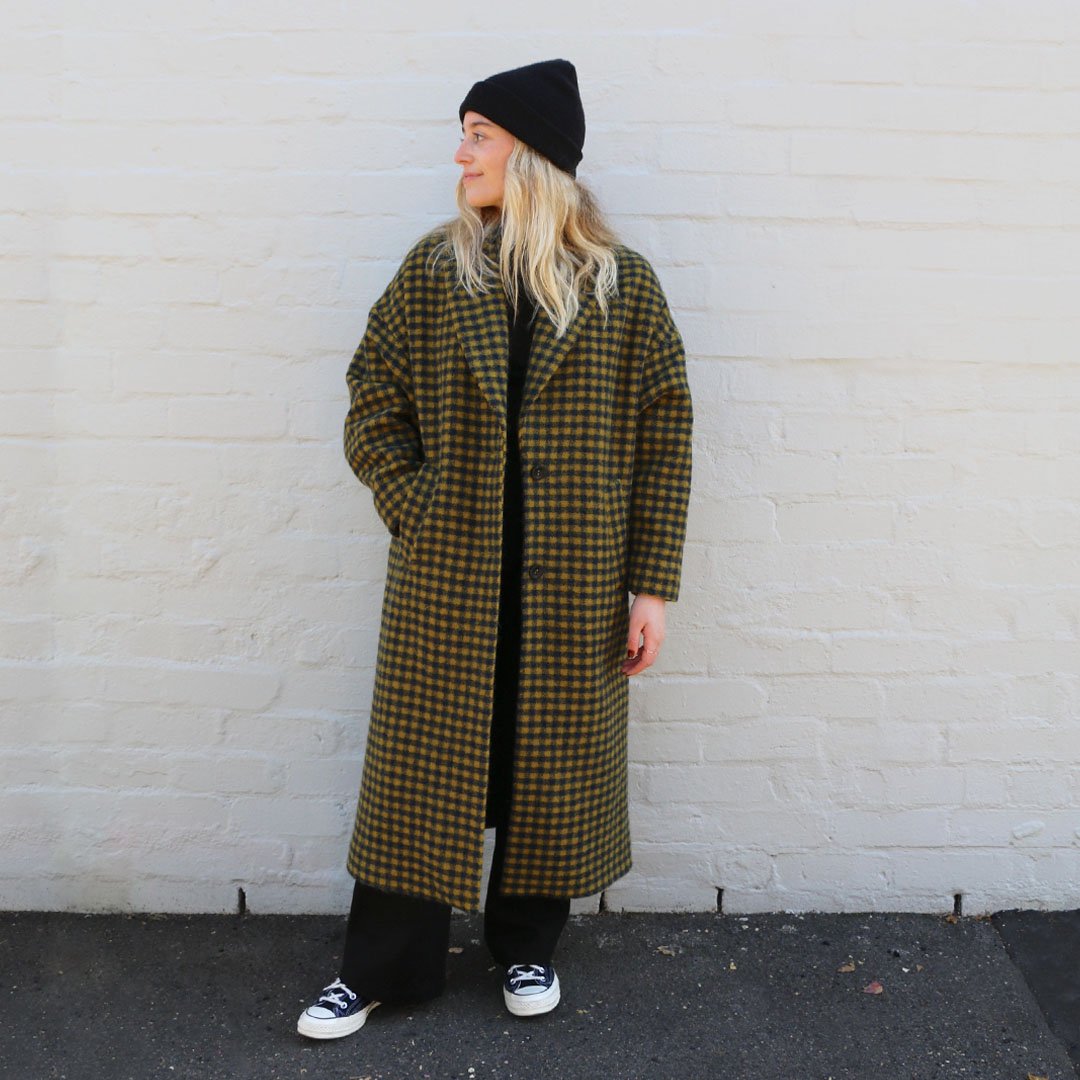
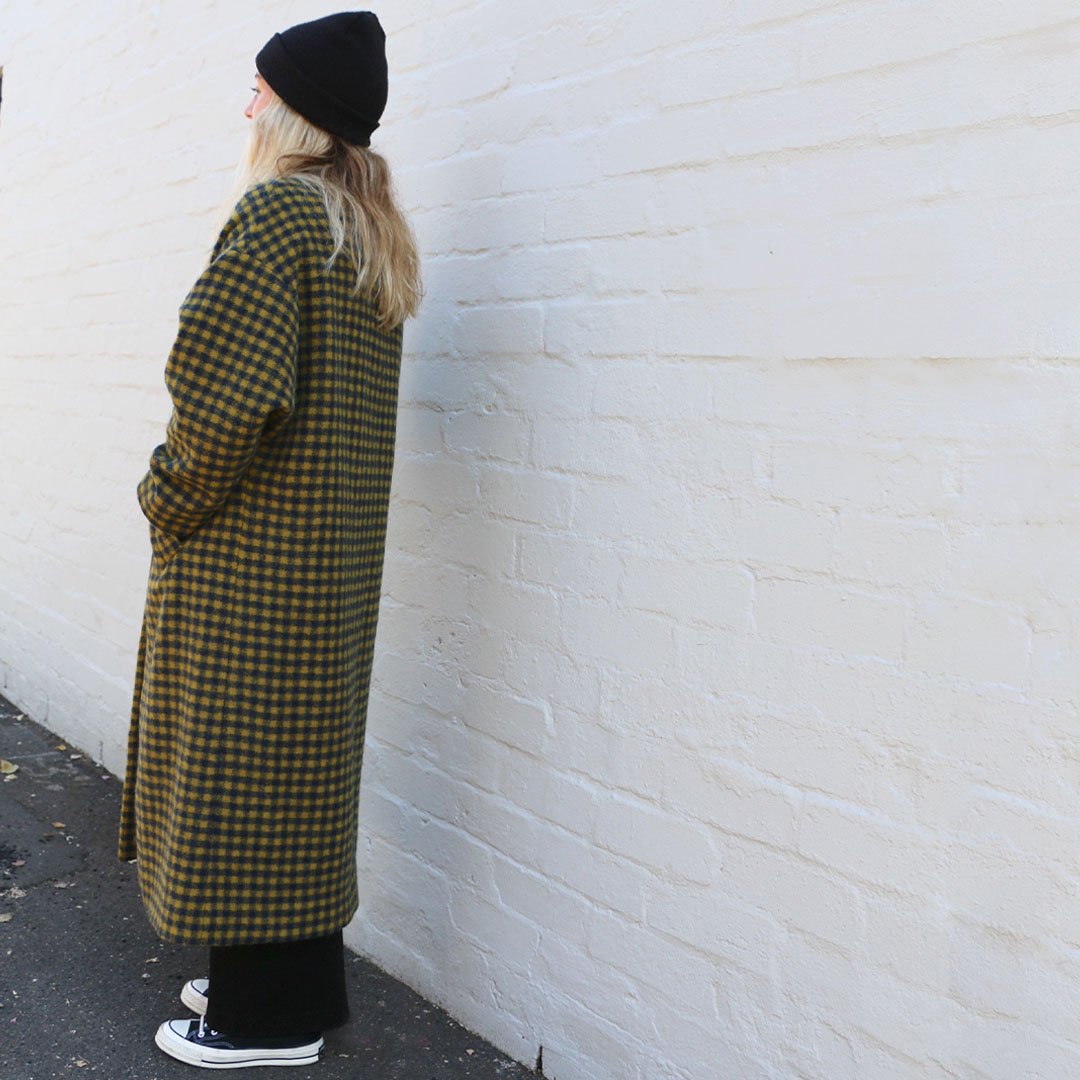
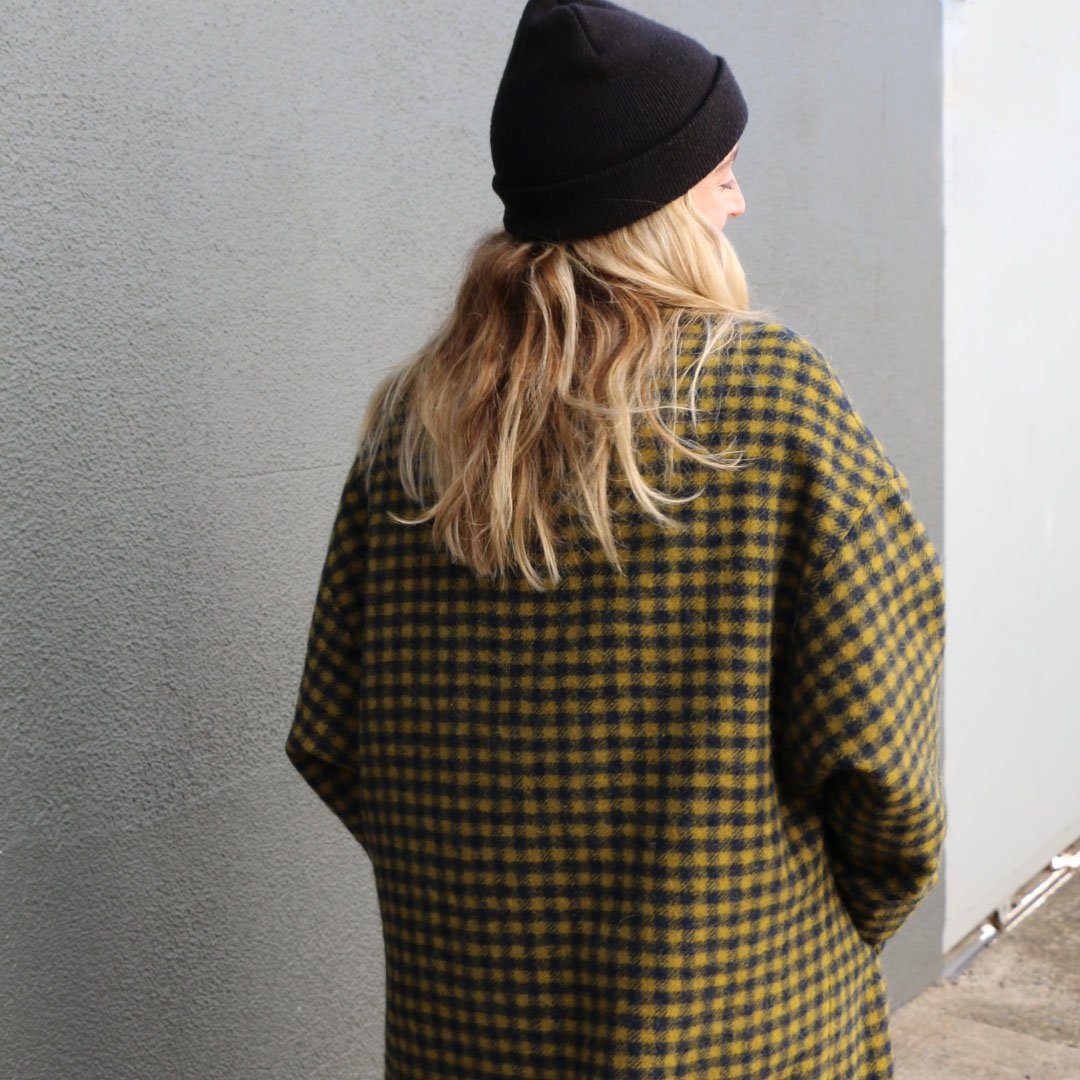
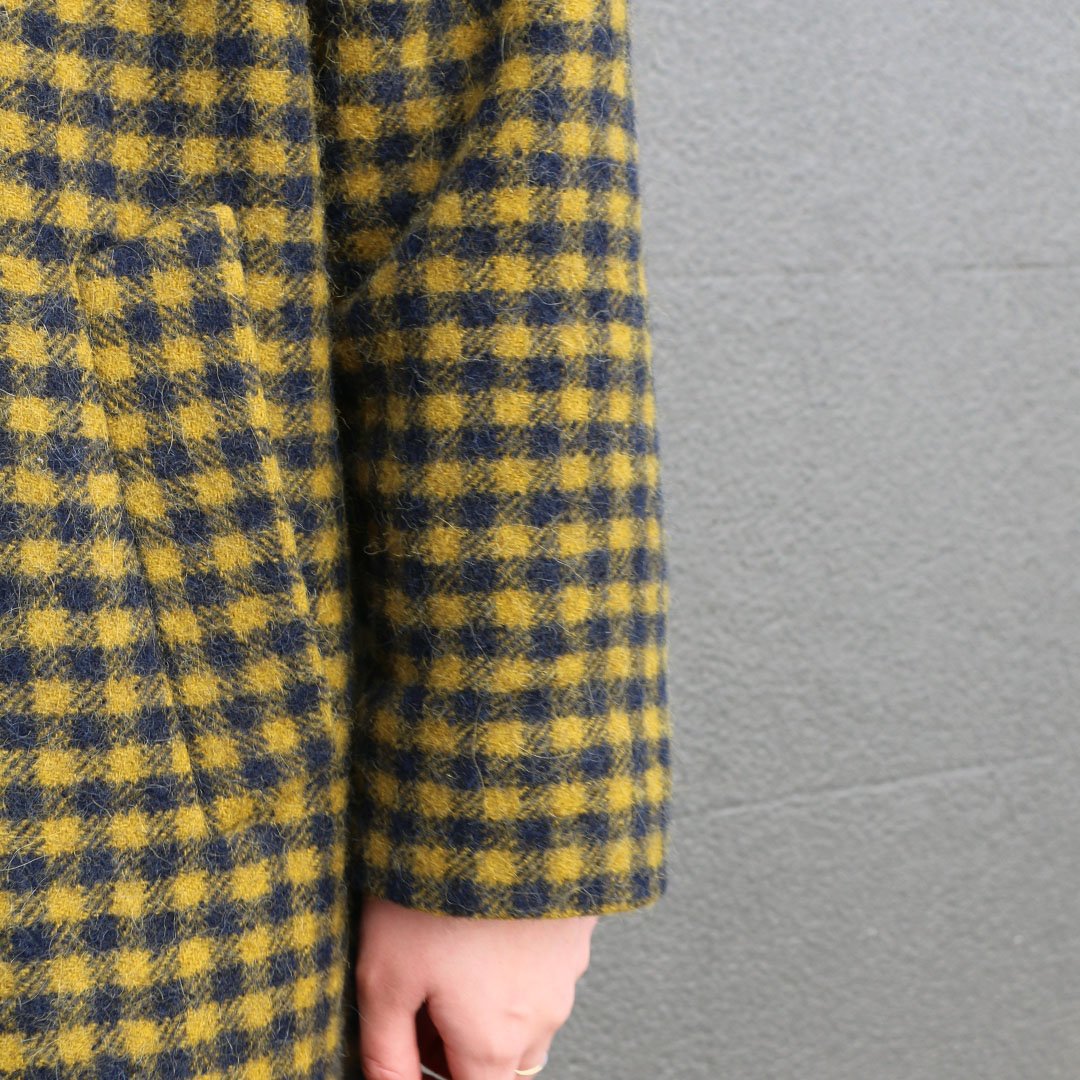
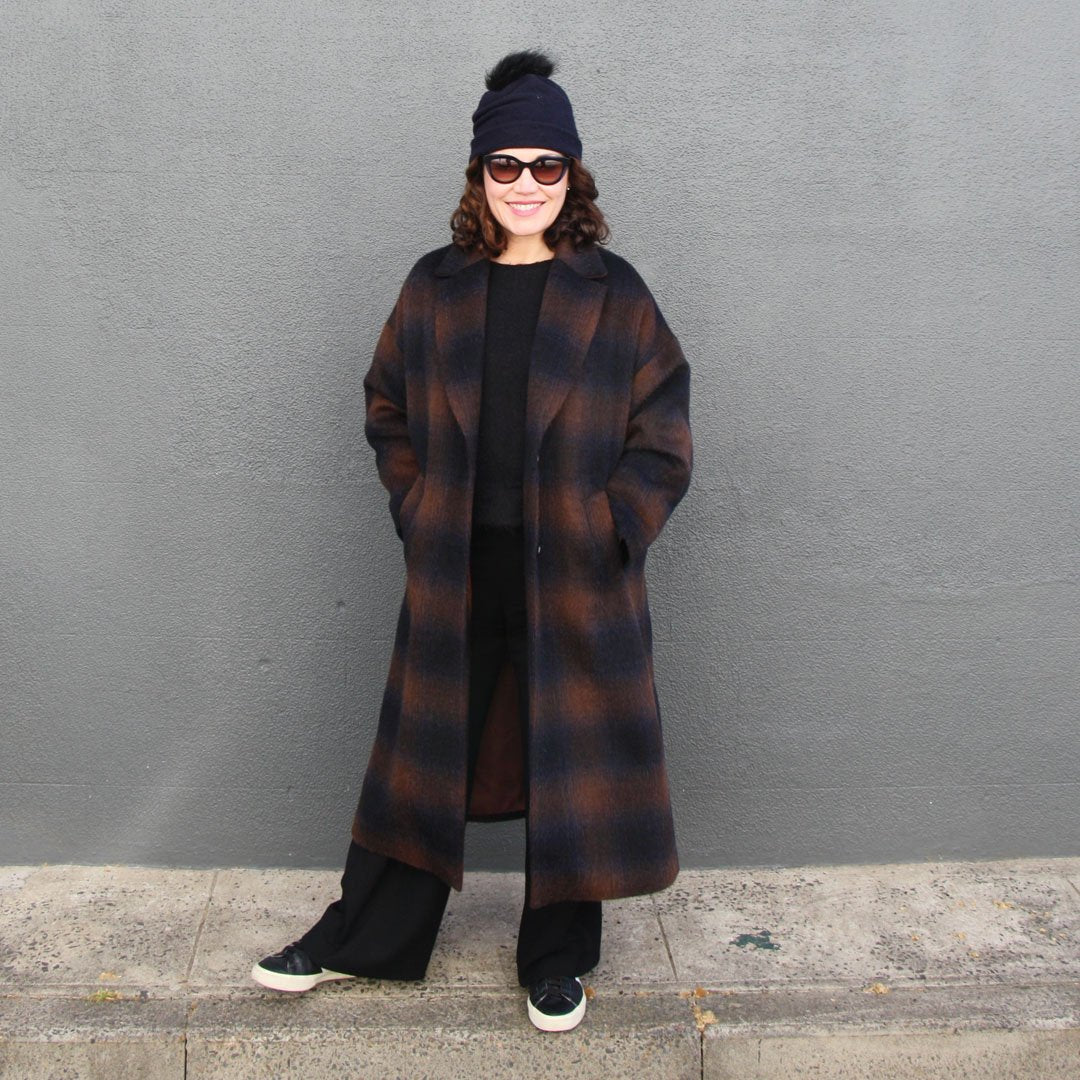
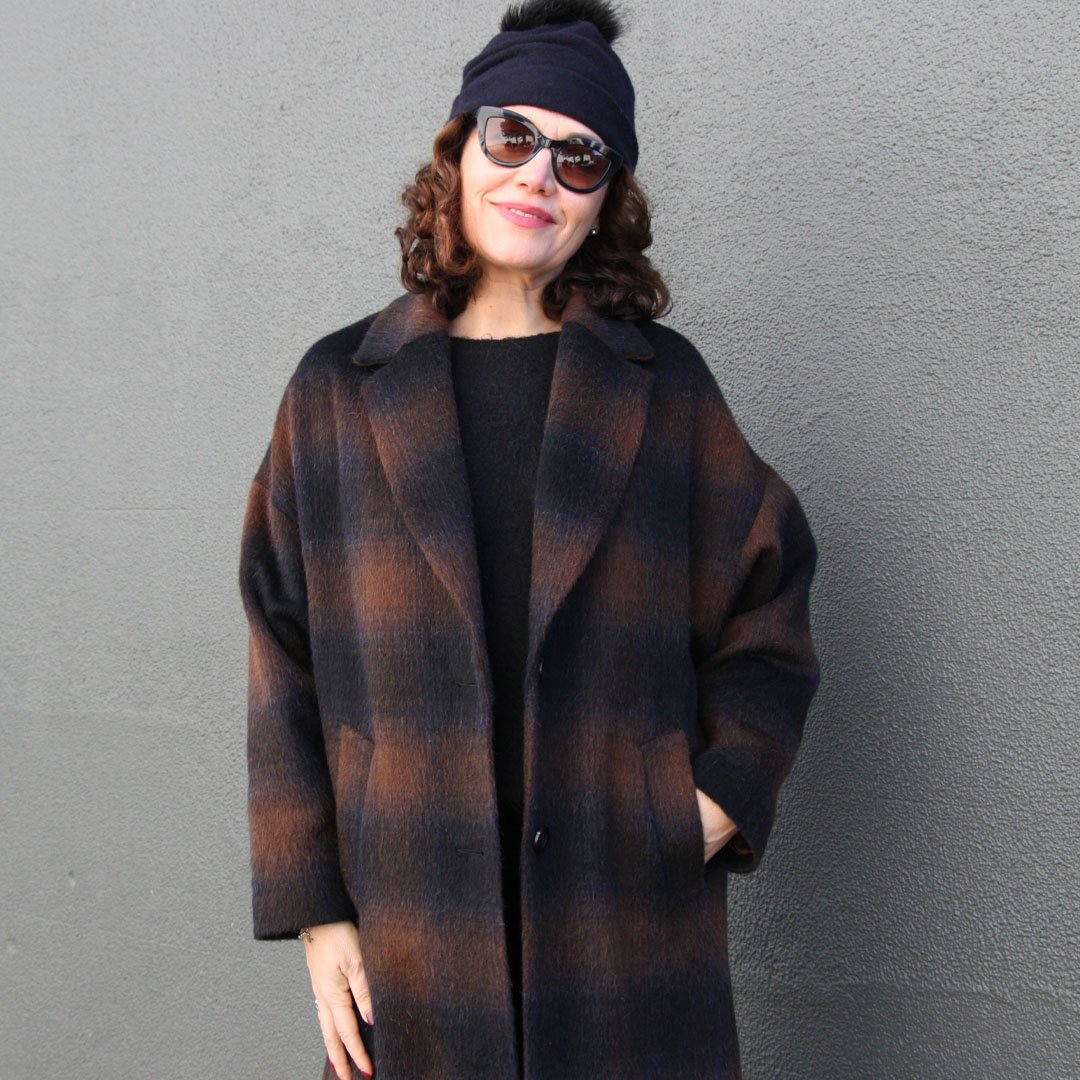
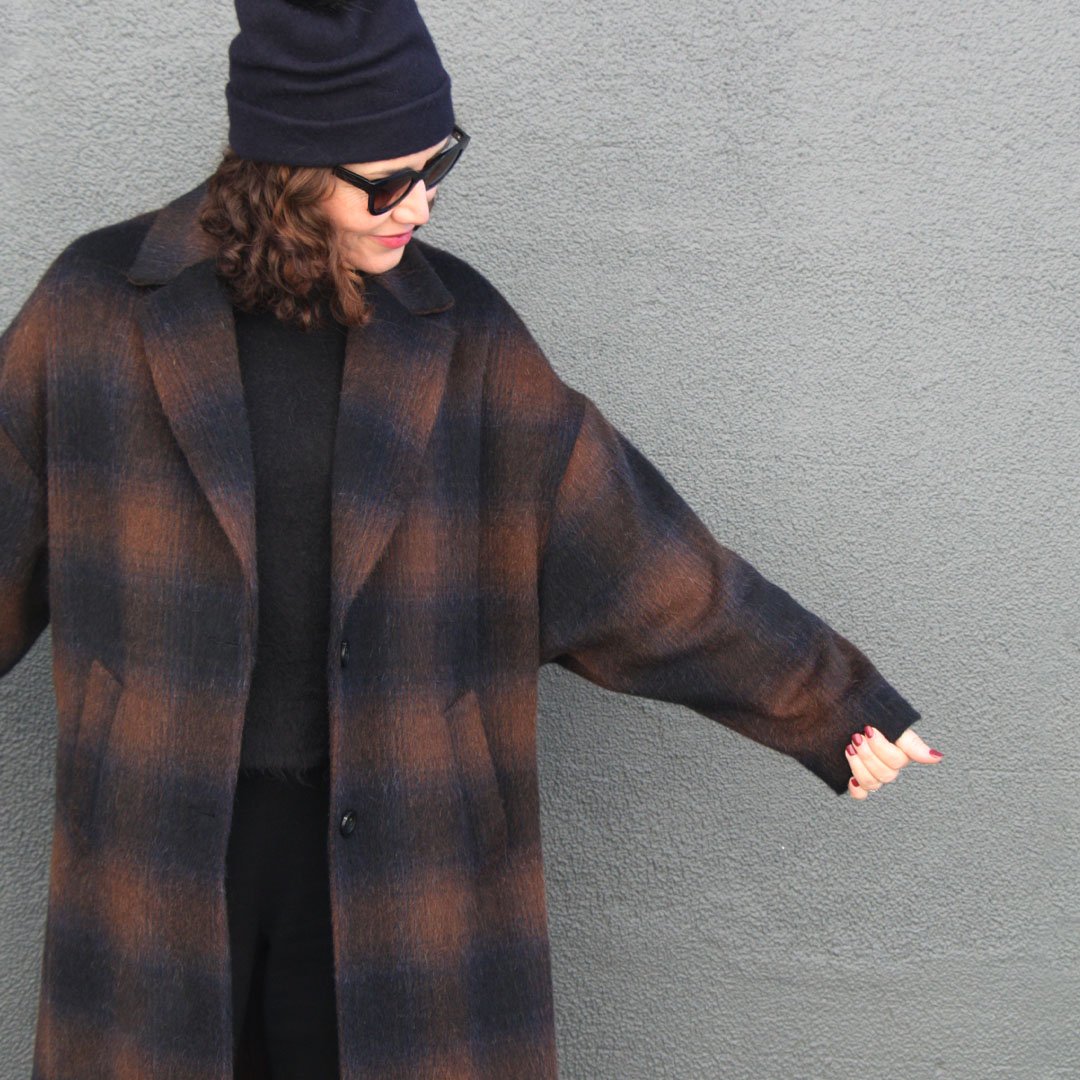
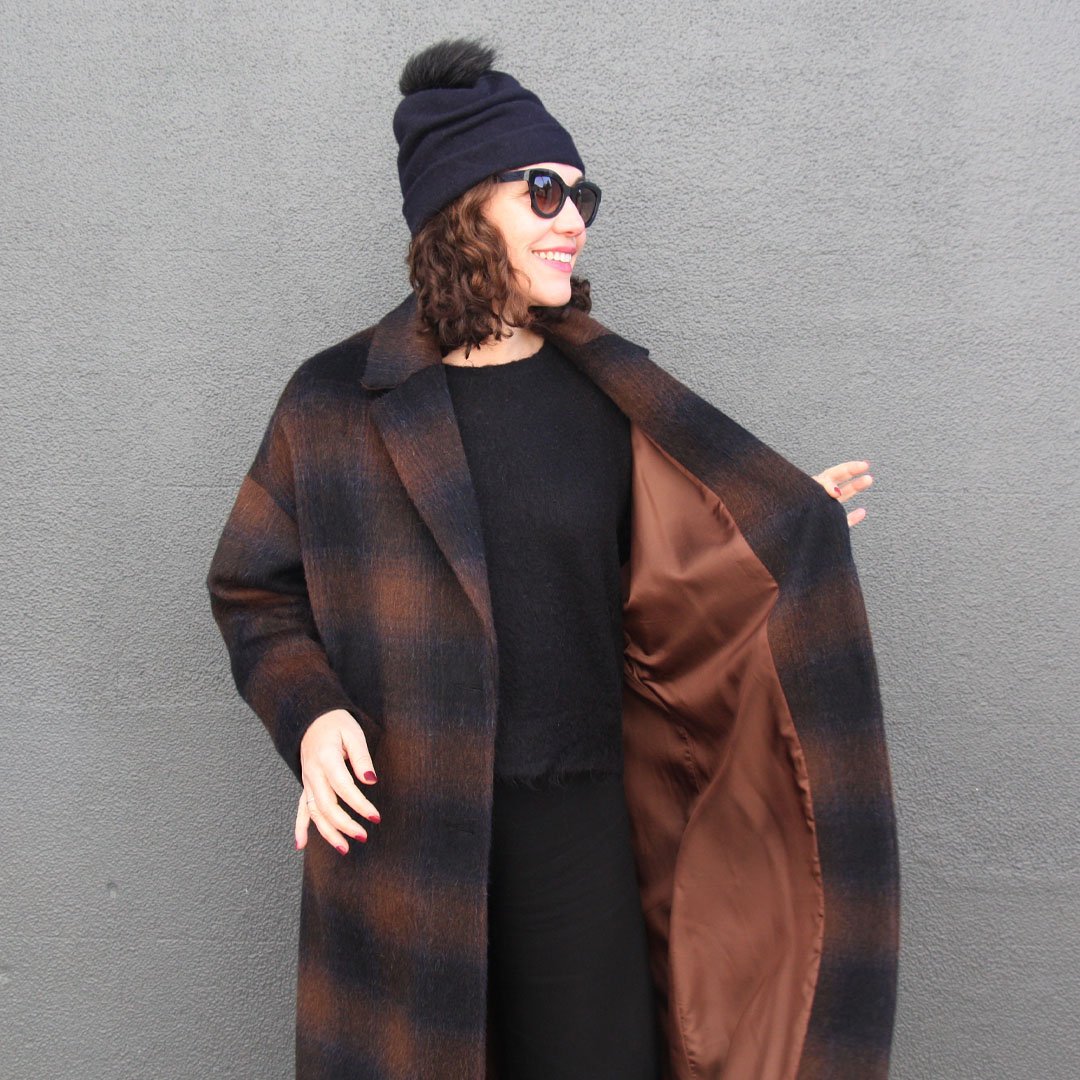
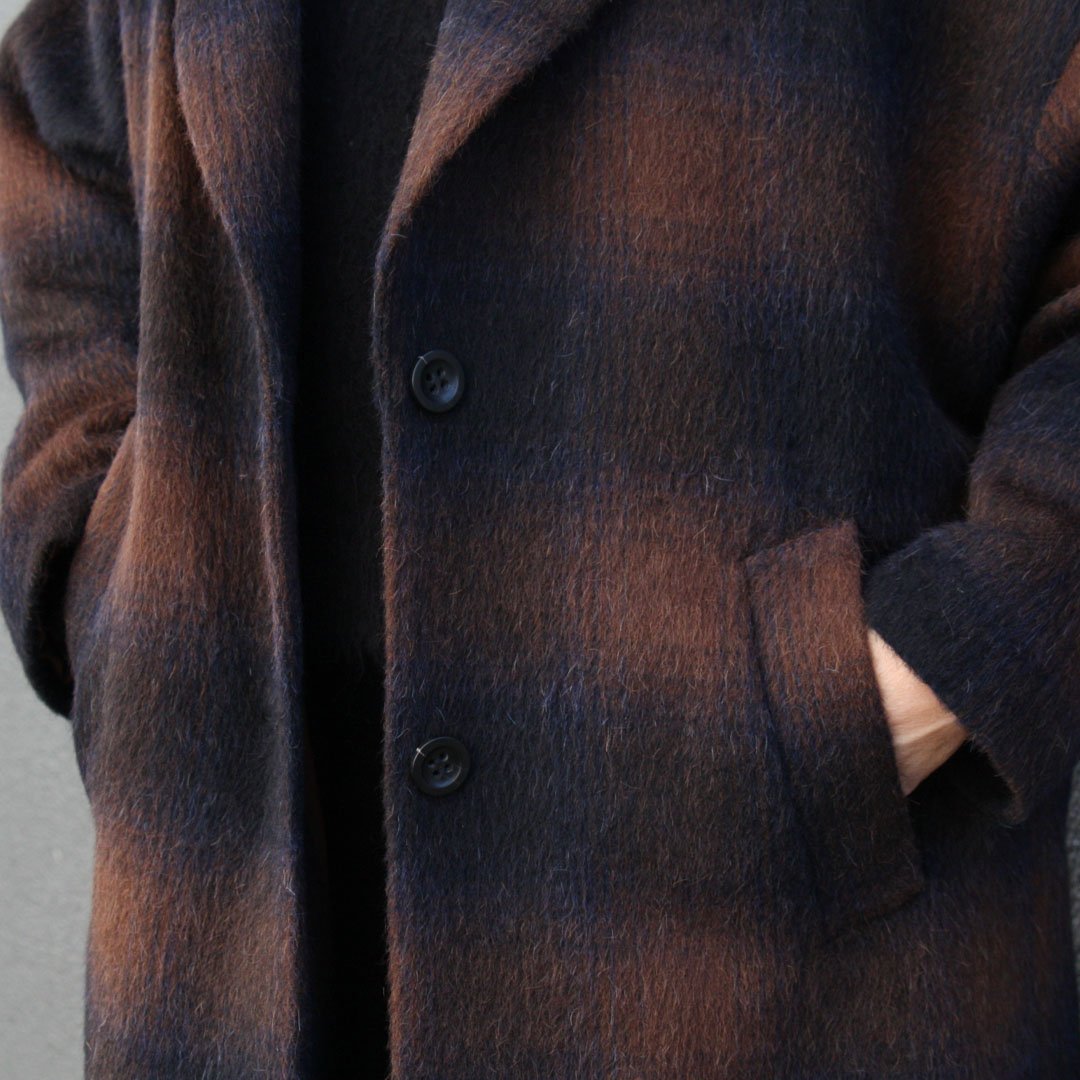
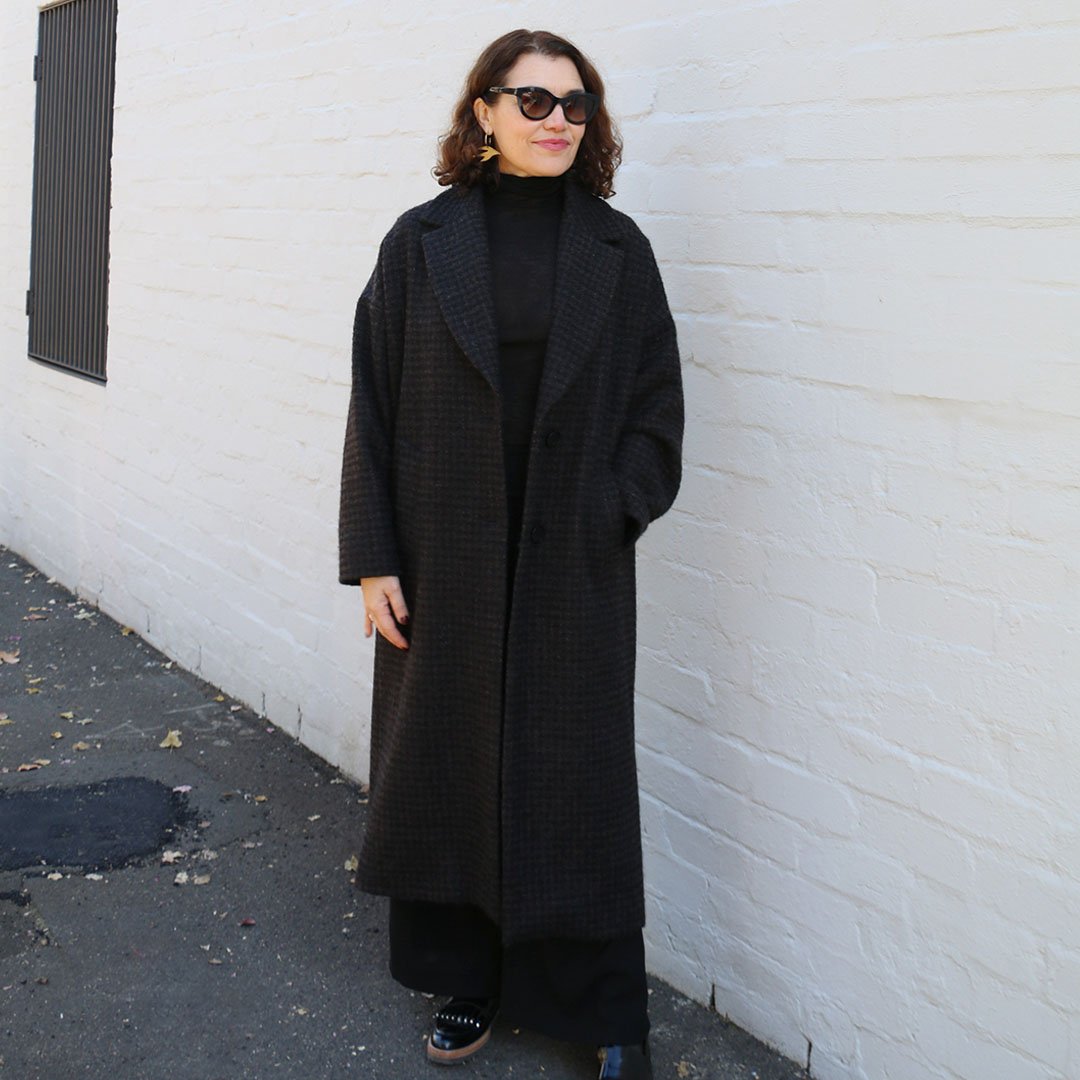
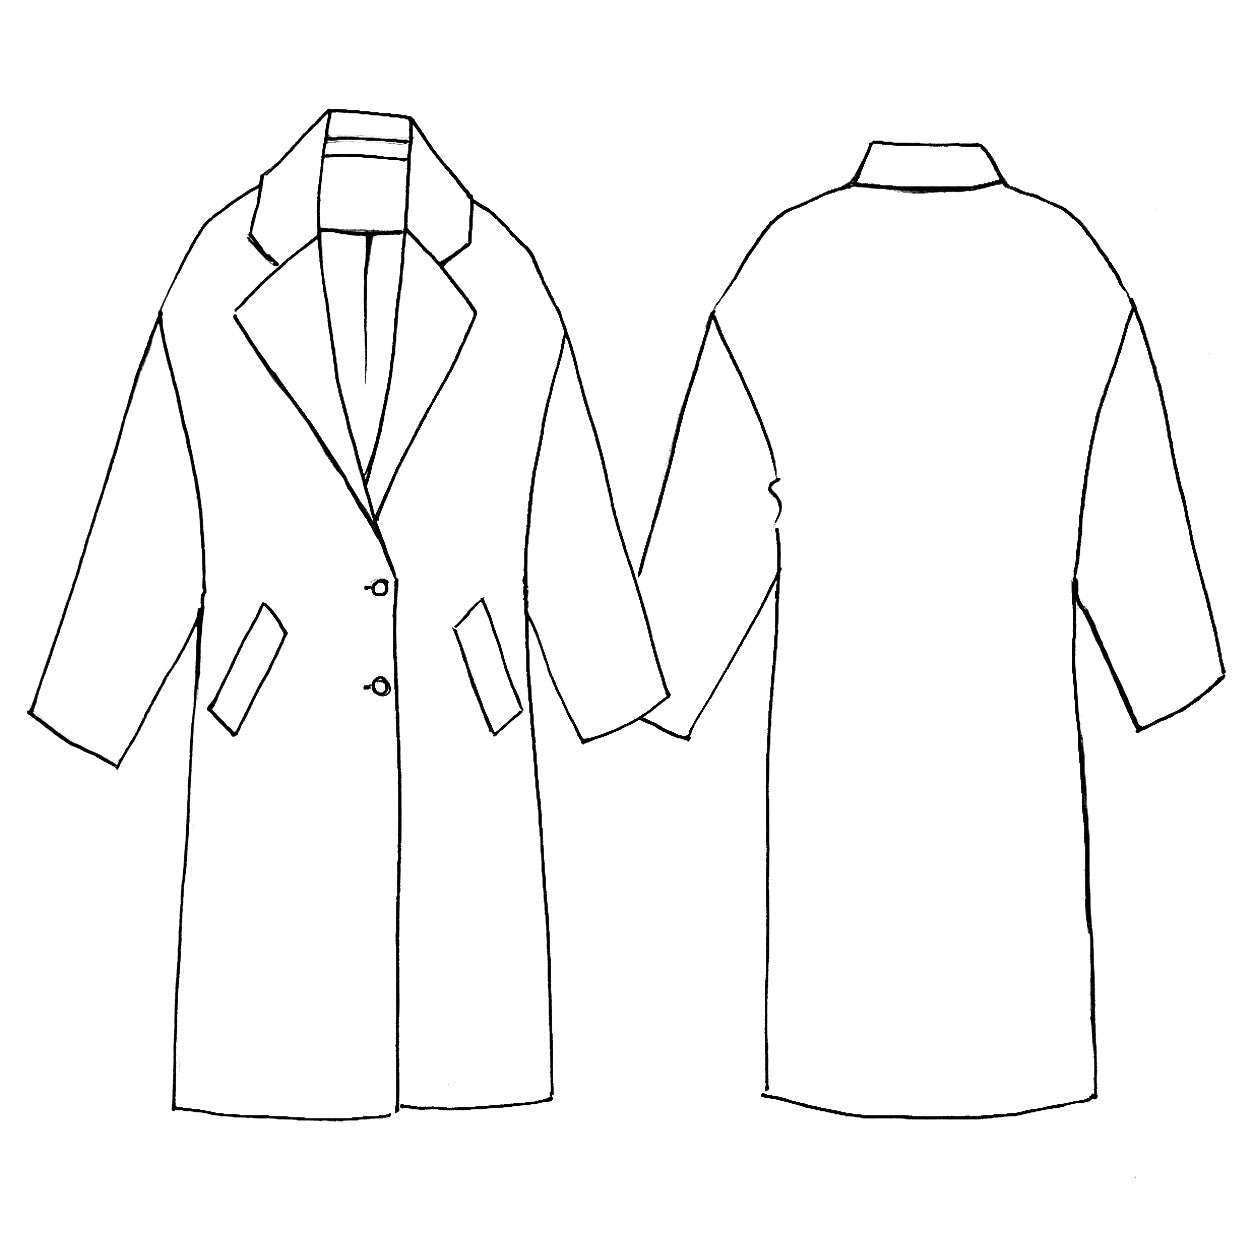
Buy the Richmond Coat sewing pattern from Tessuti Fabrics. The Richmond Coat is a modern classic style that is single-breasted and full length. The fit is oversized and straight, with dropped shoulders. Dramatic, tapered sleeves provide a cosy feel and easy layering over your favourite chunky knit. The Richmond Coat is fully lined and features a two-button closure, welt pockets and a deep, notched lapel collar.

This sewing pattern is available to buy in the following format:

– PAPER (next working day dispatch on orders and FREE UK delivery over £50)

Suggested fabrics: 

Main: Wool coating, wool blend coating, double wool crepe, wool boucle.

Lining: Lining fabric.

Fabric requirements: 

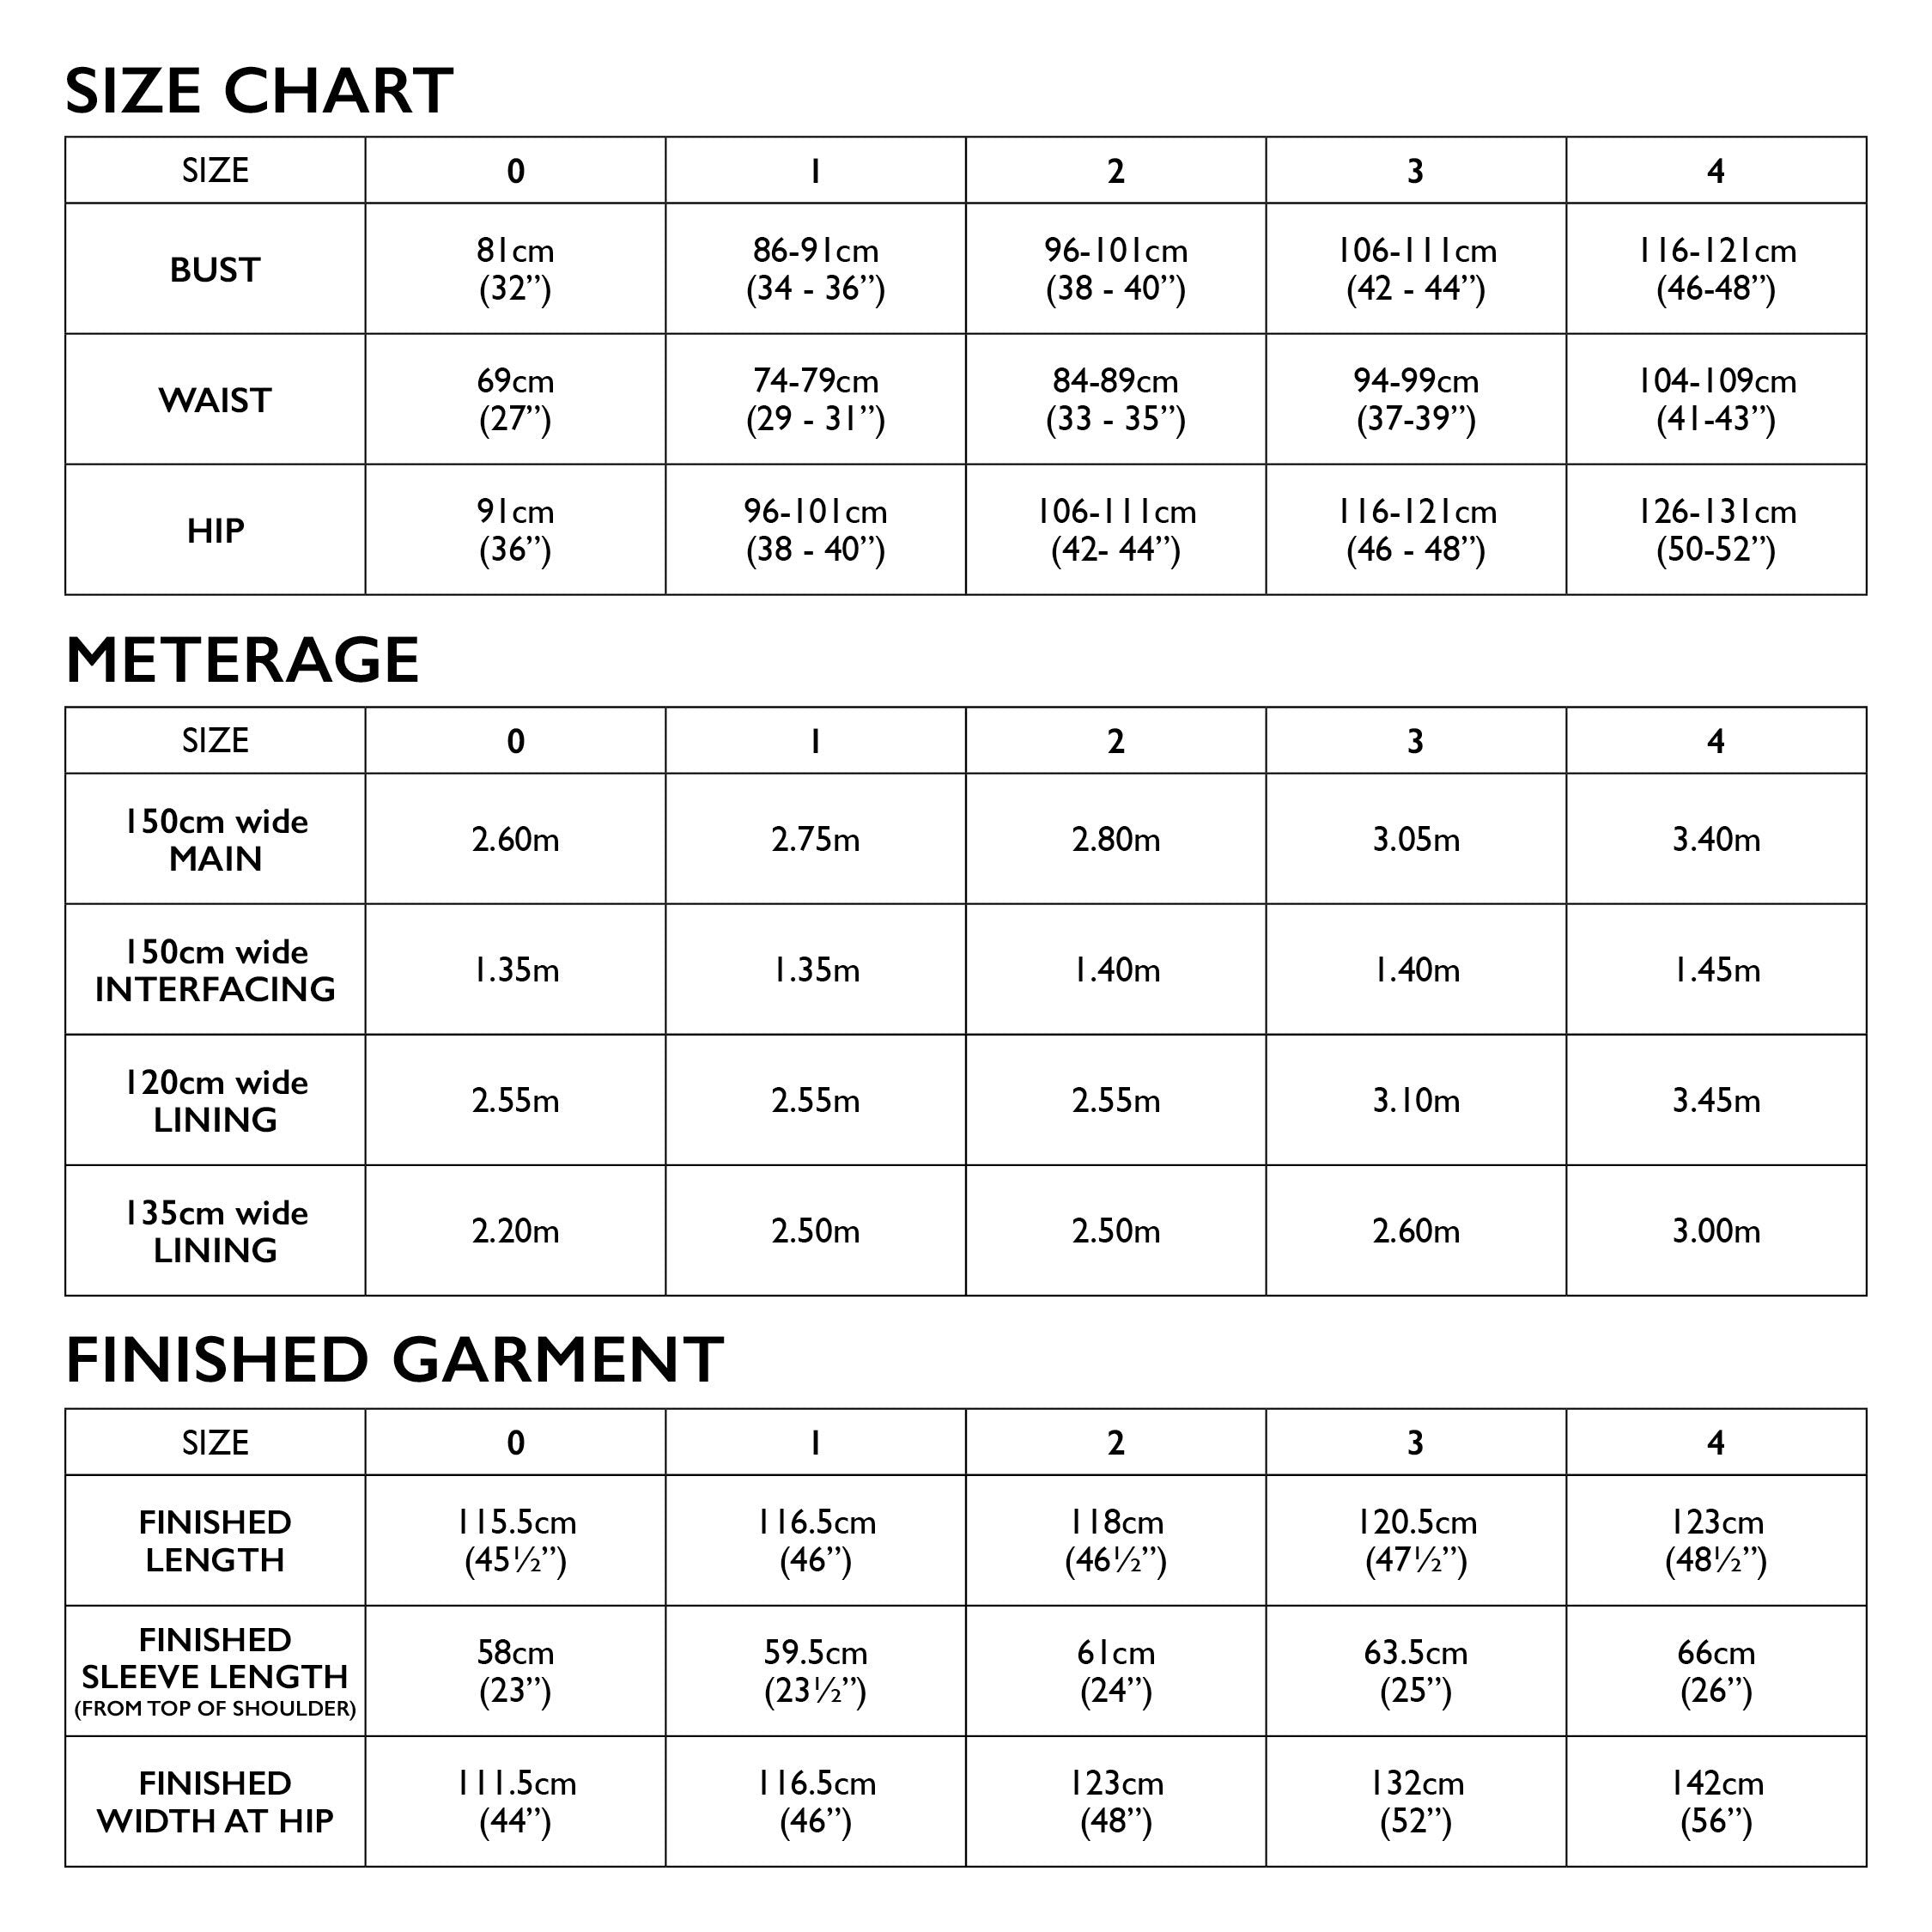
Main: 150 cm wide fabric: 2.60 - 3.40 m.

Lining: 120 cm wide fabric: 2.55 - 3.45 m // 135 cm wide fabric: 2.20 - 3.00 m.

Sizing: 0 - 4 (approx. UK 8/10 - 24, based on our standardised size chart). Please also check the designer’s size chart and finished garment measurements.

Notions: Interfacing, 150 cm wide, 1.35 - 1.45 m; two 25 mm buttons.

If you’re looking for more maker inspiration, check out the latest sewing pattern reviews from the sewing community. We also have a sewing blog to keep you up to date with all the news from the world of sewing.

Share

If you’re looking for maker inspiration check out our blog. With weekly updates on new patterns, styling ideas and maker inspiration, it's not to be missed.

Customer Reviews

Based on 2 reviews
100%
(2)
0%
(0)
0%
(0)
0%
(0)
0%
(0)
N
Natalie Smith
Richmond Coat: a really enjoyable project

Pattern and construction

I really enjoyed making this pattern. It was a stretch for me to make a garment as complicated as this and it did take me a little while to get started on it. Once I got going I worked through each step carefully and tackled the process over several weeks in chunks that were manageable for me. Overall I found it really absorbing.

I felt that the pattern had been well designed and the instructions are clear. I was apprehensive beforehand about making up the collar but found that because the under collar is in 2 parts which are stitched together it was always easy to tell at a glance which section was the under collar and which was the over collar. This made it easier to follow the instructions.

I used a walking foot to sew up the coat and this made it easier to sew the sections (e.g., welt pockets, collar) where there are several layers of thick fabric to work with. I added top stitching at the edges of the collar, cuffs and front facing to give a clean finish. On the advice of Rose's Tailor, before I sewed the openings in the lining together, inside the coat I loosely hand sewed the hem to the main fabric, and also the front facings to the front panels. I think this gives the coat a bit more structure.

Sizing

I contacted Tessuti Fabrics for advice about sizing and sized down to a size 2 because the pattern is designed to be oversized. My measurements would put me between a size 2 and 3. I'm really pleased with the fit- there is still plenty of room to put layers underneath because of the batwing sleeves and drop shoulders.

Fabrics and buttons

I chose Yorkshire tweed from In the Mills, mustard lining from The Lining Company and buttons from Textile Garden. I ordered two choices of buttons (wooden and copper). I couldn't choose between them but found that the buttonholes lined up so I could use both buttons together. I used orange thread to sew on the buttons and make the button details stand out a little more.

Buttonholes

I also contacted Tessuti Fabrics for advice about the buttonholes as I was worried that I wouldn't be able to make a good job with my Janome machine. I had thought of making bound buttonholes which would have been another first for me. Once again Tessuti Fabrics were very responsive and suggested getting the buttonholes done professionally and I'm really pleased that I did that. I went to Rose's Tailor on Victoria Road in Cambridge and they were really helpful. Rose's Tailor also advised me to go for 3 buttons, rather than the 2 on the pattern- I'm glad I did this as the coat is warmer to wear as a result.

I would 100% make this pattern again- next time I would add an inner pocket (for phone and keys).

S
Shreya | junolovesthread
Dream Coat - Tessuti Fabrics

Have you ever had one of those moments where you look at something you've just created, and think "I can't believe I've made this?!" The Richmond Coat will 100% give you that feeling!
This pattern turned out to be the ultimate slow sewing project to enjoy over the course of a pretty hectic month. The instructions break everything down into manageable chunks, and I loved seeing this come together bit by bit over the course of several weeks. The design feels timeless but still perfectly on-trend - I've seen lots of similar RTW coats popping up in the shops, and I'm a big fan of the oversized fit and length. It'll be ideal for layering with chunky knits and long dresses as it gets colder, and I know I’m going to treasure it for years to come!
Additional notes:
    - The pattern comes with interfacing pattern pieces (e.g. hems, pockets, facings, etc.) but I found it easiest to just block fuse interfacing to a large piece of fabric and cut the pattern pieces out from that. I also fully interfaced the front coat pieces and interfaced the upper half of the back coat piece.
    - The welt pocket instruction were great - I think this is probably one of the most straightforward methods of construction that I've tried. I did end up doing quite a few practice runs before the real thing, and I found that the key to a smooth pocket is to really clip into the corners. I was hesitant to go all the way up to the edge of the stitching, but you actually need to do this in order for them to turn through smoothly.
     - This was my first time bagging a lining. I'm not great at visualising anything 3D in my head, so this was one of those true "trust the process" moments as I wasn't sure what to expect when I read the instructions in advance. However when going through each step everything started to make sense (even if it felt a bit strange haha), and it was like sewing wizardry when everything came together as it should!
- On the topic of instructions - the instructions throughout were clear and detailed throughout, and I thought the photographs were helpful to properly see each step, where to stitch, etc. Make sure to pay attention to the 'special tips' in the margins - I skimmed over one or two and wish I had read them more closely as it would have made certain steps a bit easier! (e.g. which side should be up when sewing two layers together). Even though this is a pretty involved and at times complex make, I found it came together without any issues just by taking each step as written!
The outer fabric I used is a heavy chequered wool coating, and the lining is flannel-backed satin. This satin is a game changer - the satin side brings ease of wear, whilst the flannel backing made wrangling and cutting SO much easier. And because both fabrics are pretty hefty, this coat is also incredibly warm!