Wardrobe By Me

Wardrobe by Me Canvas Jacket

Regular price £16.00 GBP
Sale price £16.00 GBP Regular price £16.00
Copyshop

We print out the A0 pattern sheets, but you’ll need to download the digital instructions, as we don’t print these. The PDF files will be emailed immediately after purchase, and the printed A0 pattern sheets will be dispatched next working day.

(What is Copyshop?)
Tax included.

Earn [points_amount] when you buy this item.

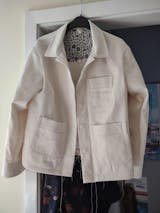
Buy the Canvas Jacket sewing pattern from Wardrobe by Me. This workwear-inspired jacket has a boxy and casual fit. It's perfect as an outerwear piece in transitional weather or as a modern alternative to the classic cardigan for a day in the office. The two-piece sleeves are roomy enough to layer over a knit in the cooler months.

This sewing pattern is available to buy in the following formats:

– PAPER (next working day dispatch on orders and FREE UK delivery over £50)

– PDF (available to download immediately after purchase). What is a PDF?

– PDF pattern + Printed A0 copy shop (We print out the A0 pattern sheets, but you’ll need to download the digital instructions, as we don’t print these. The PDF files will be emailed immediately after purchase, and the A0 pattern sheets will be dispatched next working day). What is Copy Shop?

Suggested fabrics: Medium-weight woven fabrics such as cotton, linen, wool, or other fabrics that are comfortable to wear.

Fabric requirements: 140 cm (50") wide fabric: 1.5 - 2.2 m (1.6 - 2.5 yd).

Sizing: US 0 – 24 / EU 30 – 54 (approx. UK 6 – 24, based on our standardised size chart). Please also check the designer's size chart and finished garment measurements.

Notions: 90 cm (35") wide interfacing, 0.25 m (0.25 yd); 7 buttons, 1.5-2 cm (5/8"-3/4") diameter; heavy thread for topstitching.

PDF pattern includes: Instructions; A4/US letter print-at-home pattern (35 pages); A0 copy shop pattern (2 sheets) // Layers: Yes // Projector file: Yes.

If you’re looking for more maker inspiration, check out the latest sewing pattern reviews from the sewing community. We also have a sewing blog to keep you up to date with all the news from the world of sewing.

Share

If you’re looking for maker inspiration check out our blog. With weekly updates on new patterns, styling ideas and maker inspiration, it's not to be missed.

Customer Reviews

Based on 3 reviews
0%
(0)
67%
(2)
0%
(0)
33%
(1)
0%
(0)
A
Anastasia
Worst instructions I've come across so far

I consider myself a confident beginner in sewing and with every pattern I make, I like to learn and experiment with new techniques. I've tried a lot of different pattern designers and never had such an issue with the instructions before. They were lacking at best and confusing. There are even mistakes in the listing of the pattern pieces. If it hadn't been for the video, I would never have managed. I liked the finished jacket, and I can now say I've done a collar and cuffs and placket etc, but I really suffered through the process. I have a finished wearable toile, but will not be making this pattern again, I bought a new one and the difference in the instructions is mind blowing.

K
Kate James
Go for the PDF!

This is a great jacket - boxy, straightforward shape which can be dressed up or down depending on fabric choices. Will definitely be making it again.

However - the paper pattern is a nightmare. There are numerous sizes on it, with no indication of which are which or any colour coding to help in deciphering them. Making the jacket turned out to be a struggle simply because I had marked the wrong notches - it was all guesswork. For this reason I have now bought the pdf version so that I can just print out the size I need.

M
Milie Holliday
Canvas Jacket

I finished a wearable toile of the Canvas Jacket. Here it is with about an hour to deal with of threads hanging off it and waiting for fray check to stabilise the button holes.

I returned to sewing clothes about a year ago. One of my aims is to improve the fit and finish of my clothes.

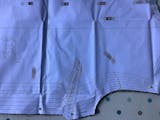
The pattern came in black and white The numerous sizes marked on the PDF print that I ordered from The Fold Line made it difficult to identify many of the markings including darts, pleats and button placement. I could try to count or do my own thing.

The pattern identifies the right (as opposed to left) side by which way one looks at the garment rather than by how the wearer sees it.

I watched the video sew-along on the Wardrobe by Me website. I also picked up tips from another maker and I’m sorry I can’t now identify her on line.

I thought the pockets would be very thick if made as instructed. After attaching the bands, I turned them out, stitched wrong sides to the pocket and turned them back. This method is used in lots of patterns. It makes identification of the line to turn under and stitch around to attach the pocket to the garment very easy.

I made the US Size 10 and knew I would find the waist a little snug. I did and I opened and bound the bottom six inches of each side seam.

I used a patterned cotton lawn for the inner yoke, under collar and cuffs.

I made the collar following the other maker. In the end, it might be the same as recommended in the pattern, which I couldn’t follow, but I don’t think so. I used it for the cuffs too. I found that ending up securing and top stitching on the right side gave me more control over the finished appearance. I liked her way of folding edges and pushing them into corners in order to define these. I don’t know if that would work on thicker fabrics.

I bound the edges of the pocket bands, the front facings, the sleeve seams and the hem using a Hong Kong finish.

The following are adjustments required if/for when I make the jacket again:

Grade out waist as the rest of the jacket is a good fit.

Possibly adjust the bust darts.

Possibly shorten the sleeves slightly.

Bind sleeve to shoulder seams so as to be able to catch the finished edge in the top stitching. I left this stitching off the toile.

Self make binding to match the inner yoke, under collar and cuffs.

The following are general learning points from this make:

Cut and top stitch patch pockets super accurately. Practise with the fabric.

Centre the needle and re-set the stitch length each time It is adjusted for top stitching etc

Make a note of settings used for edge and top stitching so as to be consistent.

Check all pieces end up in the garment right side out. (I had a collar issue.)

Resist using the thread cutter if it will be neater to leave longer ends and catch them in by hand.

Think more about the corners of bound pieces.

I learned a great deal about top stitching. There is a good deal of thread, foot, stitch length changing. The pattern specifies special thread but I also discovered dedicated top stitch needles with larger eyes. I made a note of settings used when edge and top stitching so as to be consistent. Two spools of top stitching thread are required for this make.

In writing this, I find how difficult it is to describe in English clearly what I did and how difficult it is to find online sites used.
It's a good design but not sure whether a beginner would "get" some of the moves.

 
Get Outlook for iOS