Sew Liberated

Sew Liberated Otis Overalls

Regular price £13.95 GBP
Sale price £13.95 GBP Regular price £13.95
Copyshop

We print out the A0 pattern sheets, but you’ll need to download the digital instructions, as we don’t print these. The PDF files will be emailed immediately after purchase, and the printed A0 pattern sheets will be dispatched next working day.

(What is Copyshop?)
Tax included.
Earn 1 Point on this purchase. Learn more

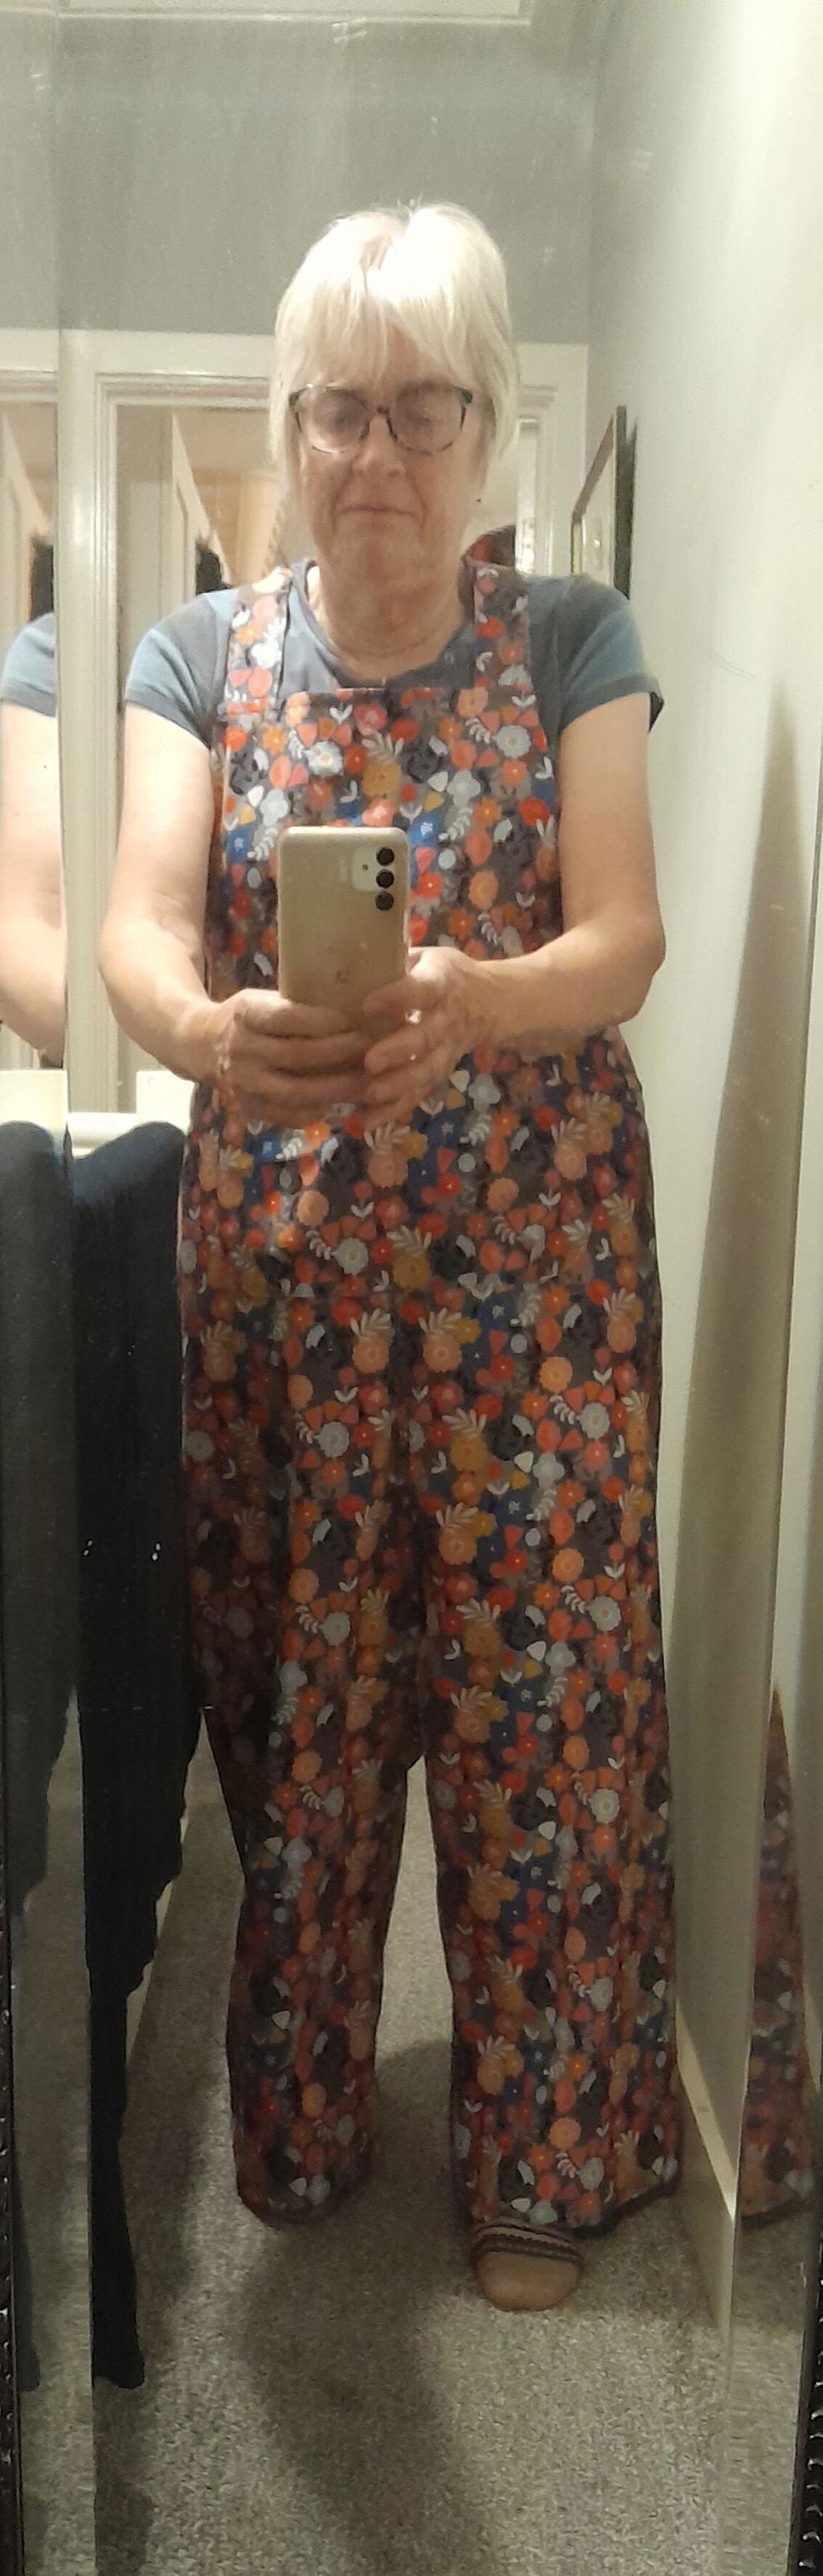
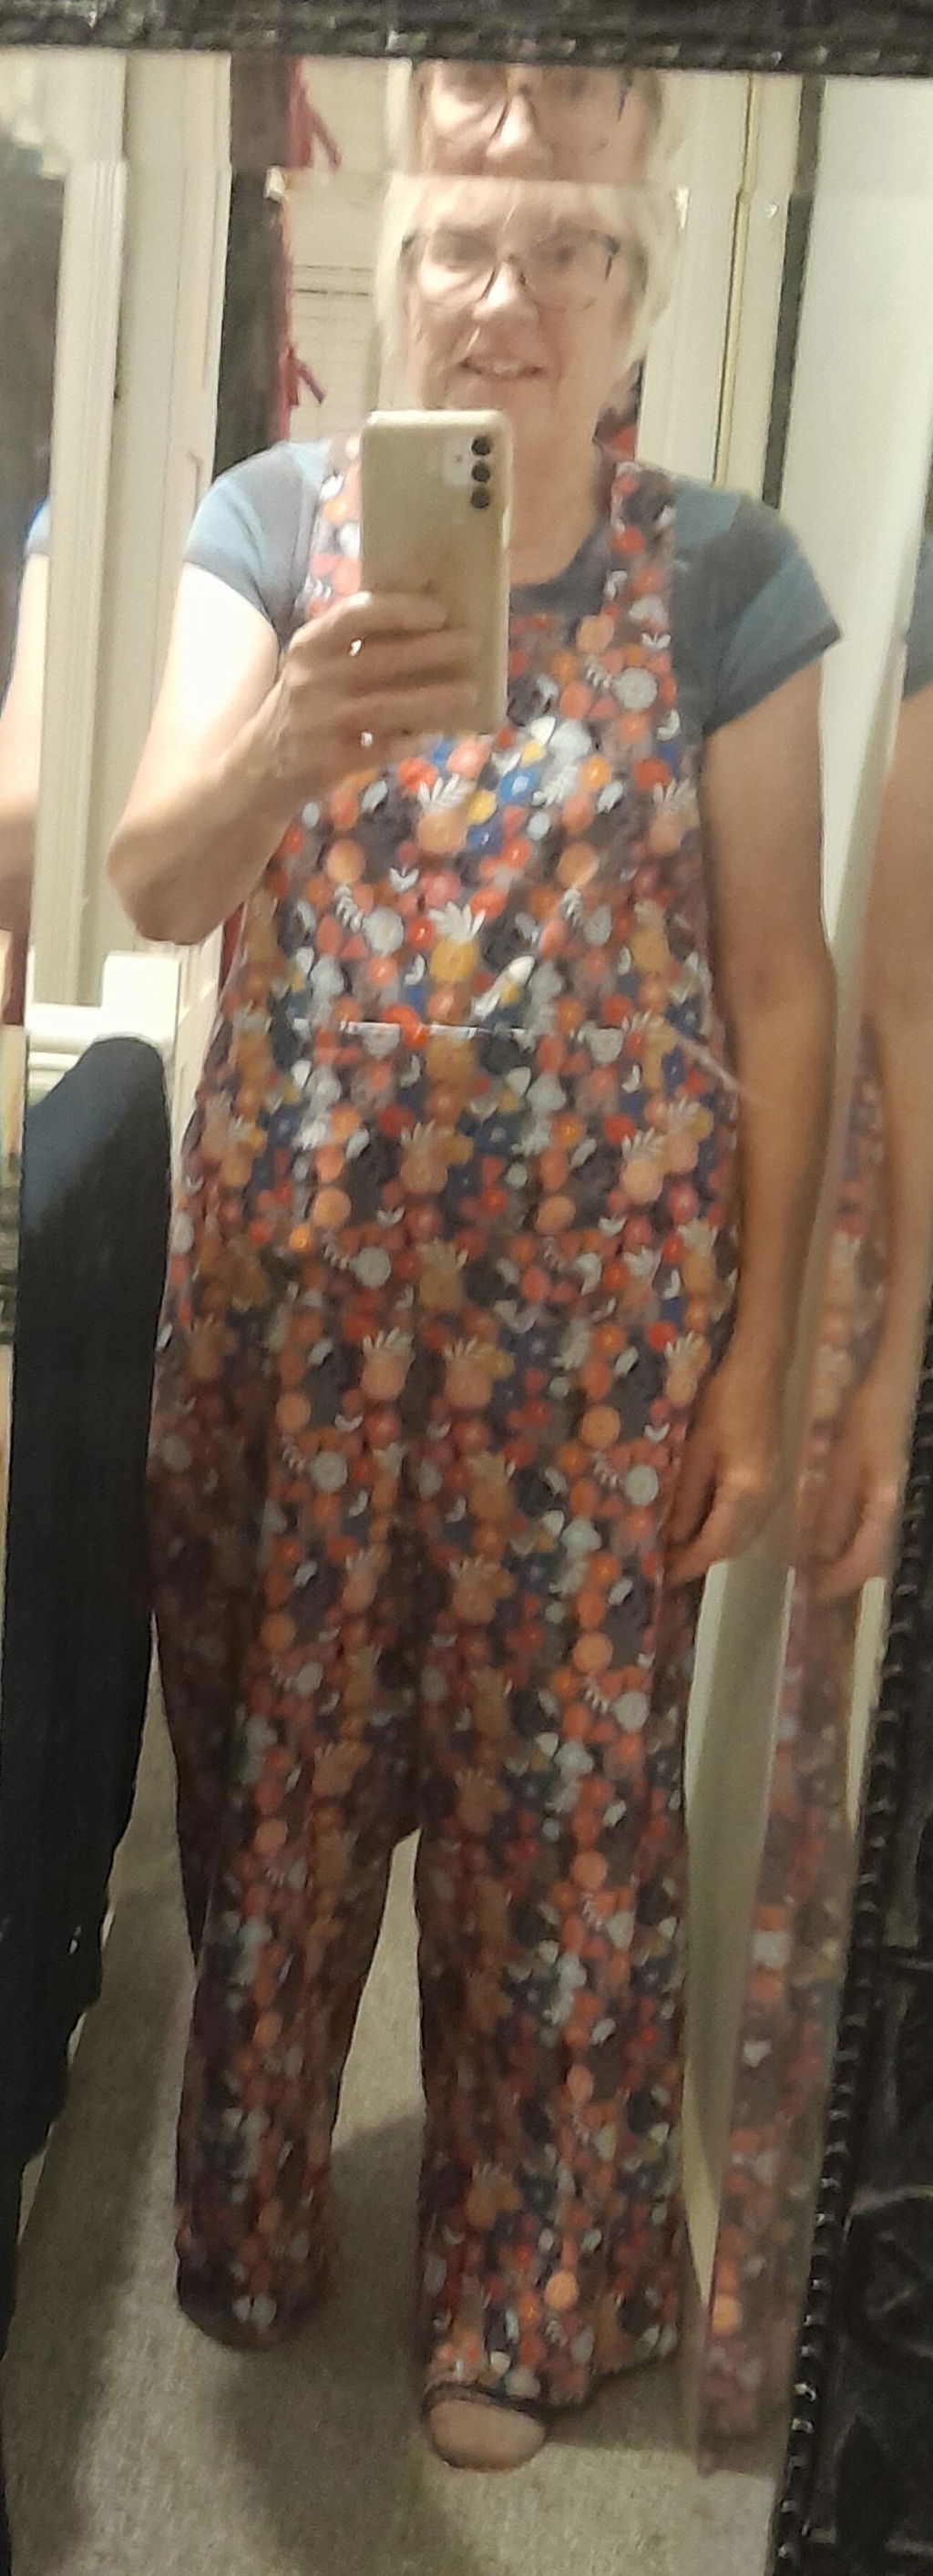
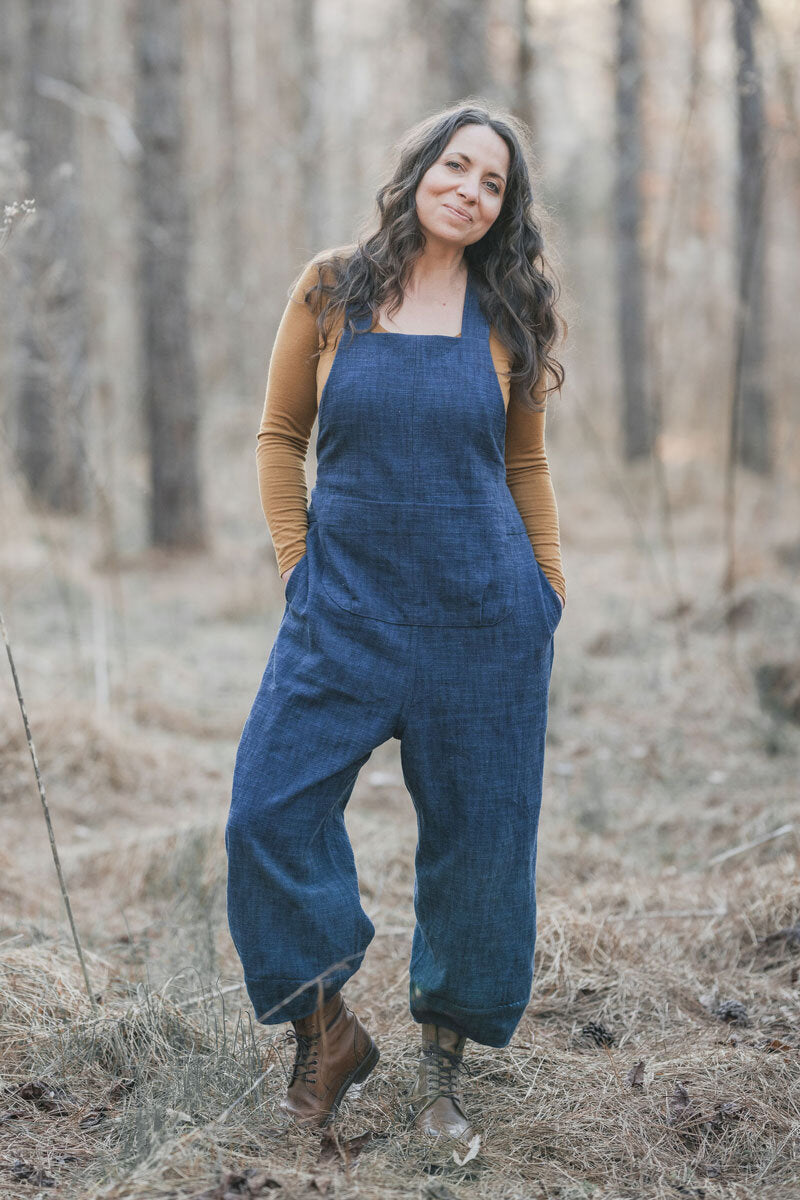
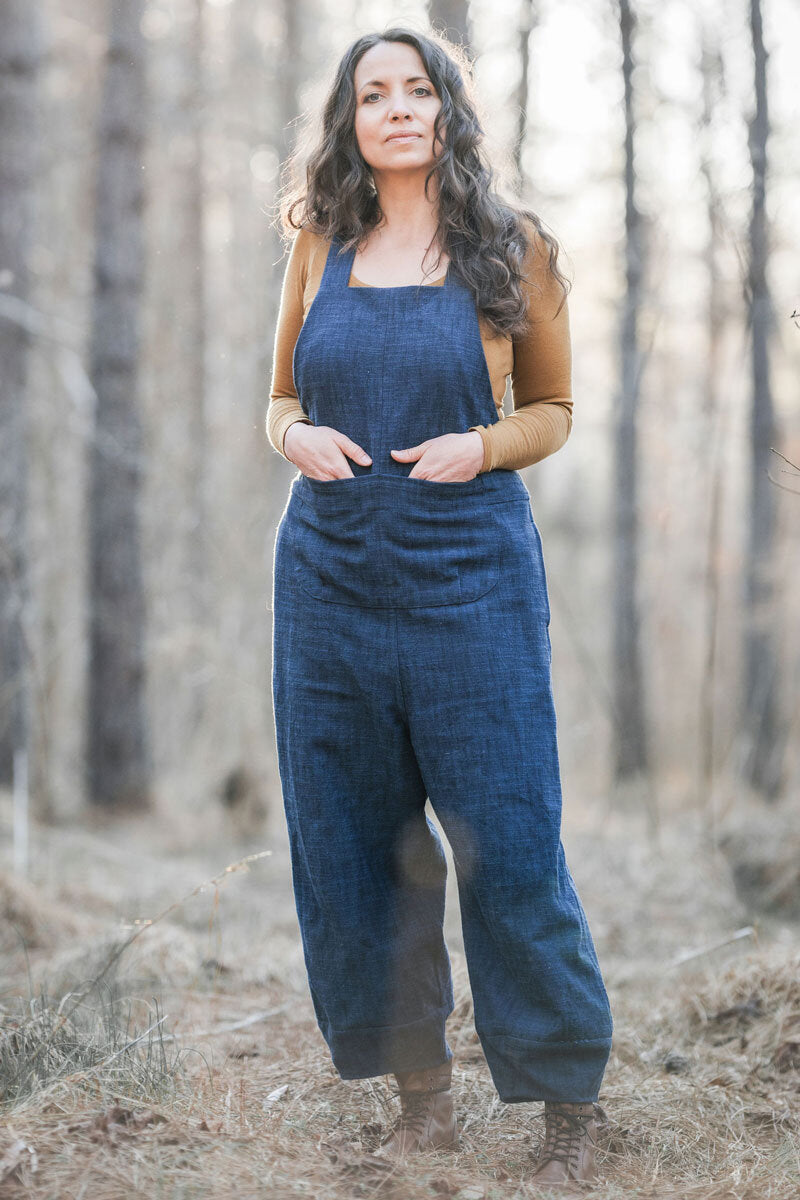
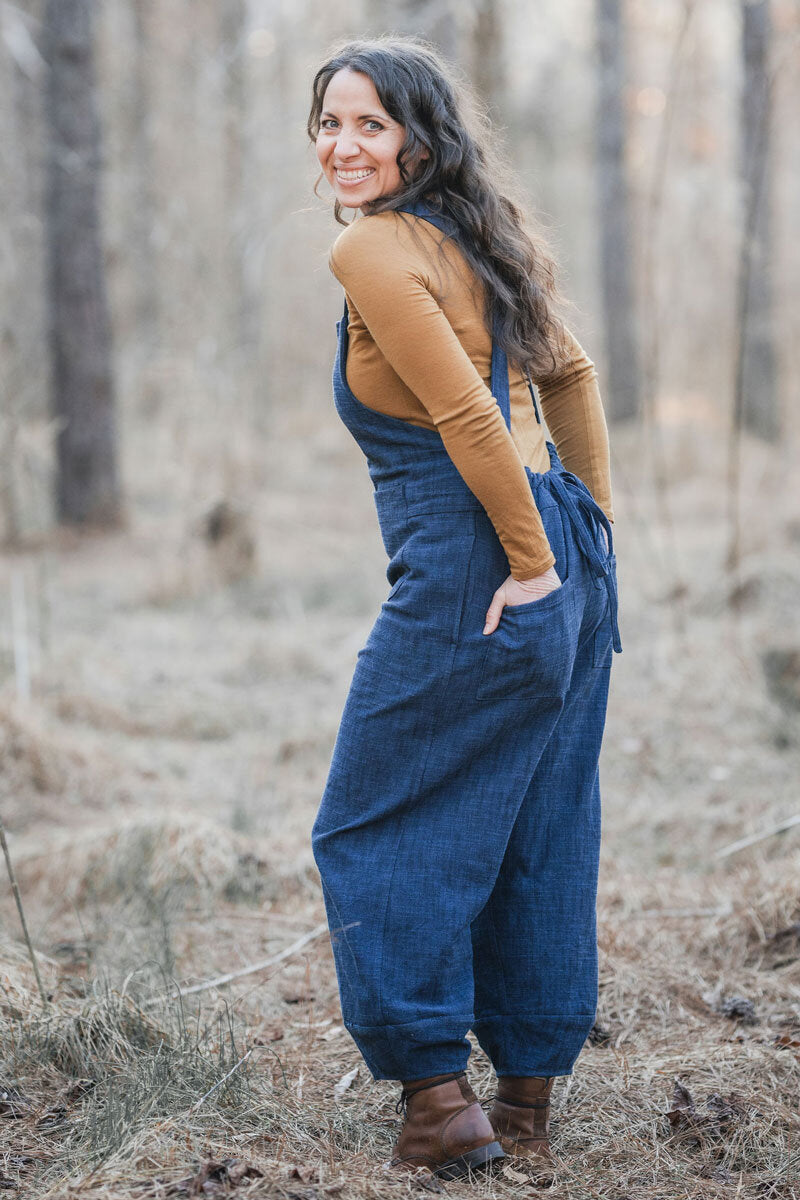
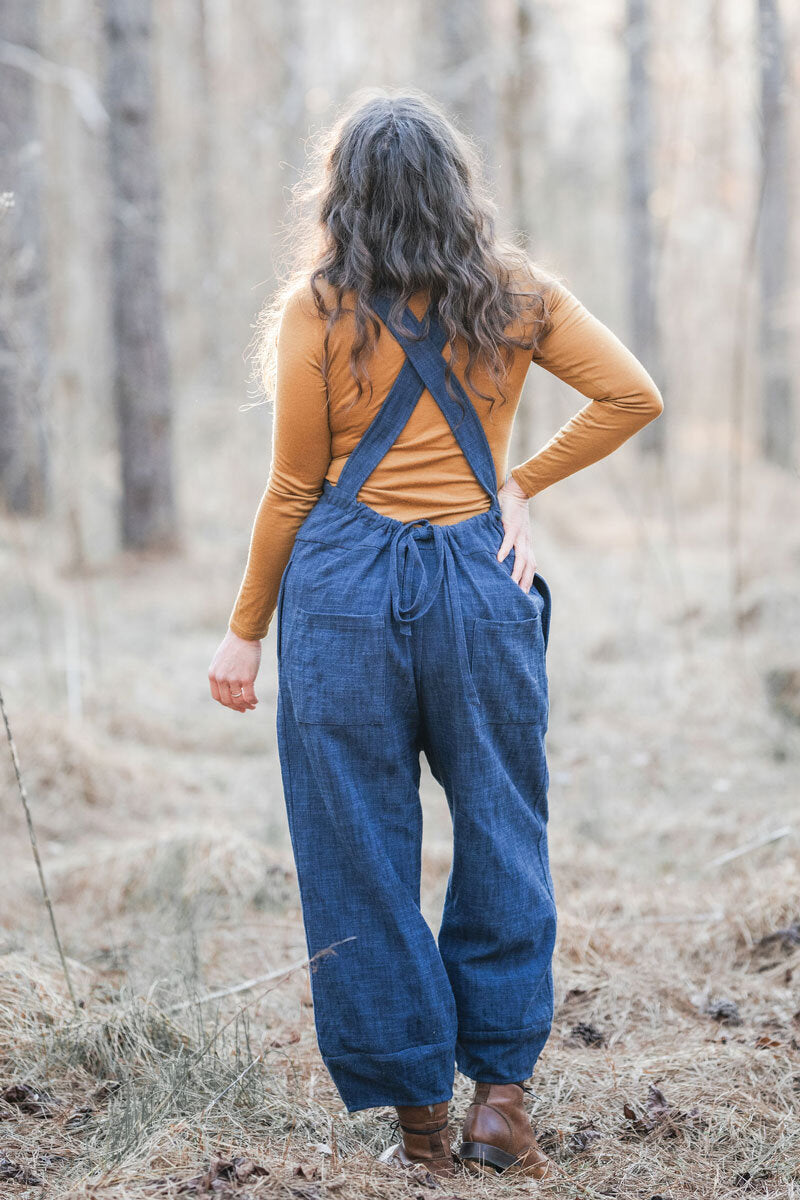
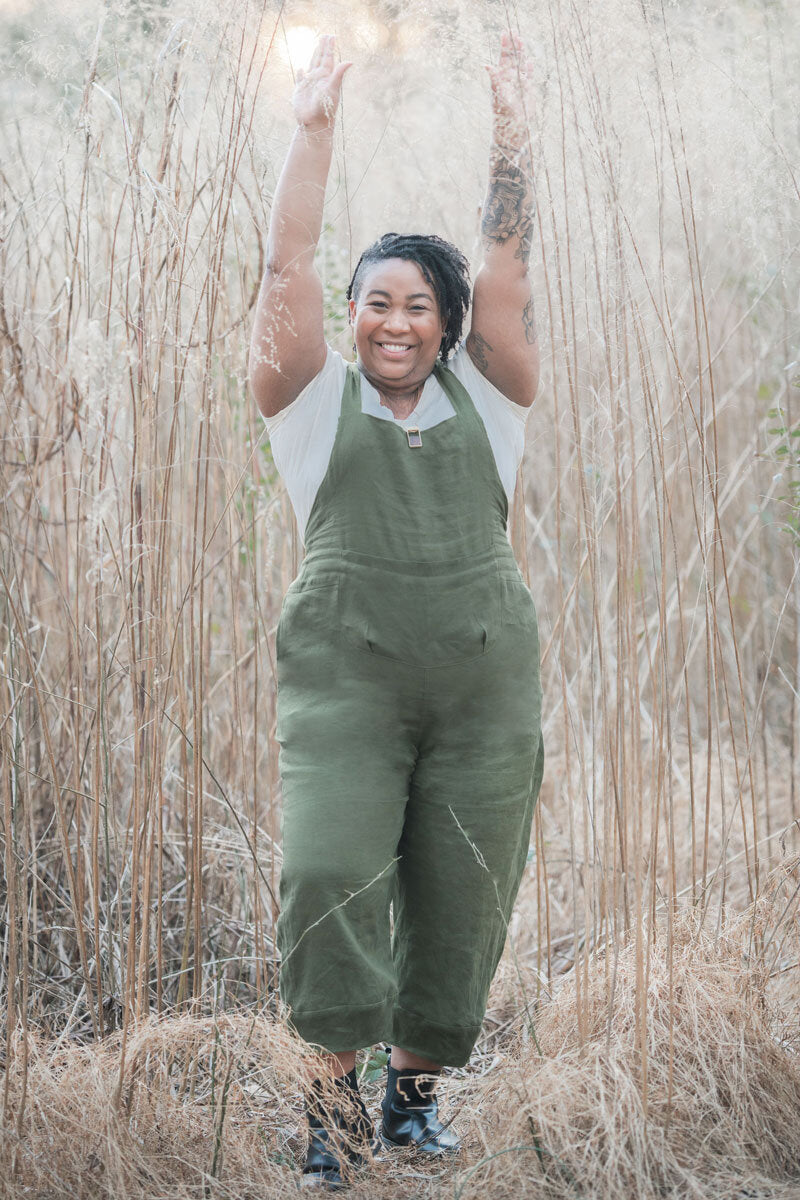
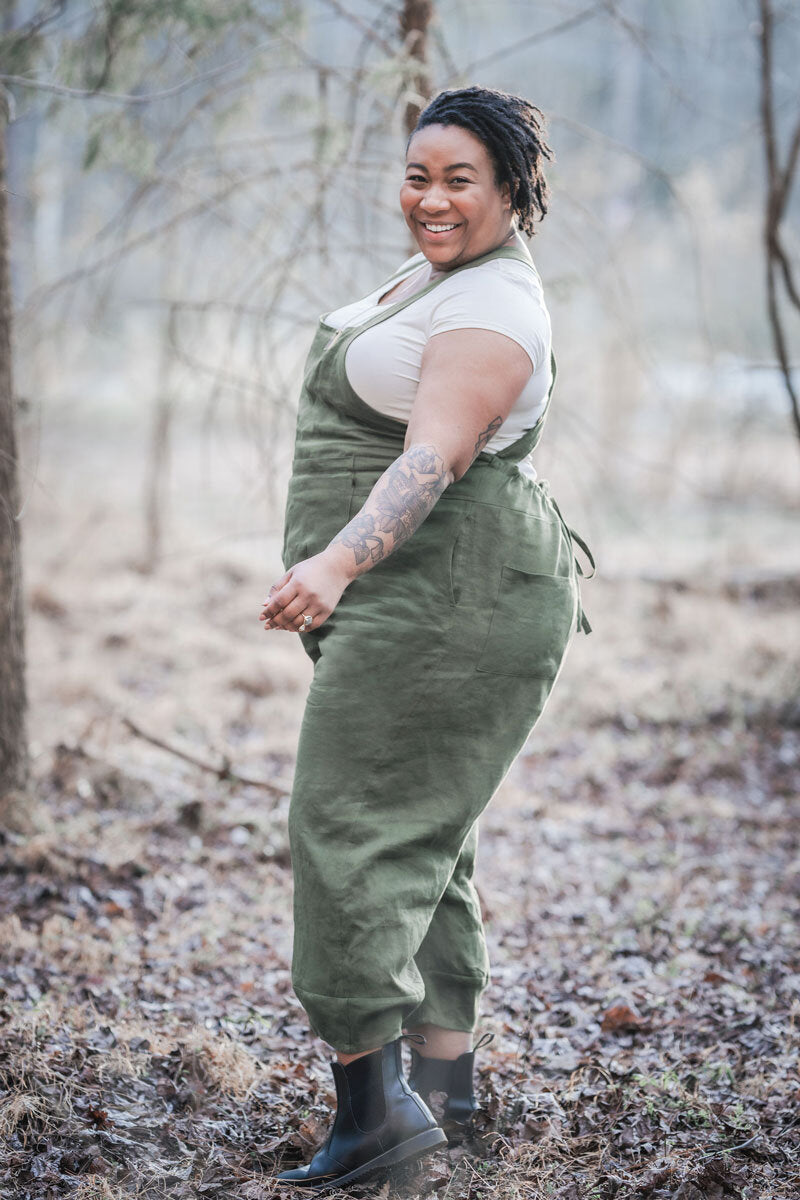
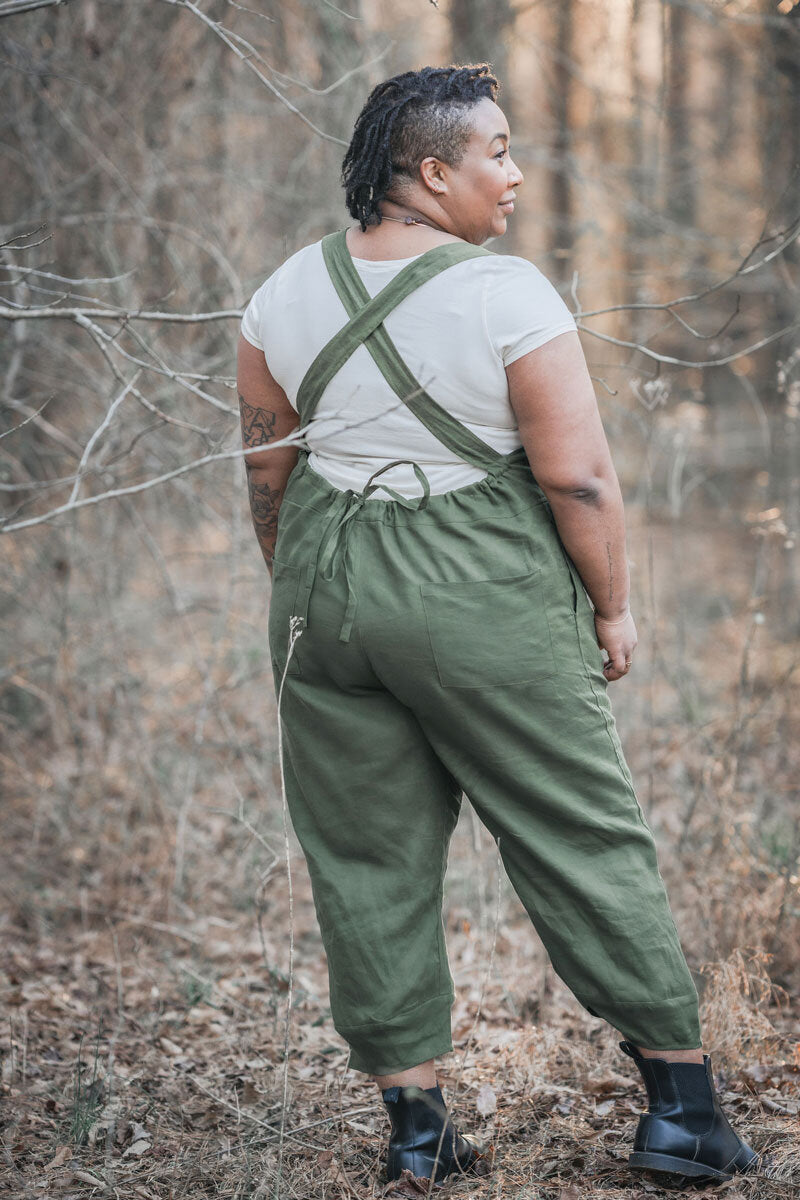
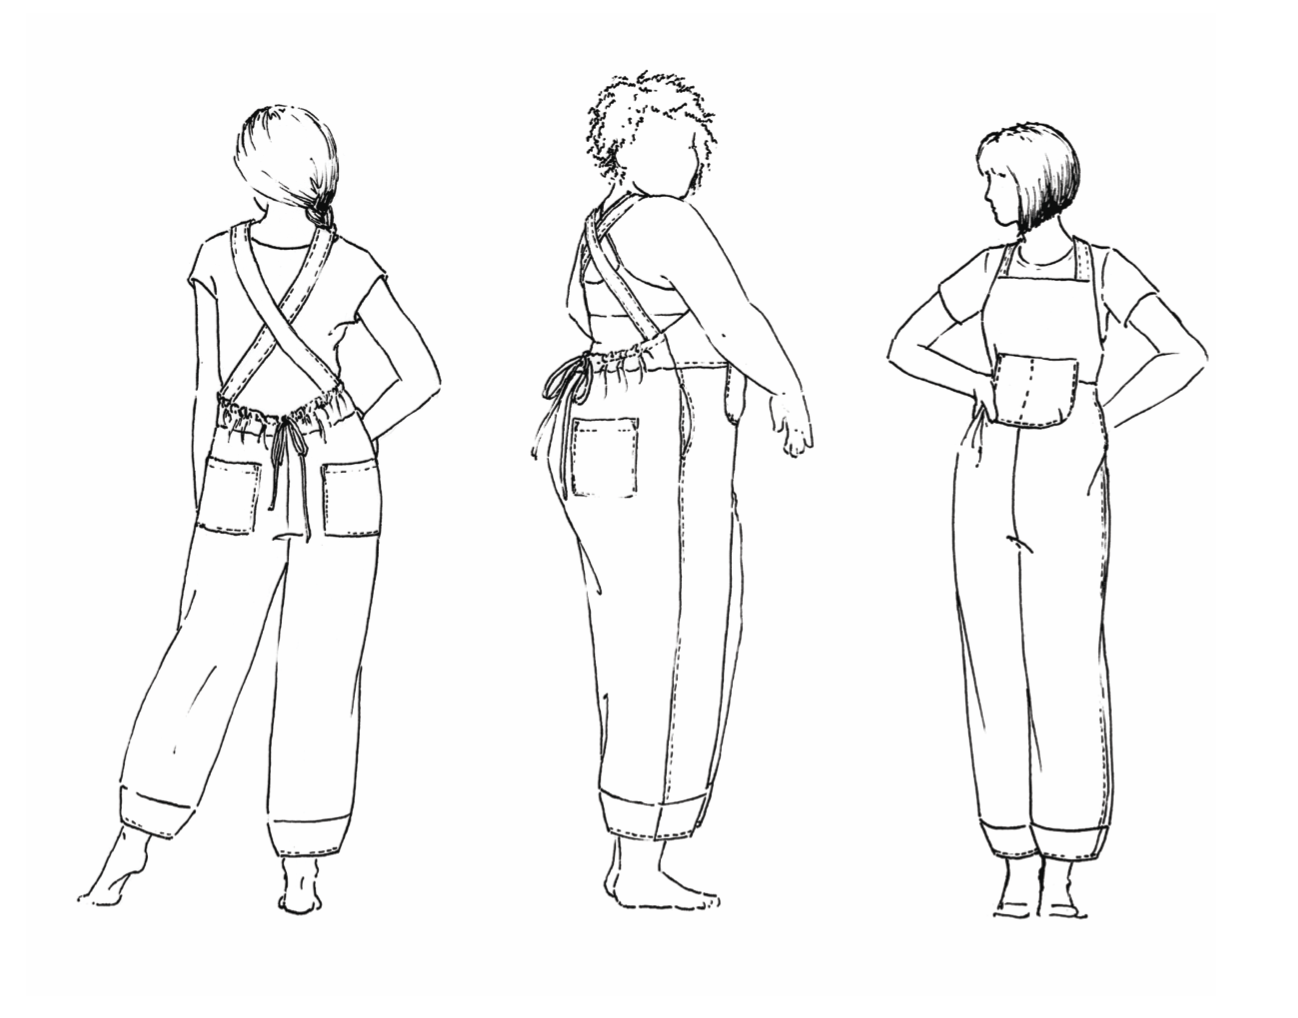
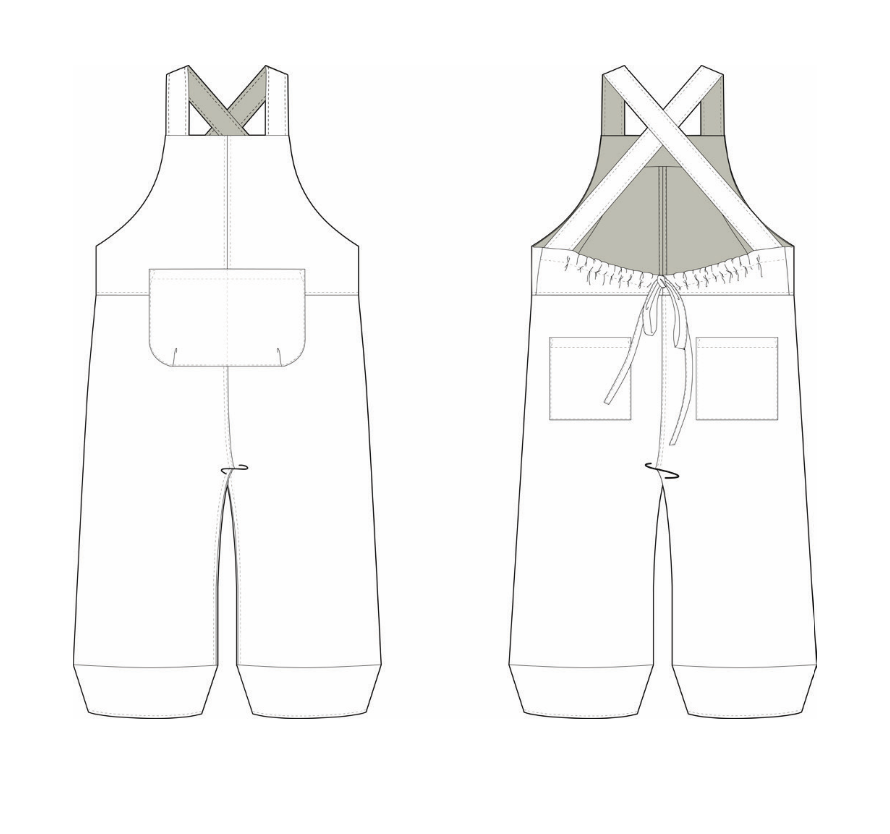
Buy the Otis Overalls sewing pattern from Sew Liberated. A playful twist on overalls, Otis brings a bit of whimsy to the everyday. Featuring a statement lantern cuff and an easy wearing gathered back, the Otis Overalls have a modern utility vibe.

Otis’ bold silhouette is formed with shaped seams on the lower leg and an ankle-length hem. The fit is relaxed, with a dropped crotch, roomy and plentiful pockets, and a drawstring back waist closure for pull-on comfort and ease.

Versatile and appropriate to any season, the Otis Overalls will become a key part of your sustainable wardrobe. Perfect for gardening, afternoons out, running errands, and anything else you might get up to, they pair well with the Stasia Tee, a bodysuit, or a cropped boxy tee like the Strata Top.

This sewing pattern is available to buy in the following formats:

– PDF (available to download immediately after purchase). What is a PDF?

– PDF pattern + Printed A0 copy shop (We print out the A0 pattern sheets, but you’ll need to download the digital instructions, as we don’t print these. The PDF files will be emailed immediately after purchase, and the A0 pattern sheets will be dispatched next working day). Choose sizes 0 - 24 or sizes 22 - 34. What is Copy Shop?

Suggested fabrics: The Otis Overalls are designed for mid-weight woven fabrics, such as linen (4-6 oz/160-200 gsm), gabardine, lightweight twill or denim, or light canvas. Softer bottom-weight options like Essex linen, silk noil, Mora slub linen, and Brussels washer linen will create a softer leg line and a warm weather feel. You want enough body and stability to support the shape of the pant leg, and enough durability for the waist tie.

You may choose to use a different, lighter weight fabric for your facings and side pockets. If your main fabric is quite sturdy, using a lighter fabric like chambray or cotton shirting will allow the waist tie to gather more easily. Be careful to choose a fabric that matches or coordinates, since it will be visible along the gathered edge and on the bib facing when you move and bend.

Fabric requirements: 45″ (1.2 m) wide fabric: 3.75 - 4 yd (3.4 - 3.7 m) // 54″ (1.4 m) wide fabric: 3 - 3.3 yd (2.75 - 3 m).

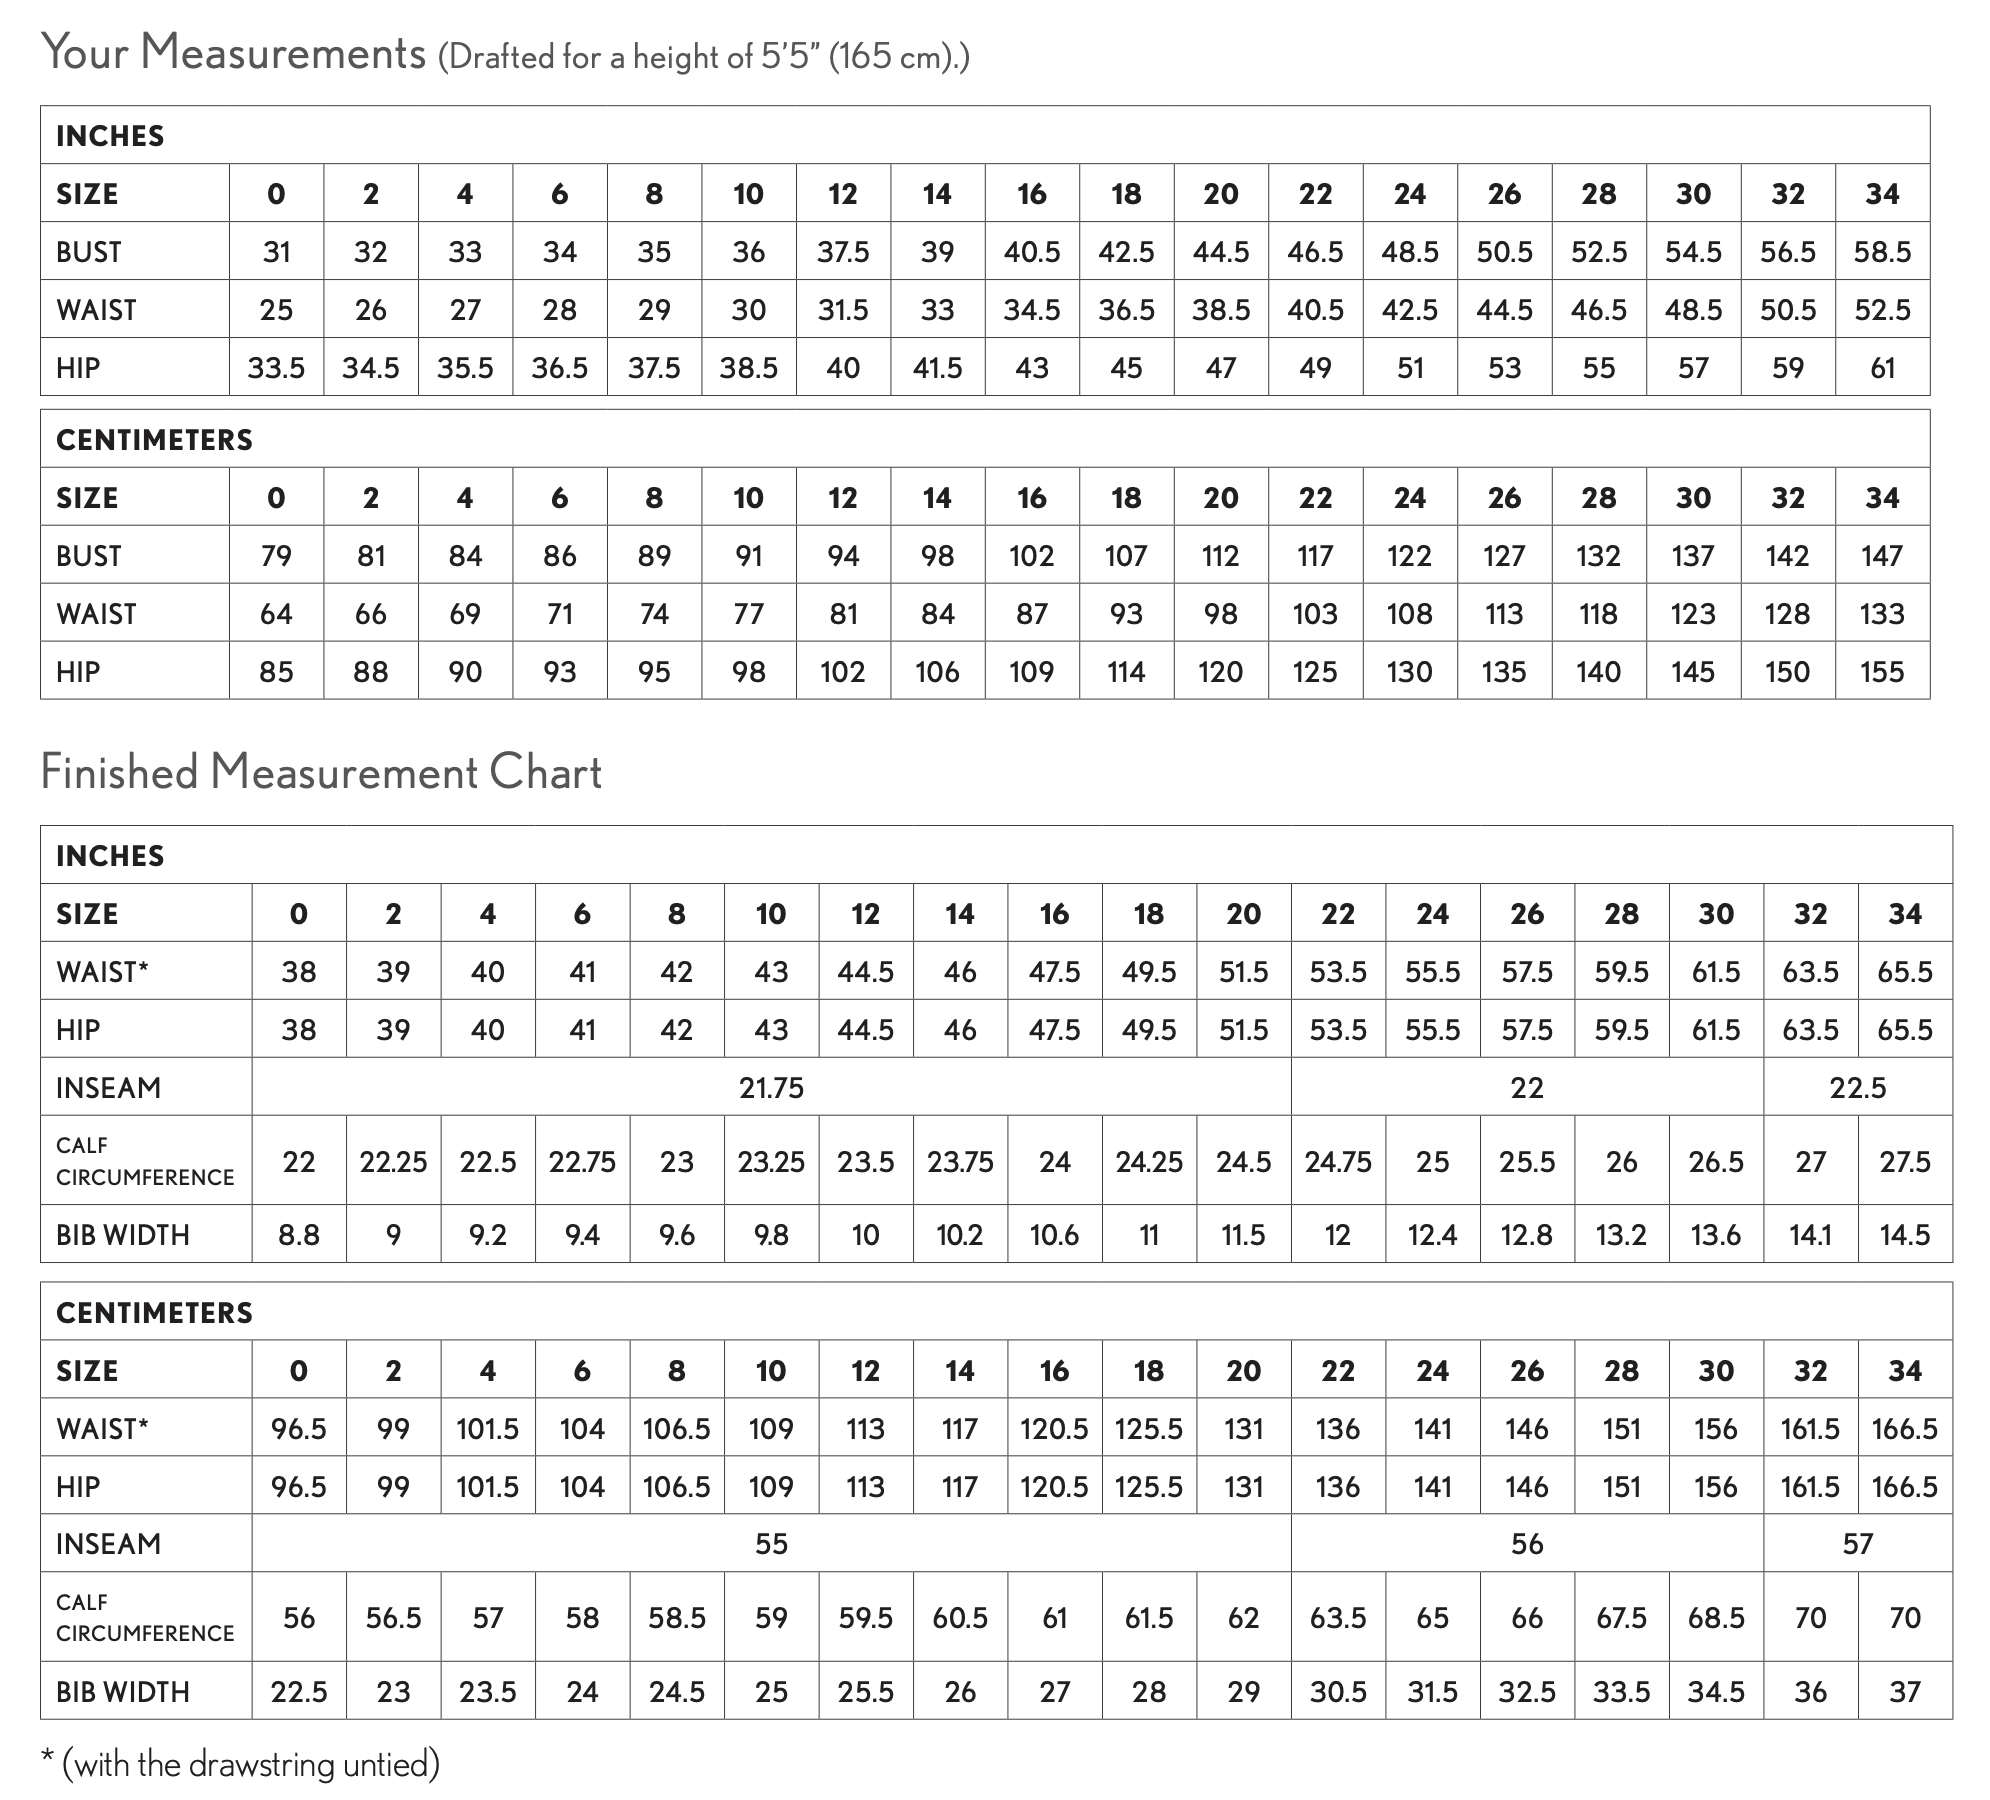
Sizing: US 0 – 34 (approx. UK 6/8 – 32/34, based on our standardised size chart). Please also check the designer’s size chart and finished garment measurements.

This pattern is drafted for a height of 5'5" (165 cm). The waist seam sits at the high hip, and the hem falls just above the ankle bone.

Since the waist is shaped with a drawstring, you can use your hip measurement as the deciding factor if your waist and hip fall into different sizes.

Notions: Wonder Tape, 1/4" (6 mm) wide; lightweight fusible interfacing.

PDF pattern includes: Step-by-step instructions; US letter/A4 print-at-home pattern (35 pages for sizes 0-24, 42 pages for sizes 22-34); A0 copy shop pattern (2 sheets for sizes 0-24, 2 sheets for sizes 22-34) // Layers: Yes // Projector file: No.

If you’re looking for more maker inspiration, check out the latest sewing pattern reviews from the sewing community. We also have a sewing blog to keep you up to date with all the news from the world of sewing.

Share

If you’re looking for maker inspiration check out our blog. With weekly updates on new patterns, styling ideas and maker inspiration, it's not to be missed.

Customer Reviews

Based on 2 reviews
0%
(0)
0%
(0)
100%
(2)
0%
(0)
0%
(0)
M
Milie Holliday
Measure carefully!

Otis overalls by Sew Liberated
This was my second attempt at this make. The pattern has apparently been popular and the garment also available ready to wear in the United States. More prior preparation and research would have told me that the rise is very low indeed and adjustment may need to be made to the straps and to the length of the bib. I didn’t help myself by using a thick Mexican cotton weave which had no clear right and wrong side and also frayed a lot. The back ties did not run freely in their casing. The rise was so low that I was hobbled and ended up taking up the straps a lot. The ankle “cuffs”, described as “dramatic lantern hems” said “clown trousers” to me, although I have made and love the Arthur pants. That item is on my naughty step and may end up as something else.
The instructions suggested that I might not be the only person to have had issues with this pattern. Sometimes they “SHOUT” in capital letters or resort to bold lettering or italics. There is a two page addendum about adding buttons and holes when you find you can’t get the straps over your head. The depictions of crosses e.g. on pages 9 and 10 puzzled me because I thought they must imply some kind of checklist but they seemed to be just for decoration.
Sew Liberated has an online video but it consists only of the pattern instructions re-read at speed with some crucial moments in the make fast forwarded.
For the second make I used a lighter needlecord. I decided to omit the leg cuffs. The pattern is sized for a height of 5ft 5. I am 5.8 but, even so, I shortened the bib by 4cm and the rise by 10 cm then added 25cm to the leg to compensate for the missing cuff. I’d strongly advise a toile before cutting into expensive fabric.
I didn’t see any reason to cut the front bib in two pieces. In my size, on 150mm fabric, it sat on the fold alongside the front trouser pieces. (I omitted its centre seam allowance). Cutting it this way would make it possible to pattern match the front pouch although I didn’t do that with my busy fabric.
I liked the method for the in seam pockets. “Trust the steps, refer to the diagrams ….” say the instructions. It worked. You need to measure and mark seam allowances very accurately. Overall, there are six pockets which is great.
This pattern has 5/8th inch seam allowances and makes liberal use of flat felling. That’s a great seam and from looking at online videos I realise that there are numerous ways of managing it apart from what is described here which is the way my Mum taught me. She always top stitched her fold on the right side of the fabric. That isn’t always what is suggested here. In attaching the bib, I got a neat finish by sewing on the facing first, right side to the wrong side of the trousers, joining the bib wrong side to right side of facing, trimming the thickness from under that then making the fold for the flat fell downwards and top stitching on the outside of the garment.
I have a great pair of sailing salopettes. I can stick my bum out the back without taking them off to you know what. This almost works like that but not quite. I’m still not sure about this pattern because of the encased strings. It’s hard to pull them tight without feeling around to see which way they go and hard getting out of them and the straps. That might just need getting used to. Should I make more, I will lengthen the straps to add buttons. I would also consider making the back fastening more like the Greta dungarees (Made my Wardrobe) or the Burnside Bibs (Sew House Seven). Neither of those has buttoned straps either, but the Greta has a much more helpful video.