Forget-me-not Patterns

Forget-me-not Patterns Adeline Dress & Top

Regular price £12.00 GBP
Sale price £12.00 GBP Regular price £12.00
Copyshop

We print out the A0 pattern sheets, but you’ll need to download the digital instructions, as we don’t print these. The PDF files will be emailed immediately after purchase, and the printed A0 pattern sheets will be dispatched next working day.

(What is Copyshop?)
Tax included.
Earn 1 Point on this purchase. Learn more

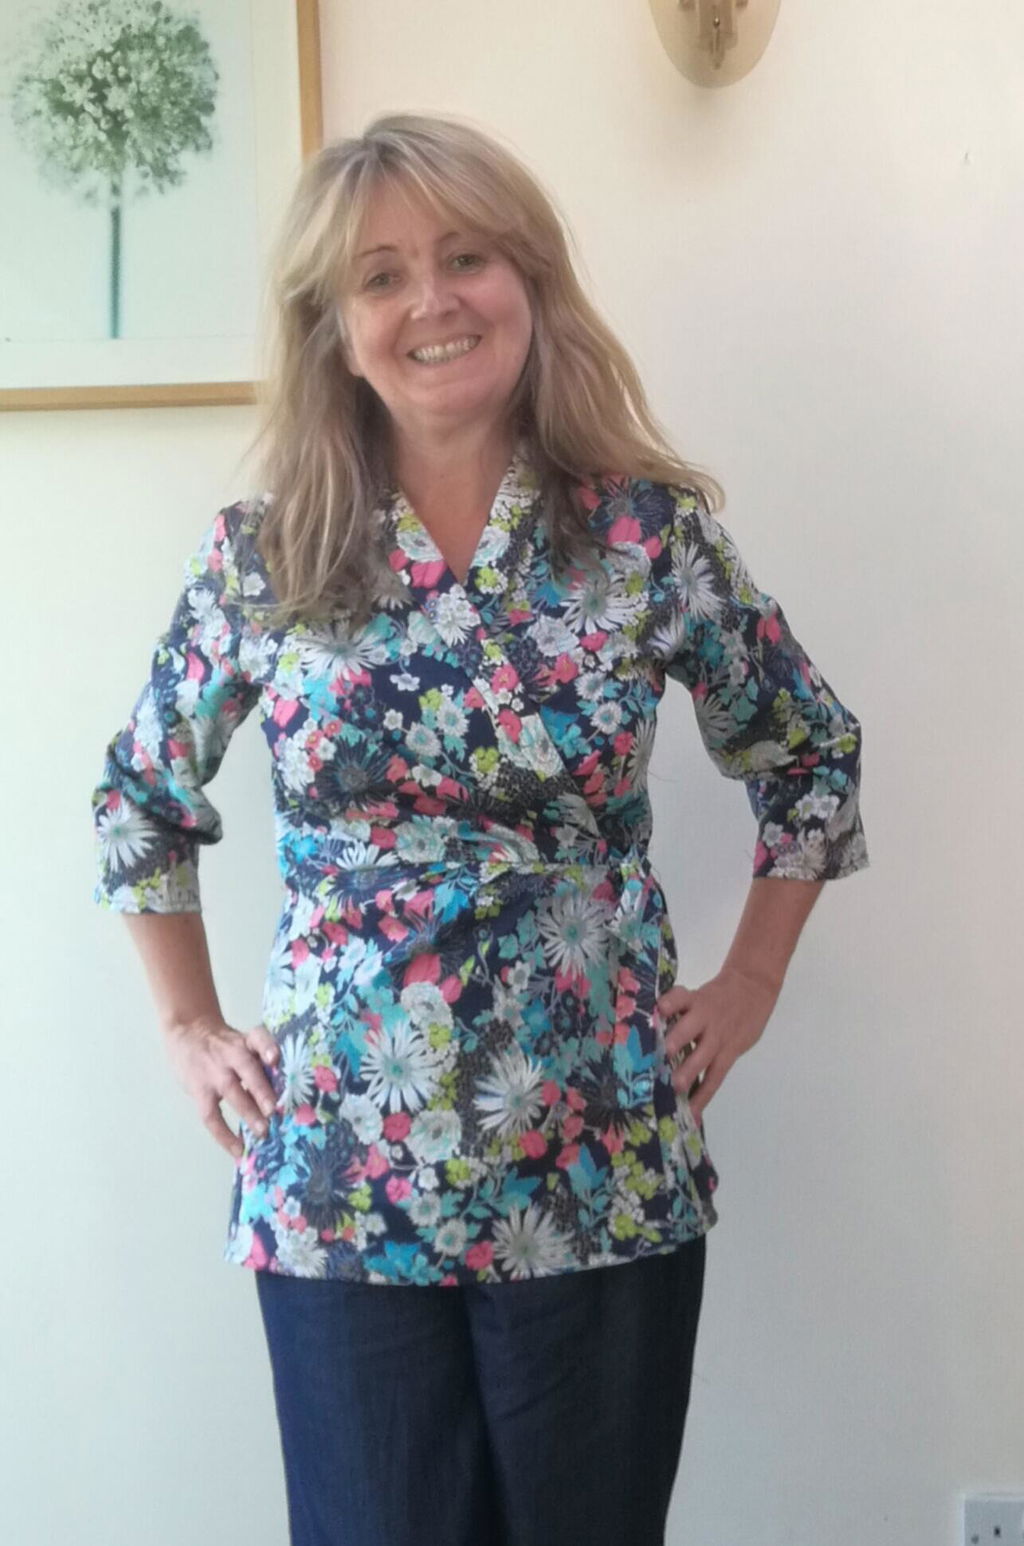
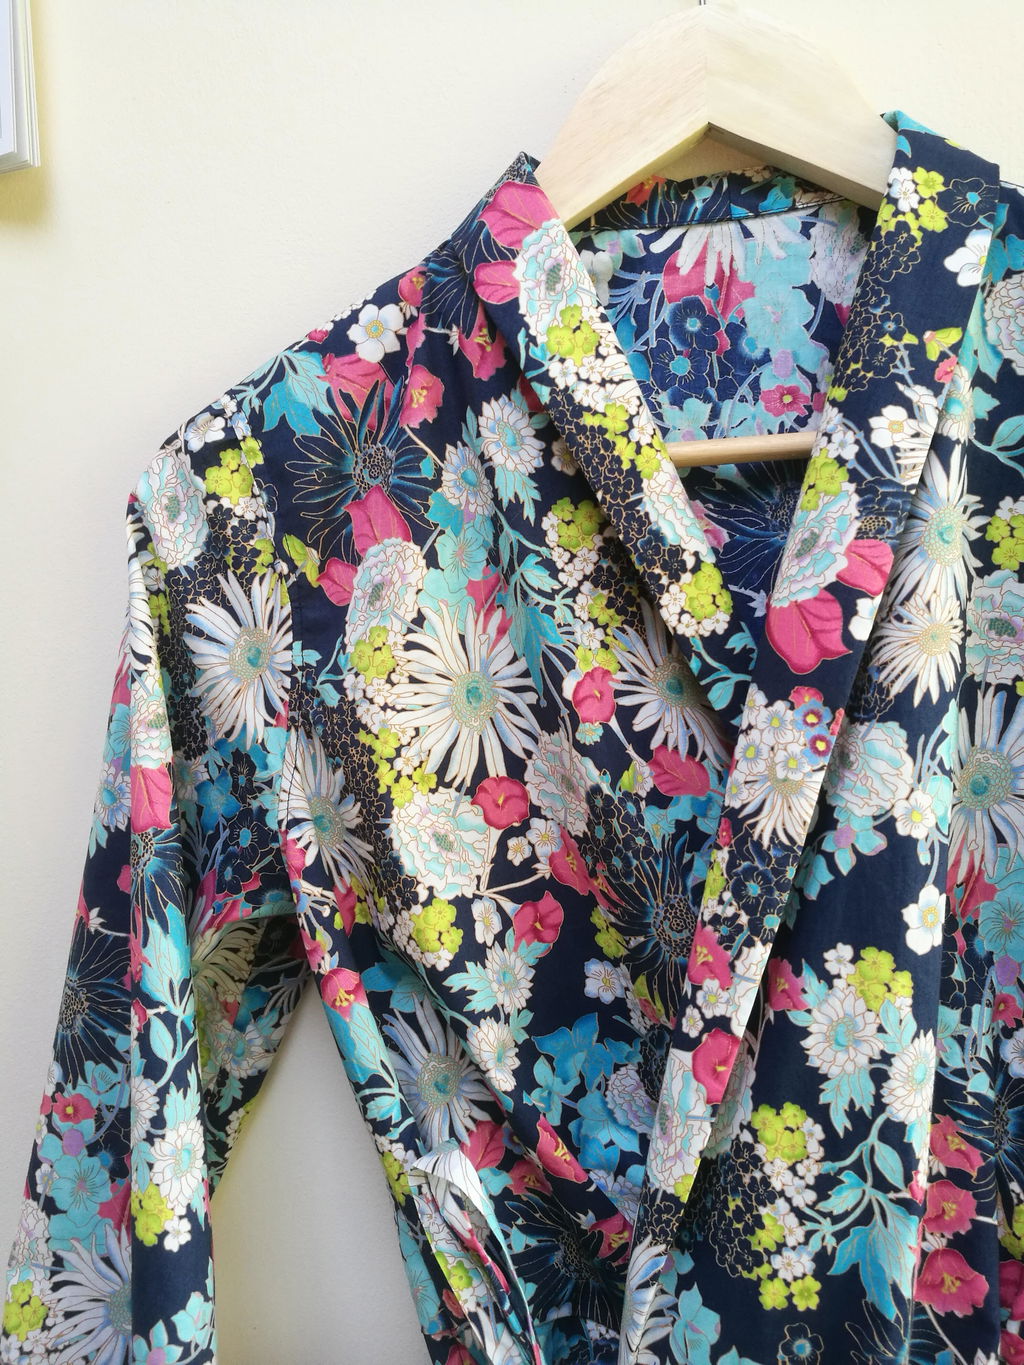
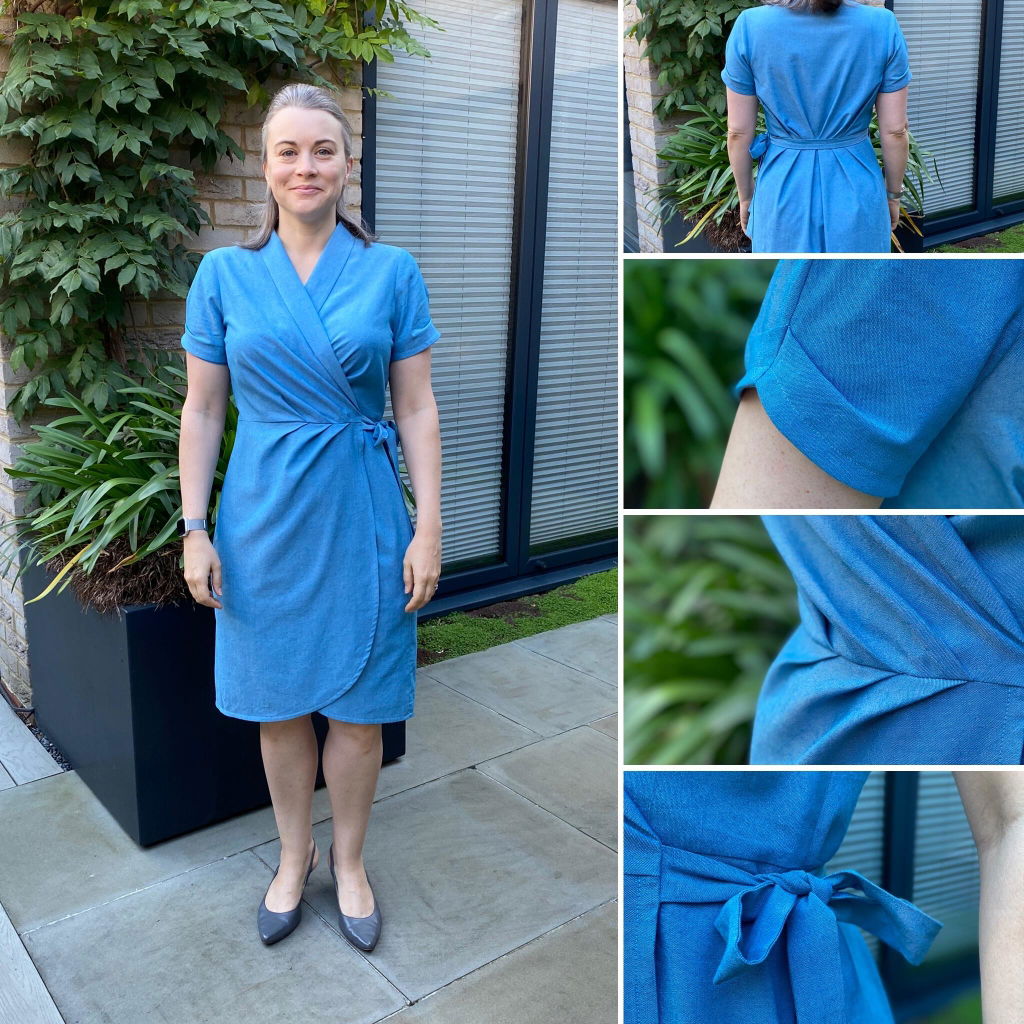
Buy the Adeline Wrap Dress and Top sewing pattern from Forget-me-not Patterns. Adeline is a wrap dress and top pattern designed for woven fabrics. Featuring dramatic diagonal pleats in the front and back, this is a wrap dress with a twist. Choose your level of detail, with either a shawl collar or a plain neckline. The sleeves come in short and 3/4 length, and can be plain or pleated. Make the knee-length dress (which includes the option of in-seam pockets), or go for the top view with a peplum. The tie closure makes it easy to wear and easy to sew - no buttons or zips! The detailed instructions will walk you through every step to a beautiful finish.

Bonus: The Adeline pattern now includes a sleeveless bodice option as well!

This sewing pattern is available to buy in the following formats:

– PDF (available to download immediately after purchase). What is a PDF?

– PDF pattern + Printed A0 copy shop (We print out the A0 pattern sheets, but you'll need to download the digital instructions, as we don't print these. The PDF files will be emailed immediately after purchase, and the A0 pattern sheets will be dispatched next working day). What is Copy Shop?

Suggested fabrics: Adeline is designed for light to medium weight non-stretch wovens with good drape. Cotton, viscose/rayon, silk, wool, and linen are all ideal. Your fabric choice will make all the difference. Go for an understated look with chambray or linen, or bring out the elegance with a flowing rayon or silk.

Fabric requirements: Below are the maximum requirements for the length of fabric needed. These are calculated using the longest sleeve and the shawl collar view. Allow extra fabric if lengthening the skirt.

Top: 114 cm (44") wide fabric: Sizes 28 - 40, 1.9 m (2.1 yd) / Sizes 42 - 48, 2.2 m (2.4 yd) // 140 cm (55") wide fabric: Sizes 28 - 40, 1.5 m (1.7 yd) / Sizes 42 - 48, 2 m (2.2 yd).

Dress: 114 cm (44") wide fabric: Sizes 28 - 40, 2.7 m (3 yd) / Sizes 42 - 48, 3.1 m (3.4 yd) // 140 cm (55") wide fabric: Sizes 28 - 40, 2.4 m (2.7 yd) / Sizes 42 - 48, 2.8 m (3.1 yd).

Sizing: 28 – 48 (approx. UK 4 – 24). Please check the size chart and finished garment measurements.

Notions: Thread; 1.3 cm (1/2") wide bias tape, 3.3 m (3.6 yd) for Top or 4.5 m (4.9 yd) for Dress (note you will need 1.3 m/1.4 yd less bias tape if you are making the shawl collar view); lightweight fusible interfacing, 0.7 m (0.8 yd) for shawl collar and pleated sleeve views or a small amount for the plain neckline view (note you may use pre-made fusible tape for the plain neckline, or cut your own 1 cm/3/8" wide) // Sleeveless bodice: Allow an extra 1.2 m (1.3 yd) of bias tape to finish the armscye edges.

PDF pattern includes: Instructions; A4/US letter print-at-home pattern (41 pages + 11 pages for bonus sleeveless bodice); A0 copy shop pattern (2 sheets + 1 sheet for bonus sleeveless bodice). The PDF files are layered so you can print just the size(s) you need.

If you’re looking for more maker inspiration, check out the latest sewing pattern reviews from the sewing community. We also have a sewing blog to keep you up to date with all the news from the world of sewing.

Share

If you’re looking for maker inspiration check out our blog. With weekly updates on new patterns, styling ideas and maker inspiration, it's not to be missed.

Customer Reviews

Based on 4 reviews
25%
(1)
0%
(0)
50%
(2)
25%
(1)
0%
(0)
S
Sandra Reynolds
Adeline wrap dress disaster

I was not happy with this pattern.  I think that a 1/4 inch seam on those tricky tucks/darts was not nearly enough and I ran into trouble with pining them in place then tacking them.  Sadly I had chosen a silk fabric which frayed like mad.


You  do not sew these tucks until you attach the skirt to the bodice.  This seam is then enclosed in bias leaving a tiny amount of the tuck exposed and unfinished ready to fray to it hearts content the first time you wash it.

My advice is to skip using this pattern or select a non ravelling fabric such as jersey.  More generous and consistent seam allowances would have helped too.

p
pam_parsnip
Mixed Feelings

This is an honest review. We invest money, fabric, time and energy in sewing and its important to have as much information as possible.

This pattern makes up into a nice wearable top.

The making of it was not quite as enjoyable as it might have been, loss of stars, but are things to bear in mind rather than total deal-breakers.

I chose it because I wanted a wrap top with a shawl collar and set in sleeves. They are quite difficult to find, so if this is your style, then definitely go for it!

My version is adjusted length, between the top and the dress. (Something the Forgetmeknot patterns blog says not to do!!)

Firstly the bit which is useful to know for any wrap garment.

- the ties attach to each front edge. The long tie is on the underneath section, passes through a slit in the side seam to the outside, covers the back waist seam and ties at the far side. The short tie ties directly to the long one.

- its up to you which side you choose.

- the underflap does not extend to the side seam, its about 75% coverage depending on how tightly you tie it, and the pattern suggests that if you want less leg-flashing, to extend this pattern piece by 10-15cm. This is not included in the pattern piece, you are on your own if you want to do this.

Sizing and Fitting:

I chose a larger size to give the option of wearing a layer underneath. I think its quite a small draft – the shoulders fit me and I think my shoulders are quite narrow. The armscye is also on the high side – it doesnt cut in but is not as roomy as Id like for my extra layer. If I make this again, I will change that.

I measured my centre back neck to waist, and compared with the pattern. I have 4cm of ease. I considered shortening the back piece but left as is and glad I did.

Pattern PDF:

Normally no problem with sticking A4 together but this was a difficulty as the pattern is set to print in the margins.. You might not find this an issue if you can set your printer, or go for the A0 copyshop.

The ‘check the scale’ box is on Page 4 – not page 1, you have to go searching for it.

Seam allowance:

Varies between 1cm and 1.5cm. The pattern says main construction seams are 1.5, everything else is 1cm, for purpose of not wasting fabric. Really? Because I can make another garment out of those little differences? No its just annoying. The pattern layout is generous; you’re not squeezing pieces together.

Waist pleats:

The pleats all round the waist seam front and back control the fullness. There are no bust darts.

I very carefully matched up the notches but did not manage to get the perfectly aligned pleats that I would have liked. I decided to be happy with it as is because my fabric is so busy, plus the back tie covers the joins. The pattern advises : Do not press the pleats, they are designed to fall softly. I disagree, because pressing them well during the making stage, and using lots of vertical pins, or even basting them, puts the pleats exactly where you need before sewing. Also helps avoid catching the underside pleats in the machine as you sew and distorting them. You can ‘unpress them’ when you’ve finished. Alternatively, Instagram is full of pictures where the pleats have been topstitched, a really nice effect.

Seams:

Pattern says either overlock or zig zag all seam edges. Not keen on that, so french seams for side seams, incorporating the tie opening slit, and flat fell for sleeve head. Was able to do that with the 1cm seam allowance. Im thinking of binding the waist seam (Hong Kong finish), just to hide those extra raw edges.

Shawl collar:

This was nice and straightforward. Lots of wrap dresses have a diagonal front with a bias bound edge which is easy to stretch out of shape. This has a facing. It is attached at shoulders and waist and otherwise flaps free. You understitch and its easy to get a nice finish.

Sleeves:

I chose to do the plain ¾ sleeves. There are options to do pleat details. Im thinking of adding a cuff/closed sleeve band as the length is a bit awkward, just below the elbow. When you put on a jacket the sleeves go with it and bunch up. Not good.

Hem:

The pattern has a curved, bias bound hem which I left off completely and did a simple square finish.

If I was making it again as a dress, I would find a better way of controlling those angled pleats. But Im not sure I want to make this again. (This is unusual for me, I normally make and remake, tweak the fit and get maximum value).

Thank you for reading. More pics on Instagram. Happy Sewing!!

S
Sarah Boddey
Adeline Dress

I’m a sucker for pleats so when I saw this Adeline Dress pattern from Forget-me-not had 26 of them in total I was sold! ?
They give the most beautiful, soft, flattering and striking lines to the dress and somehow manage to make it both smart and casual all at once! It’s a fairly time-consuming make, took me 7.5hrs in total, but the instructions and illustrations are superb - the only very small addition I made was to understitch the pocket bags. I cut a size 36 and opted for the shawl collar and short, pleated sleeves. There’s options for longer and/or unpleated sleeves and for a collarless neckline. Oh and btw, it has pockets! ???

The fabric is just perfect for this make, it’s an Art Gallery Fabrics yarn-dyed 4.5oz chambray from Fabricate Mirfield called ‘Endless Paradise’ which describes the shade of blue to a tee! ??? I used 2.3m in total.

I have the dress on today for work (from home) and I’ve already had lots of lovely comments on my zoom calls ? I think I’ll give the top version a try at some point in a bamboo knit as it would totally be secret (but smart) pyjamas!

B: 37” W: 30” H: 40”  5ft 3”