Super Sienna!
A review of Closet Core Patterns Sienna Maker Jacket
Reviewed by MingMakes on 1st May, 2023
I really like this jacket and have a bumper blog post here with many more photos and details. Below is the ‘short’ version!
I sewed this on a course with Lynda Maynard which was brilliant, like a detailed sewalong with lots of hints and tips for a professional result. There is a sewalong on the Closet Core website.
Sizing
My measurements matched size 4 most closely, but this ended up being too tight around the bust. I attribute this to a larger upper bust measurement than full bust, and so I re-cut a size 6 to allow for more ease. It was pretty roomy around my back and knowing it was to be a loose-fitting jacket, I didn’t do any further adjustments to this but it’s something I might consider if making it again.
I lengthened it by 4cm and omitted the inside breast pocket.
Fabric
12oz (410gsm) organic cotton sanded twill in ecru from Merchant & Mills. It has a lovely brushed finish and is a good weight for this jacket.
I used Vilene H410 fusible interfacing for convenience having never used sew-in interfacing before (Lynda’s much preferred method), mostly to keep it simple for my first jacket, but her videos go through all the steps for pad stitching so I may consider this for a future version. I cut the interfacing down to remove the seam allowances to reduce bulk.
Fitting adjustments
I put together a separate post on all my fitting adjustments here.
I had front neckline gaping on my toile with an excess of 1.5cm, which I managed to remove quite nicely using this technique from Alexandra Morgan where you essentially distribute the excess into the surrounding seams – the shoulder, centre back/front and armhole. What I managed to forget until I finished the jacket was to adjust the collar pieces to match the reduced neckline. It seemed to look OK, but I did have an issue with the collar standing away from the back of my neck on my toile. I don’t know whether this had anything to do with it.
I got round this issue by trying to compensate for a lack of a rounded back adjustment by using a smaller seam allowance on the back piece at the neck. The thicker fabric of the finished jacket versus the calico also made it look a lot better. I fiddled with the roll line here for the best result and put a few small stitches under the collar to secure it in this position.
During construction of the jacket, I decided to rotate the sleeve by 1.5cm to ease some of the wrinkling at the front of the upper sleeve, which meant the top of the sleeve head now sat more towards the back. The pieces were already cut out by this stage so I just flattened the curve on the sleeve head that now sat against the back armhole and this seemed to do enough. It did mean the underarm seam of the sleeve sat more forwards but it looked OK to me.
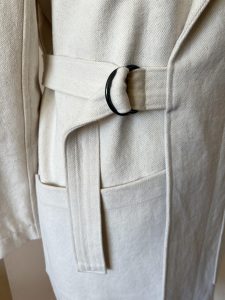
Belt
Lynda recommended doing channel-stitching on the belt and loop. This helped reinforce it but also made it look really lovely.
The belt and D-rings are a lovely feature but it’s a little awkward if wearing the jacket undone. You either have to roll the belt up into the pocket or tie it round the back leaving the front flapping open slightly. I have also seen others put belt loops on the inside to thread it through there, or make it a normal tie belt.
Seam finishes
I did flat felled seams on the shoulder, and Hong Kong binding everywhere else. It was my first time doing this and I was amazed with how beautiful it looked on the inside, especially with leftover Liberty lawn. It was a bit tricky doing this inside the sleeves but it was manageable with allowing the end of the sleeve to bunch up and sewing towards the middle from either end.
Topstitching
I enjoyed all the topstitching, going on the slowest speed setting and using a walking foot. I was nervous of the topstitching looking wonky in places so either drew the line to follow with a water-dissolvable marker (Prym aqua trick marker), or used a makeshift seam guide (rectangular plastic cap secured with washi tape). This was preferable to following the edge of the facings which weren’t necessarily as straight.
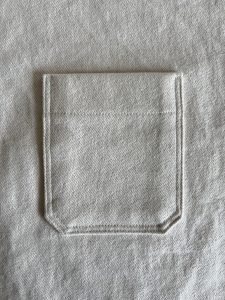
Pockets
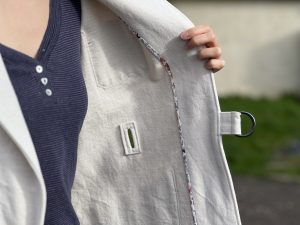
Lynda went through various pocket choices and how to line them, and I loved this extra luxury touch. With these being my first patch pockets, I hadn’t appreciated how much it takes to get them symmetrical! I didn’t quite manage it, but it’s not noticeable. I omitted the inside breast pocket partly because I didn’t want additional bulk here, but also because the stitching would be visible on the outside and the chances of me getting it beautifully straight and square were slim. I wrote a separate blog post about how I lined the pockets here.
Collar
I found the notched collar tricky because it relies on absolute precision in cutting, marking and sewing. I ended up with a small tuck on one side so unpicked and handstitched this for more control.
I’m not sure it was in the instructions, but I handstitched the facing/upper collar seam to the back/under collar so they would remain together when using the hanging loop.
I fiddled with the roll line at the back of the collar for the best look once I’d finished, although this should have been determined earlier in the process as it can be encouraged to remain there using the interfacing. I then put a few stitches under the collar to secure it there.
Summary
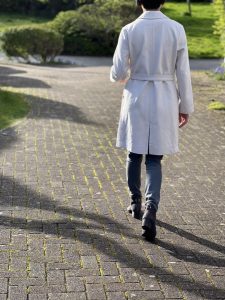
There isn’t room for many jackets in my wardrobe but this goes well with a lot of my stuff so was definitely worth making. I love the longer length and it looks great with jeans. It’s perfect for the betweeny seasons, and I know I’ll get a lot of wear out of it because summers don’t get that hot here in the UK. I love the casual but not too casual look of this jacket, and I can see it being quite a wardrobe staple. The course with Lynda Maynard was a huge help for me, particularly with this being my first jacket. It set me up for success with so many hints and tips that will carry me through future projects.
Full review with lots more photos on my blog.