
This pattern has five eighth inch seams so it was easy to French seam the top part. I had to cut the ruffle in three parts and allow for that when buying as I was using 110cm fabric. I clipped the pocket seam corners on the second pass which I need not have done. It's also necessary to pay attention to the way the finished seams are lying when they cross over others.
If making again, I would top stitch the pocket tops before attaching them to the skirt front and back as they have a tendency not to lie flat.
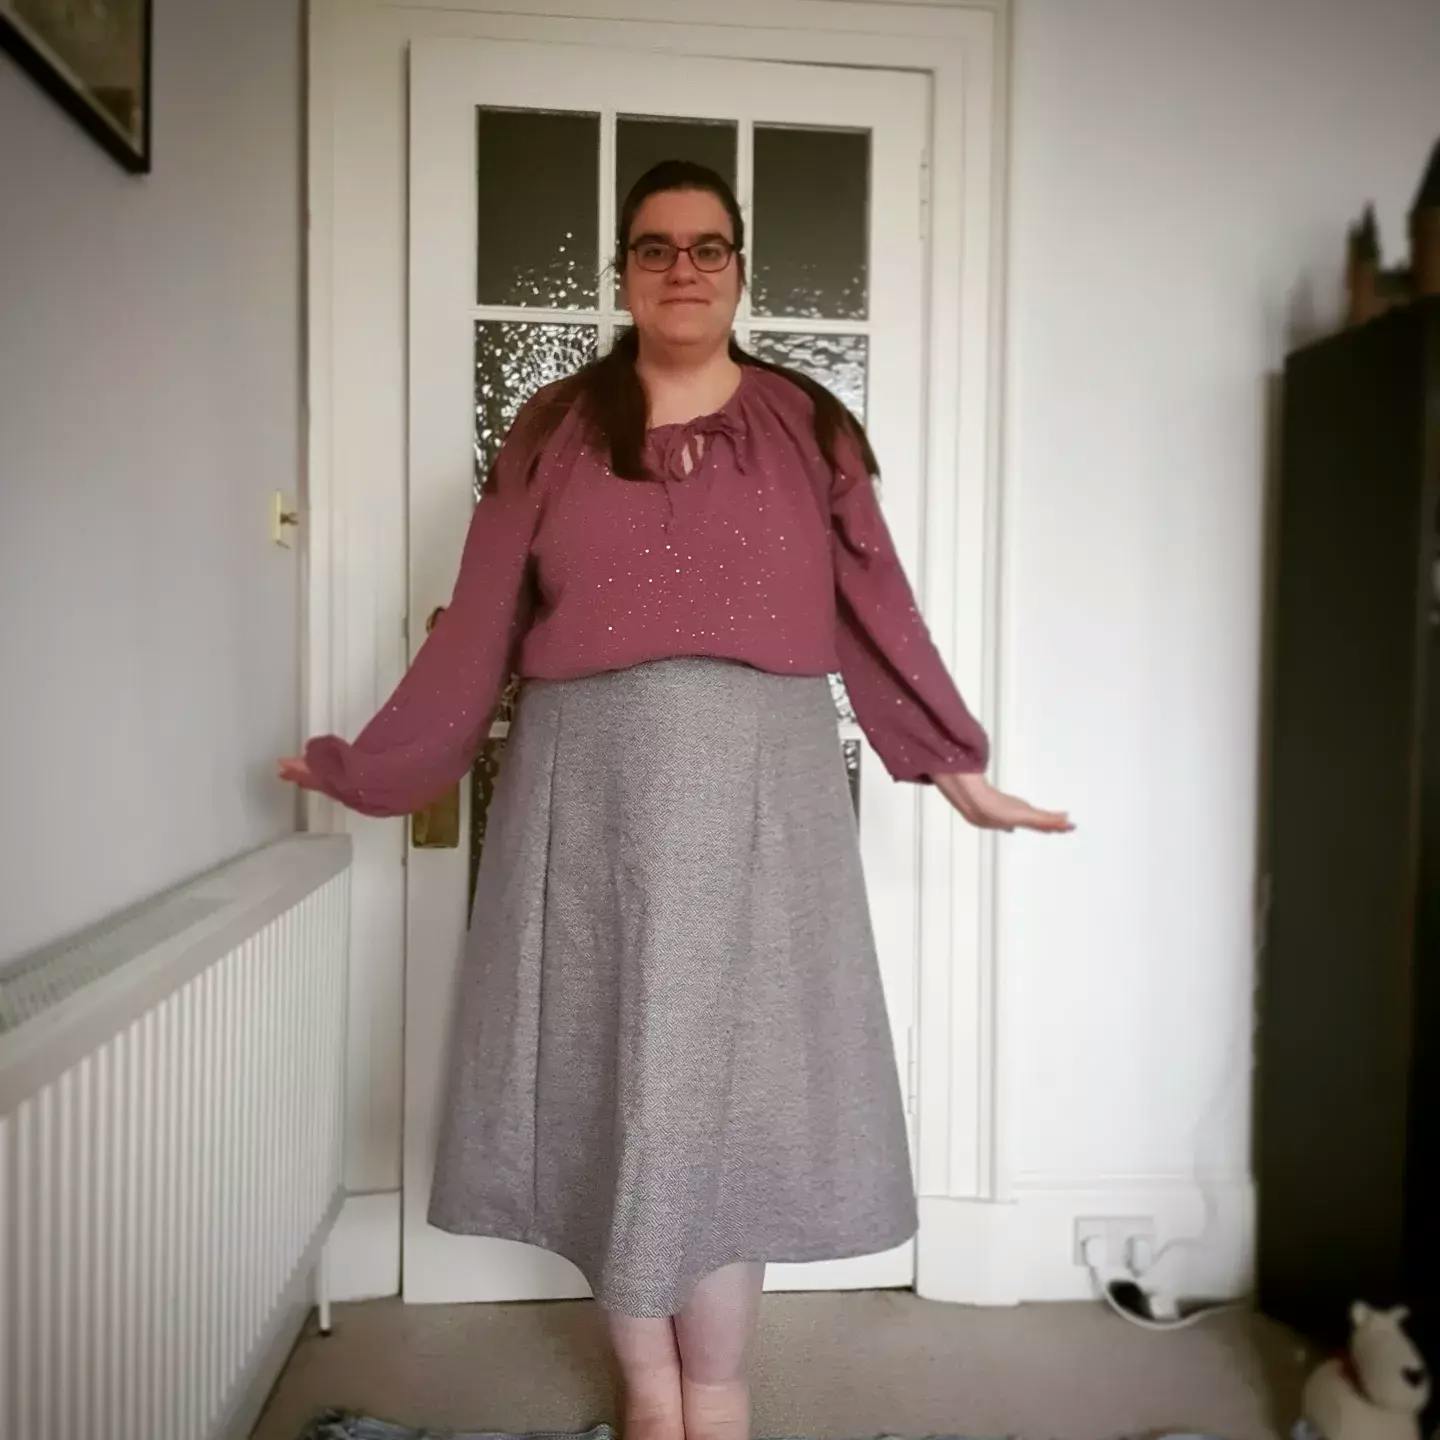
It's a great pattern and I wore it to a summer evening concert. Now I want to make a matching top.


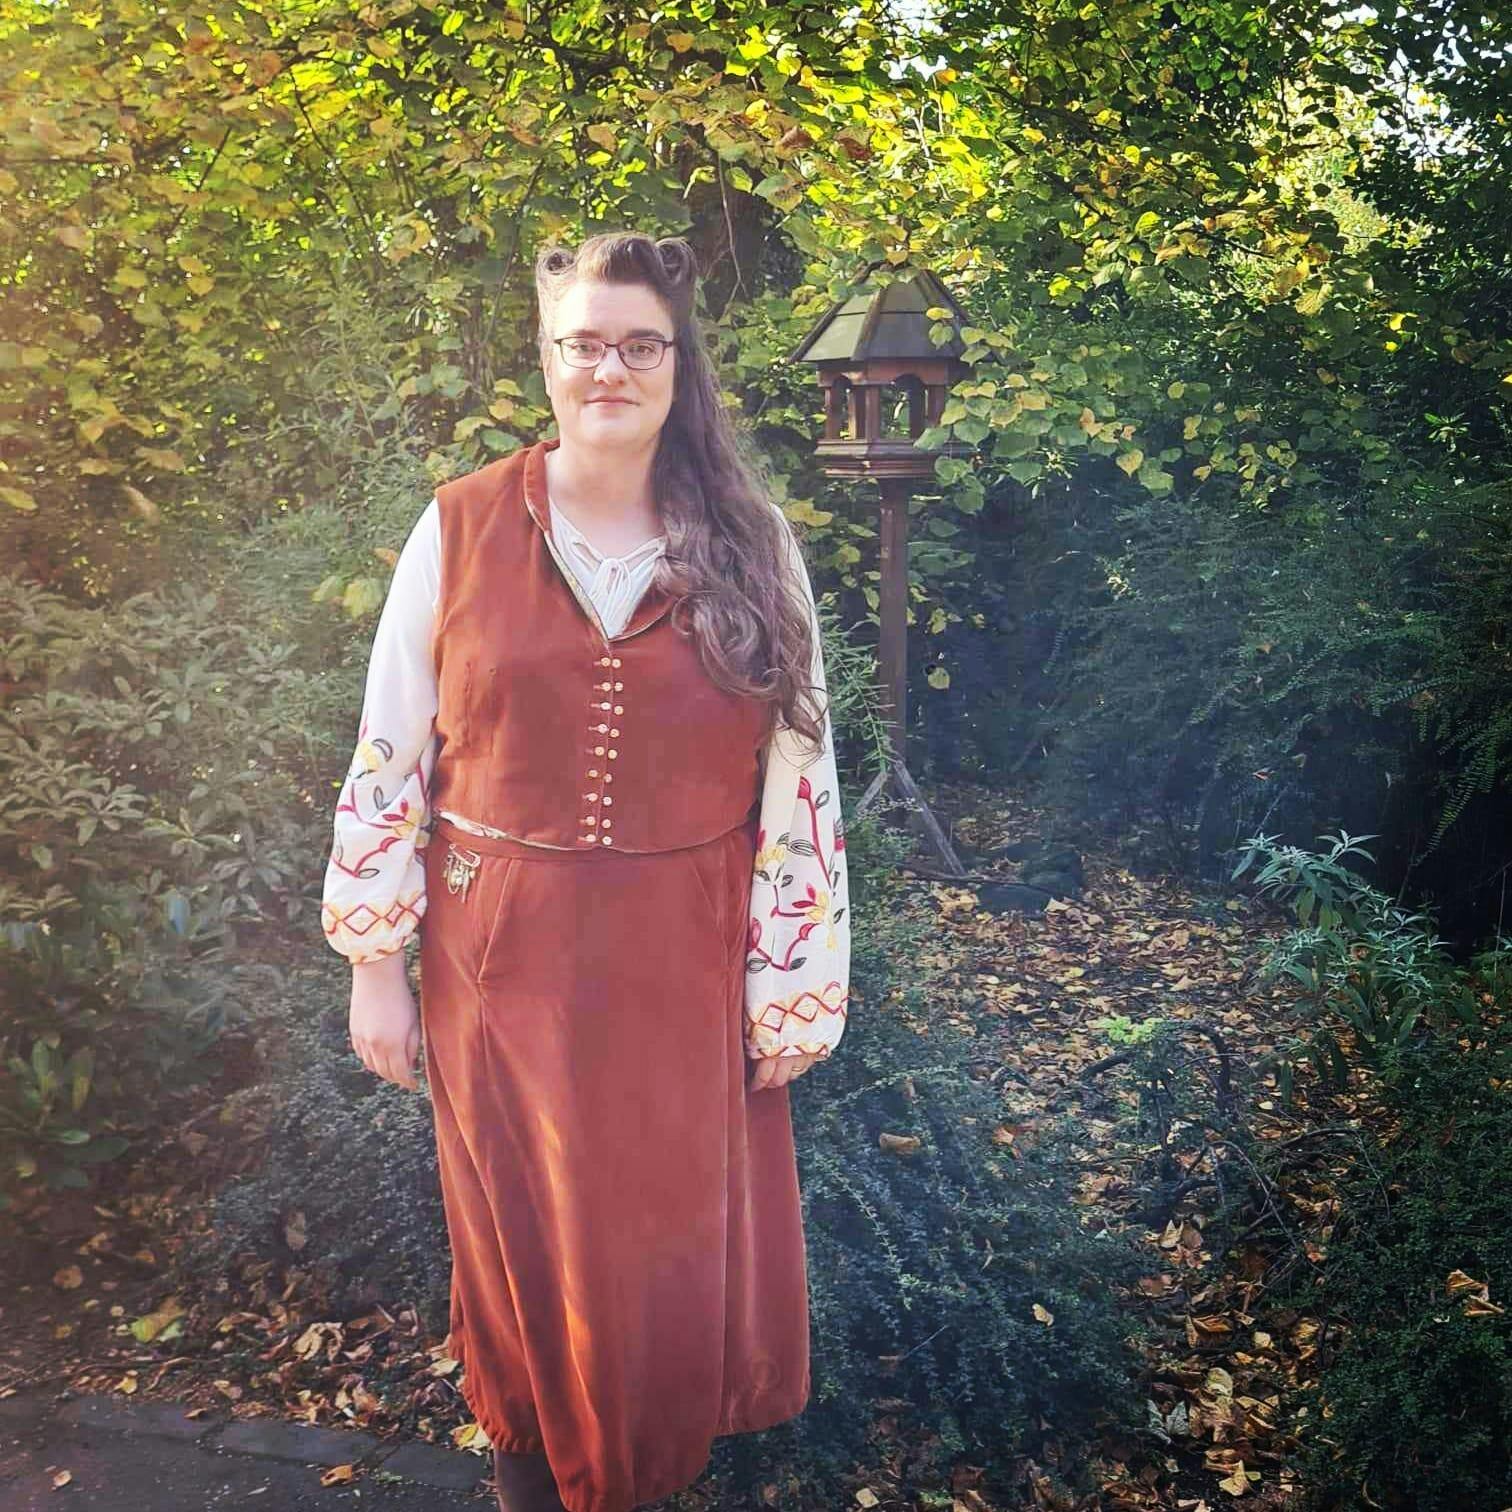
I wanted a skirt that was historic (or at least historically inspired) that I could still wear every day.
Great pattern, great instructions & a great make. I don't think I had to make any changes.
I was a little worried about the fly opening but the way it's constructed, it comes together super well and there's no gaping.
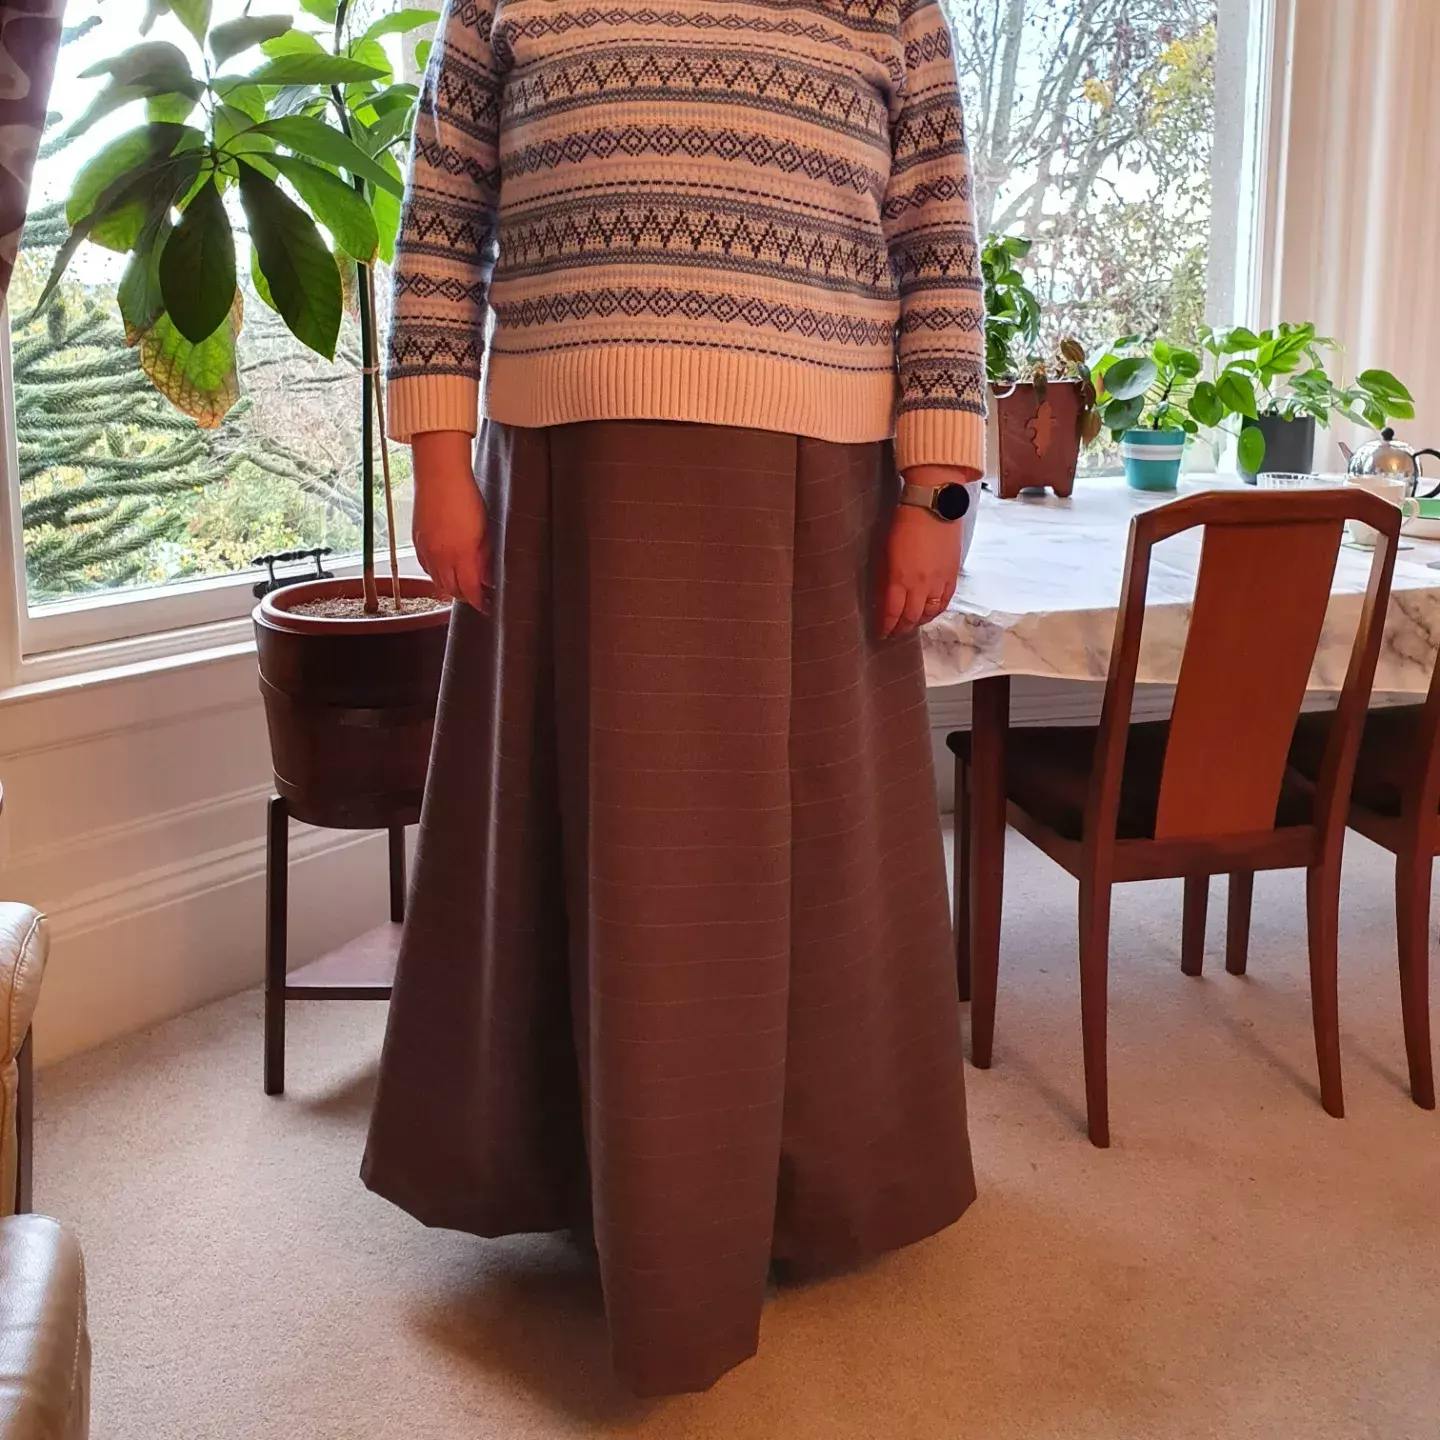
Have already made 3 of these - 1 in suiting fabric, 1 in herringbone wool & 1 in velvet viscose and I love them all.

I'm normally a very slow sewing and this came together so fast. Instructions are clear & very easy to follow. It is spot on.
Fabric was a brushed French terry
Only adjustment I made was to widen the pockets - entirely because I was too afraid to figure out how to add the patch pockets so I just widened them to go from edge to edge of the front piece & just include it when overlooking the neckband side seams. Will definitely be making more of these.

When I saw a photo of this pattern on Instagram I had to make one! I had the pattern ordered & printed so fast!
I had trouble finding the correct fabric in my stash because with all the pleats it is a little fabric hungry.
I assumed with all the details it would take forever but it actually came together rather quickly.
I love this shirt, the length is perfect & a major statement but I do find it pulls a little to the back.

I really enjoyed making this beautiful pattern. The sizing is spot on. I’m a high street 8 on top, 10 bottom and because of the way this dress is designed I made the 8. It fits beautifully and is lovely to wear. I had to wait a long time to wear it due to the weather so I made the blouse in the interim and it’s also perfect. I will be making more in plain fabrics. I used a lightweight cotton lawn for the summer and it’s cool and flows well and holds the pleats. The written instructions were a little lacking (due to the translation) and there were a few typos/errors but the video guide was clear and helpful (please note it is in French). I will definitely be making other patterns from this designer.


I bought this pattern in early 2021 and it’s still my favourite top to make. Big sleeves are still in guys and this pattern is still really popular. I made it in railroad denim with a red stripe and in soft cotton fabrics as well, I hacked it into a top without the button closure, I have not made the dress version yet. Also it would be really easy to hack into *the* Ganni shirt by adding ties, straightening up the hem at whatever length you like and also adding a peplum.

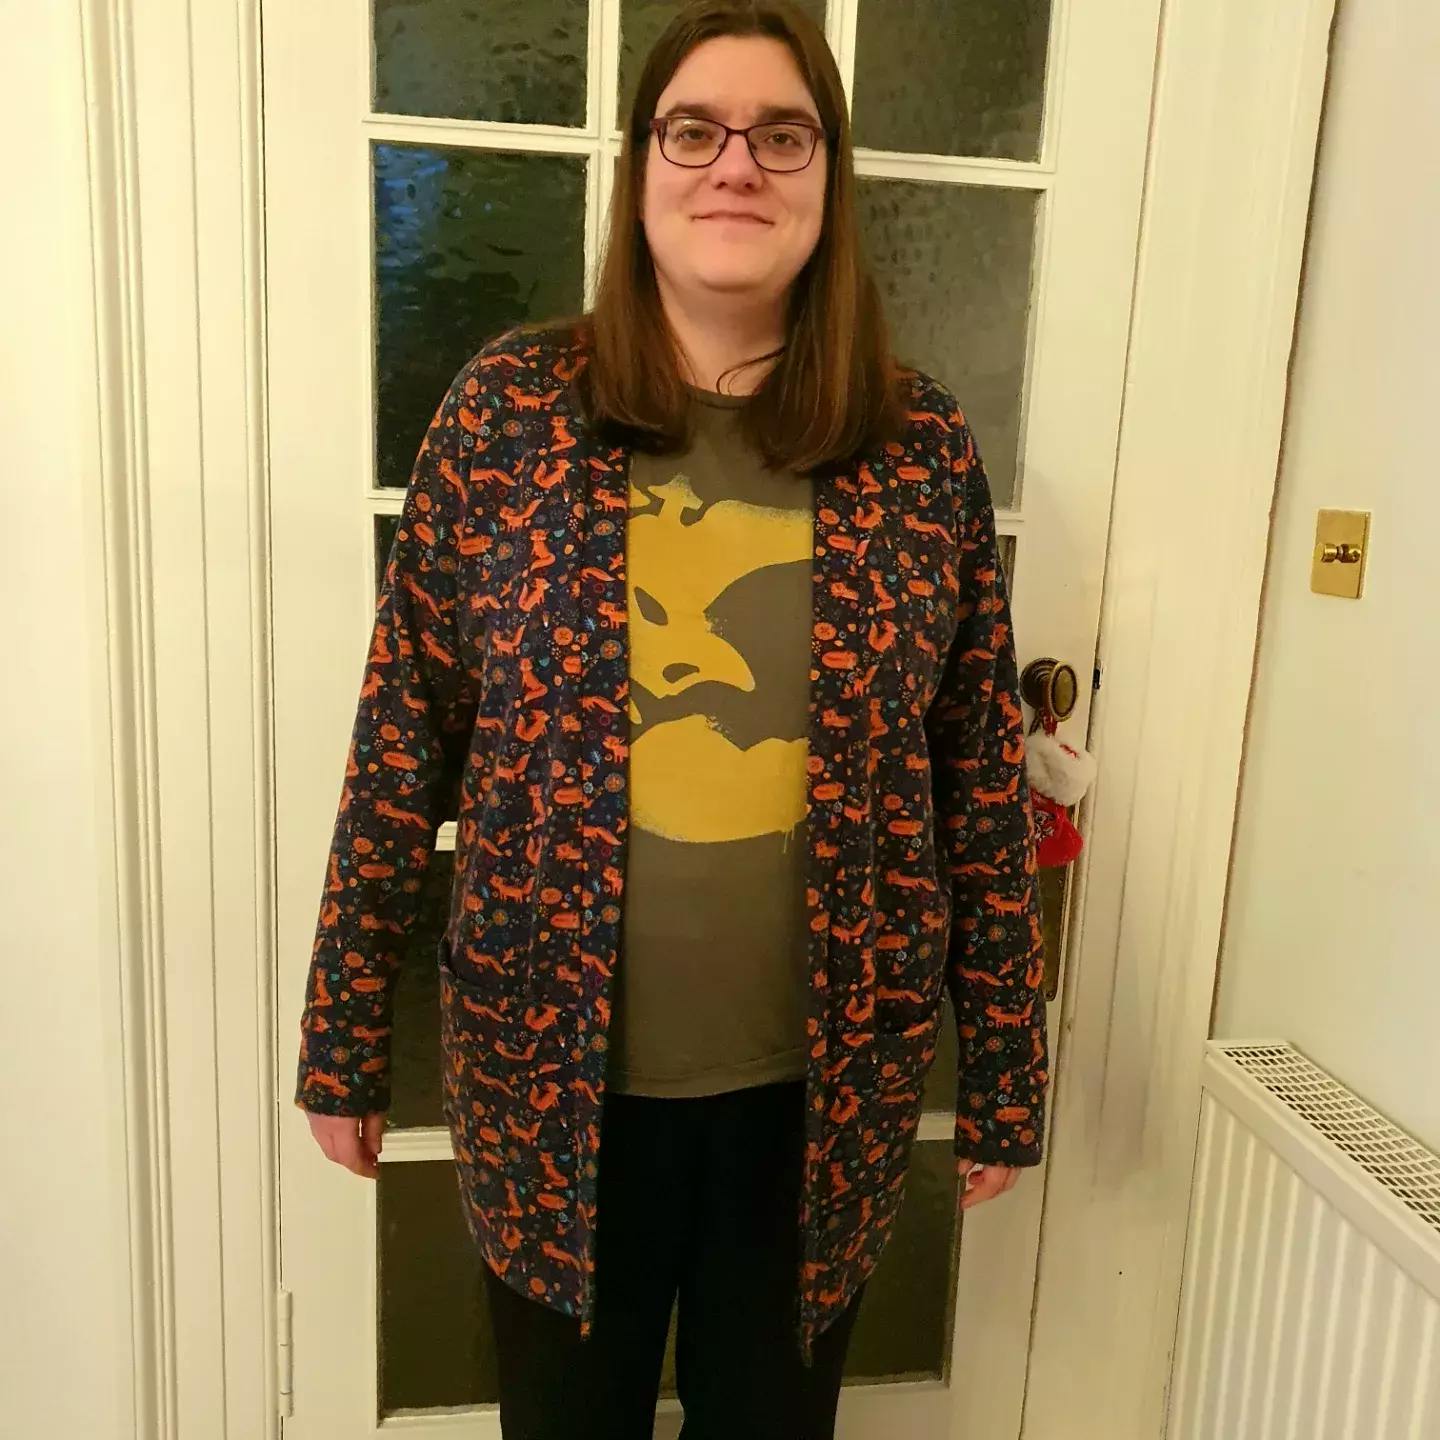
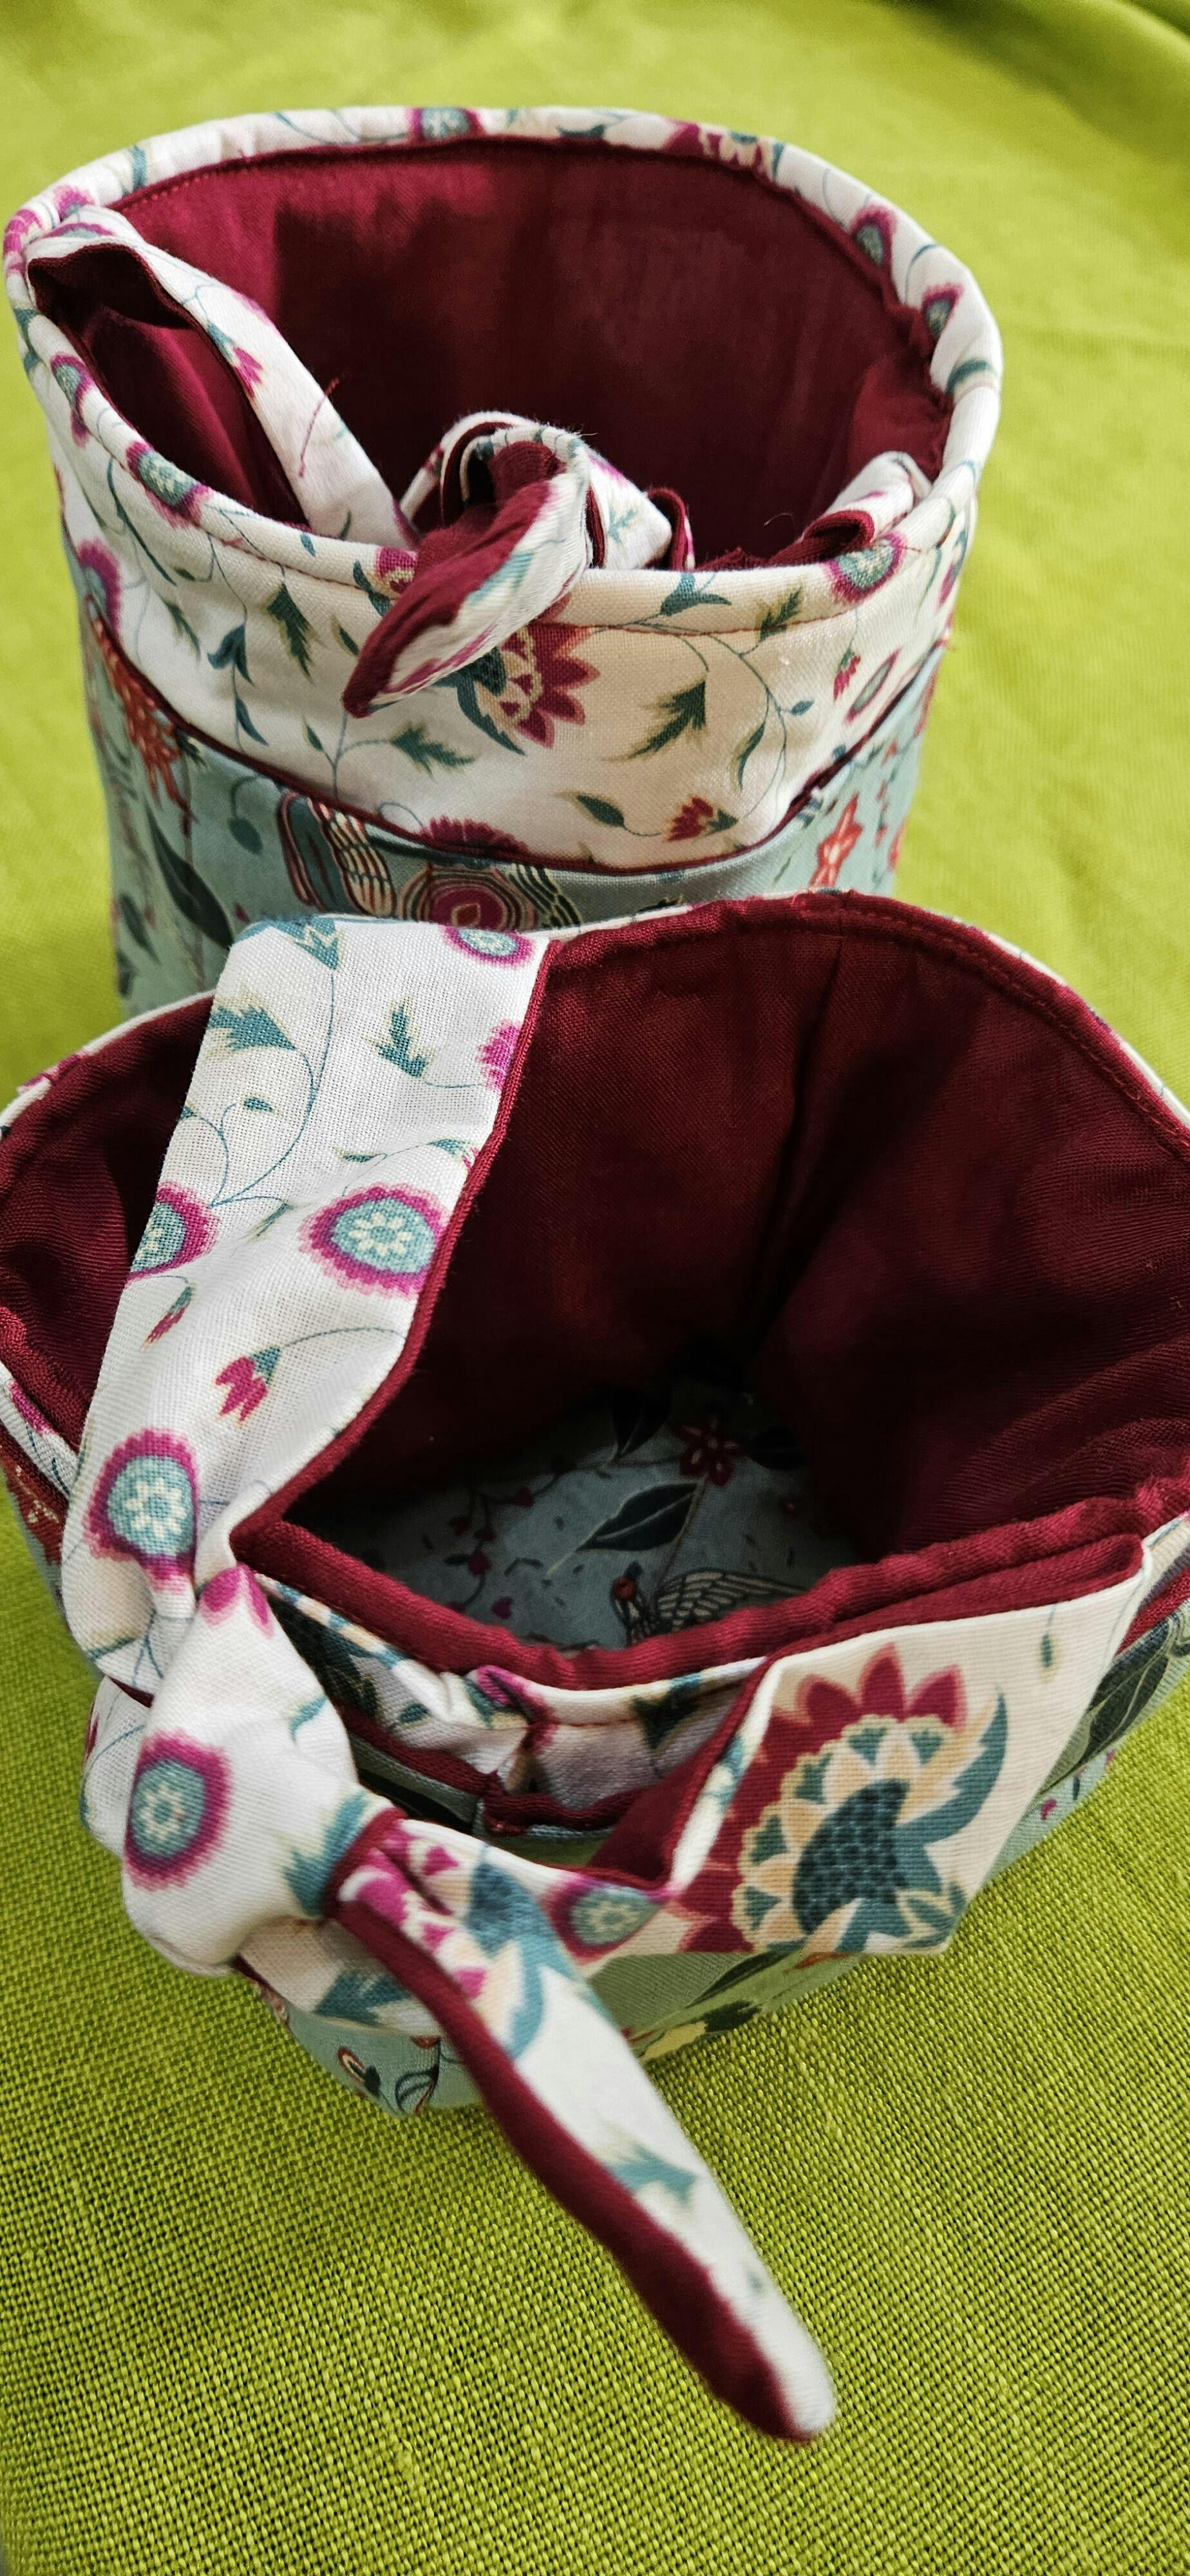
Cute storage baskets. Some head scratching required with all the layers, but pleased with the end results and can see more of these being made as gifts.

The moment I saw the puffball sleeves of the Nell top/dress I was sold! Nell is an easy-to-wear style - it's a relaxed fit and there are bags of options for customising. You can choose from 4 different lengths as well as 4 different sleeve types, plus there is an option of traditional buttoned-up front or go for hidden poppers with faux ties. (The latter style definitely has a Ganni-vibe but with less risk off flashing any skin.) I went for the puffball sleeves, top length and with the faux ties.
I decided to jump straight into the pattern and cut a size 4 and made no modifications as I know that Tilly patterns fit my shape well. In order to make the puffball work, I needed a fabric that had a bit of structure to it but isn't stiff. So I chose our Superbloom cotton poplin in the green colourway.
The pattern itself is well-written as you would expect from a Tilly & the Buttons pattern. If I had one niggle it would be that because there are so many options I wasn't sure exactly which pattern pieces I needed for my option as I didn't want to trace and cut more than I needed. But I got there in the end.
The blouse itself is very straight-forward in construction - if you have a couple of makes under your belt it's definitely not hard. The biggest learning curve for me was the puffball sleeve. This is formed in two pieces: the first outer sleeve is large and has gathers at the sleeve head and also the hem. The inner sleeve is smaller and effectively pulls in the outer sleeve to create the puff shape. It's just like the bubble hem skirts of the 80's. You need to be accurate for attaching the inner sleeve to the sleeve head but otherwise it went together straightforwardly.
The faux ties are formed by strips of fabric which are sewn shut and then attached to the outside of the placket in the centre of the blouse. Don't do what I did and hand sew the poppers on backwards. What a twit!!
So all in all I'm delighted with my blouse and I'm very excited to wear it. I'm tempted to make a drapier version of Nell next time, possibly as a midi-length dress for holidays. I think a linen/viscose blend would work perfectly for the shape and it'll make a great everyday option.
Happy sewing
Tanya xx
@bornellafabrics
(You can read my blog here )

I made these out of a light to mid-weight cupro modal, so they don't totally hold the structure of the pleat but I really love them. Fit is great, pattern was clear. One of the few patterns I have that I'm excited to make more. Definitely looking forward to making them with a thicker fabric.
My only complaint is that the pockets are just a tad shallow, and I love a butt pocket. Will experiment how to add some.
Apologies for the bathroom photo. Was the best I could get!

I love Style Arc designs. They are always so wearable and also I find the Aussie sizing matches up to UK better than some other global patterns. I love trousers these so much I have made 2 versions already, in a camouflage denim and later in a linen mix so have a more casual pair and a smarter pair. I love the wrap feature at the front instead of a zip fastening. You do need to concentrate on the wrap front and left side pocket and I made a toile of this part only for the first time. I have plans to make more.

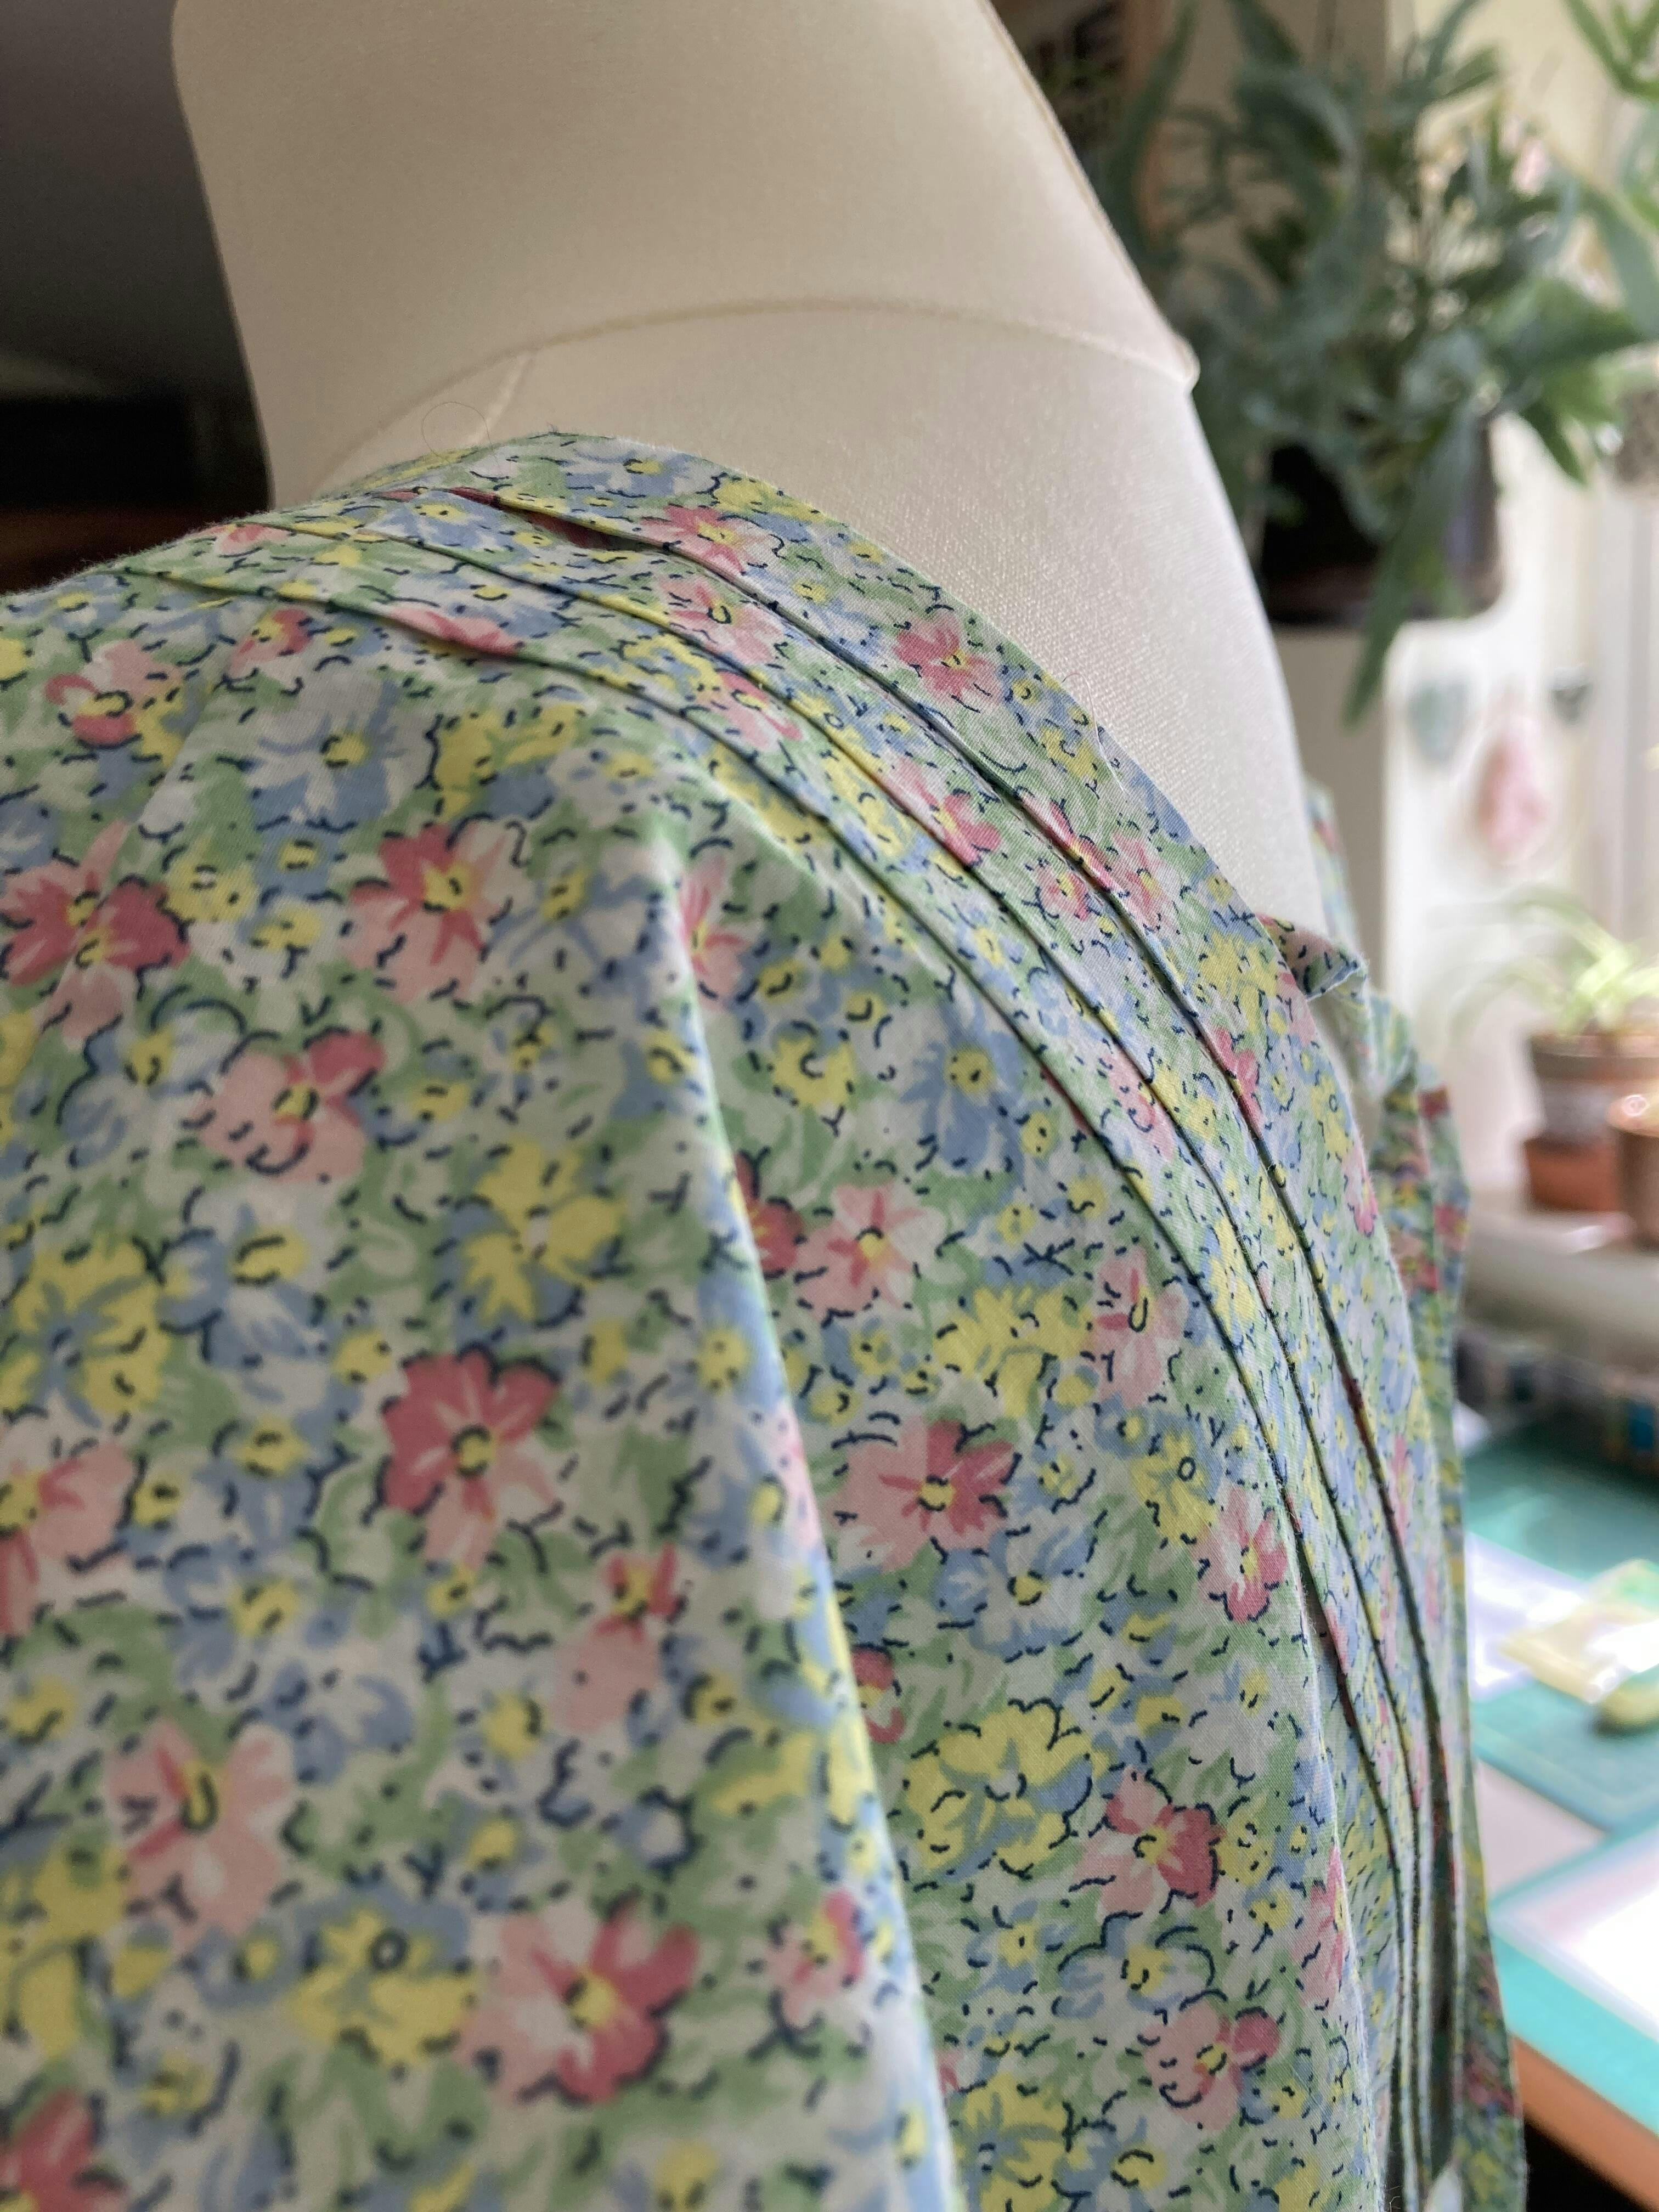
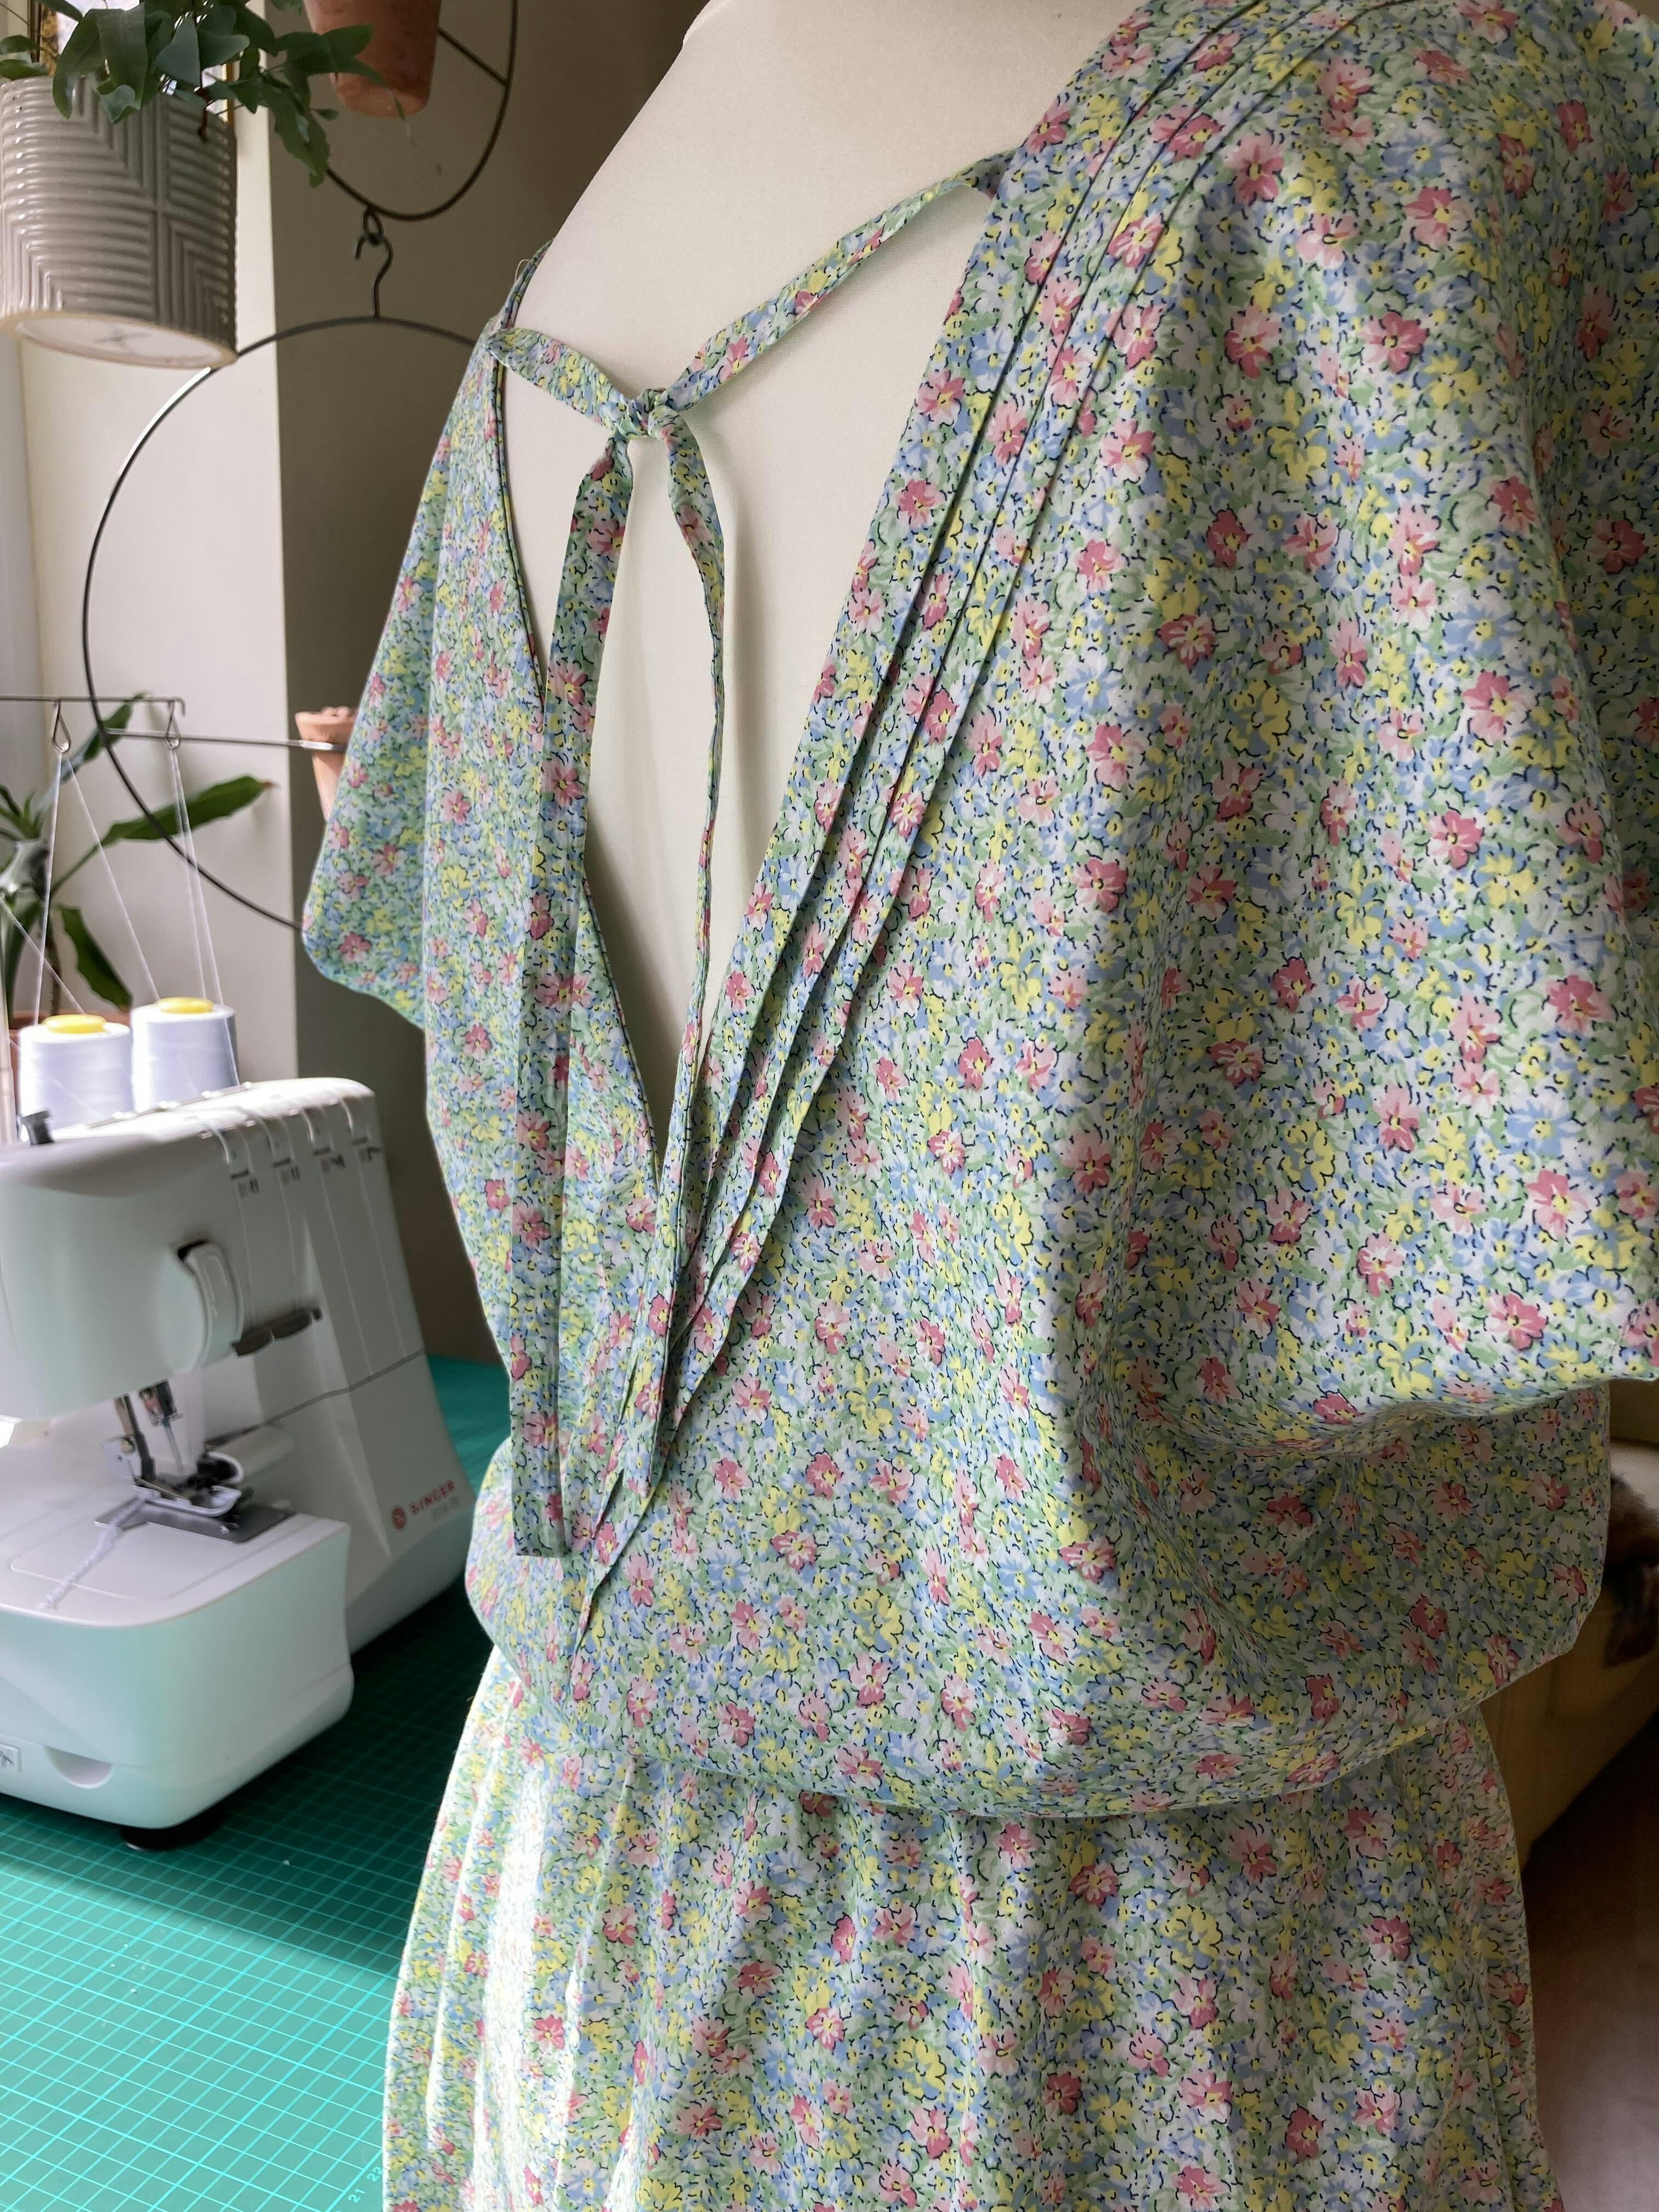
This is the first proper “party dress” I’ve made, in this thin and drapey viscose fabric. I found the pattern easy to follow and I think suitable for a beginner, without much top-stitching or fiddly techniques.
I’m glad I made a toile first. I agree with HRosens review that the sleeves were unusually long. For my final garment I shortened the sleeves and also made the neckline just a bit less plunging. Due to the ties in the back the dress is easily adjusted for size, but I find that there’s a lot of fabric bunching up in the back of the bodice, especially below the shoulders. I followed the size guide for this pattern, but perhaps it would have looked better in a smaller size.
All in all I’m content with this pattern. I’m torn between giving three or four stars. My one advice is to make a toile first and adjust accordingly!

Unfortunately I can't see whether I've managed to upload a photo of me wearing this, but it looks pretty much as I expected it to. I did make a smaller size than I need because I cut the paper pattern out last year before I put on weight. However, it still looks good although it's a little snug around the middle when I sit down!
This is a fantastic pattern - everything goes where it should and everything is the right size. I didn't need to line up notches because they just fell into place. No easing, no head-scratching. I haven't made dungarees before but it was easy to follow the instructions and I really enjoyed making these overalls.
I did have a few issues, and only one of those is a gripe. Firstly, unless you are a puritanical, world champion (and possibly masochistic) tube-turner, use Method 2 for the ties. I used a lightweight twill and it was impossible to turn the ties once sewn. There are no instructions to trim the seam allowance but I did this anyway and it made no difference. The problem is that the end of the tie is turned and stitched, so that after you've seamed it there are four layers of fabric in the first half inch of the tube and it just WILL NOT turn. I ended up cutting out another tie/strap combo and using the much easier Method 2 (belt loop/bias tape method).
Secondly, the instructions for the belt loops are not correct. You're required to make 8x 8cm loops from a piece of fabric which is only 51cm long. I made 6, and so far that's not a problem. Once you've threaded the ties through, you can leave them there and take the overalls off and on - but it took me a while to thread them through in the first place so six loops is enough for me! Obviously you can make a couple more if you prefer.
I highly recommend this pattern. Even though it's a size too small, the overalls still look good and have a very flattering shape. My daughter saw them and asked me for a pair so that's got to count for something!

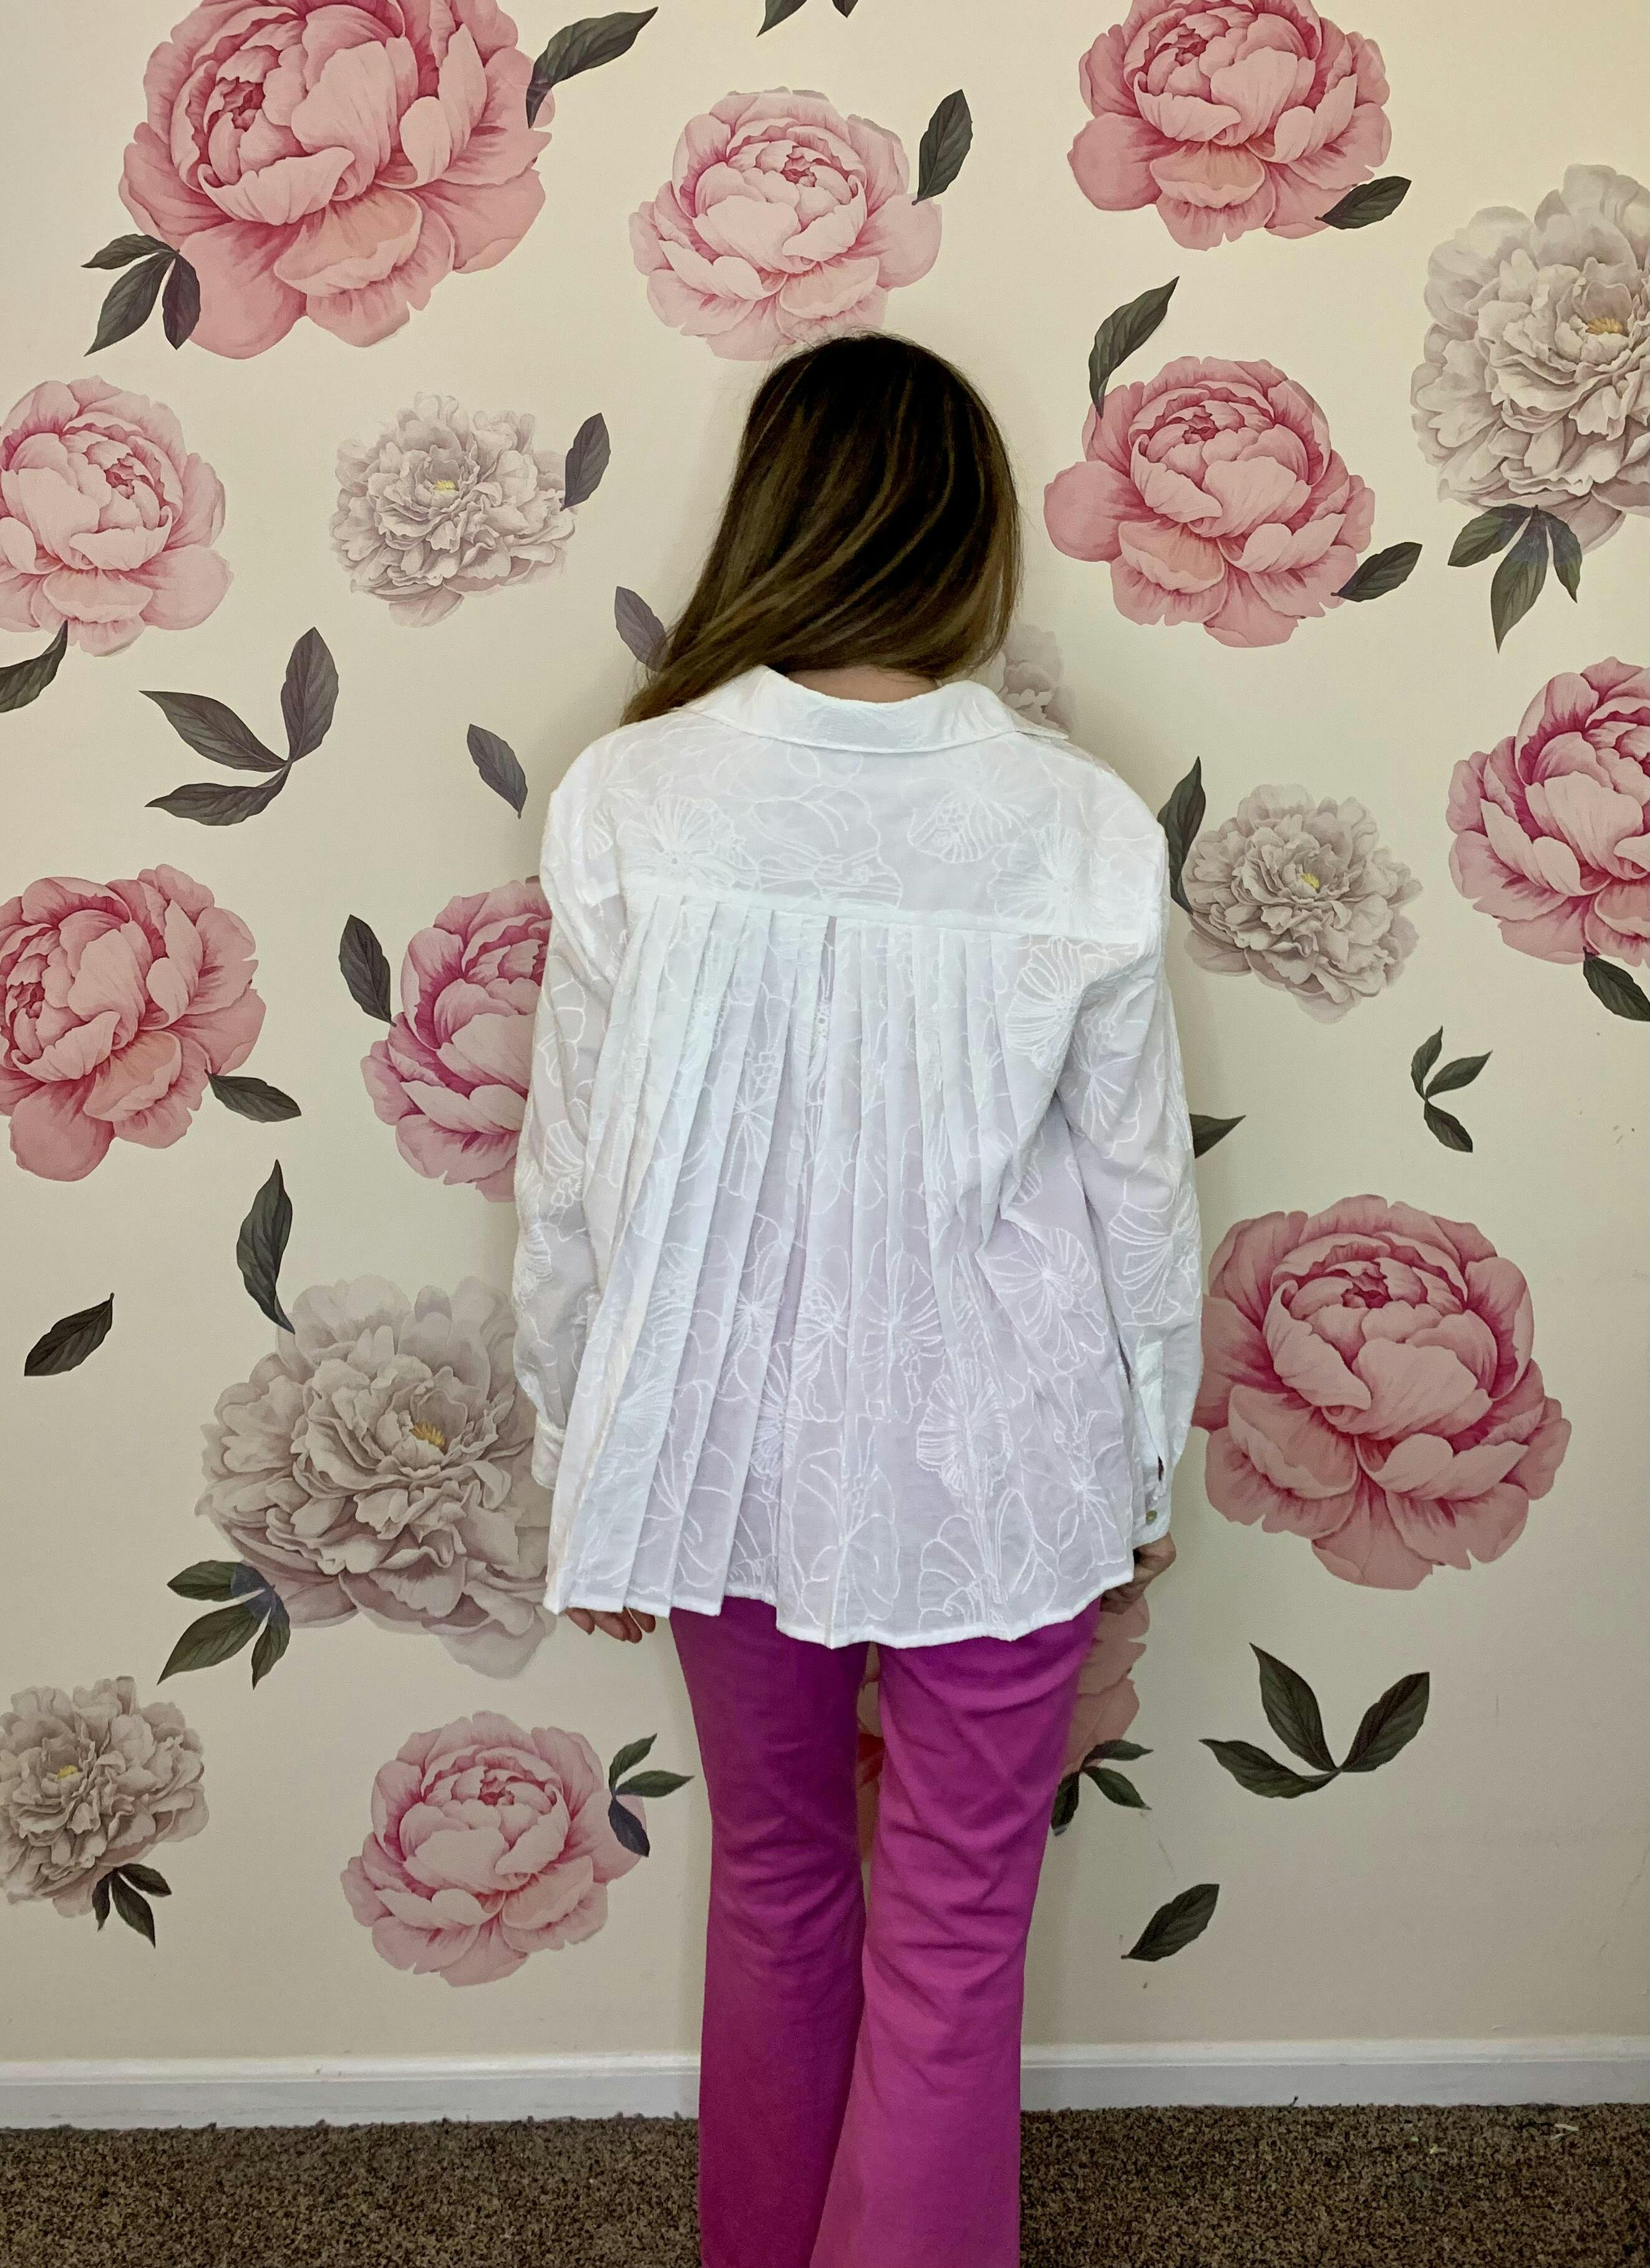
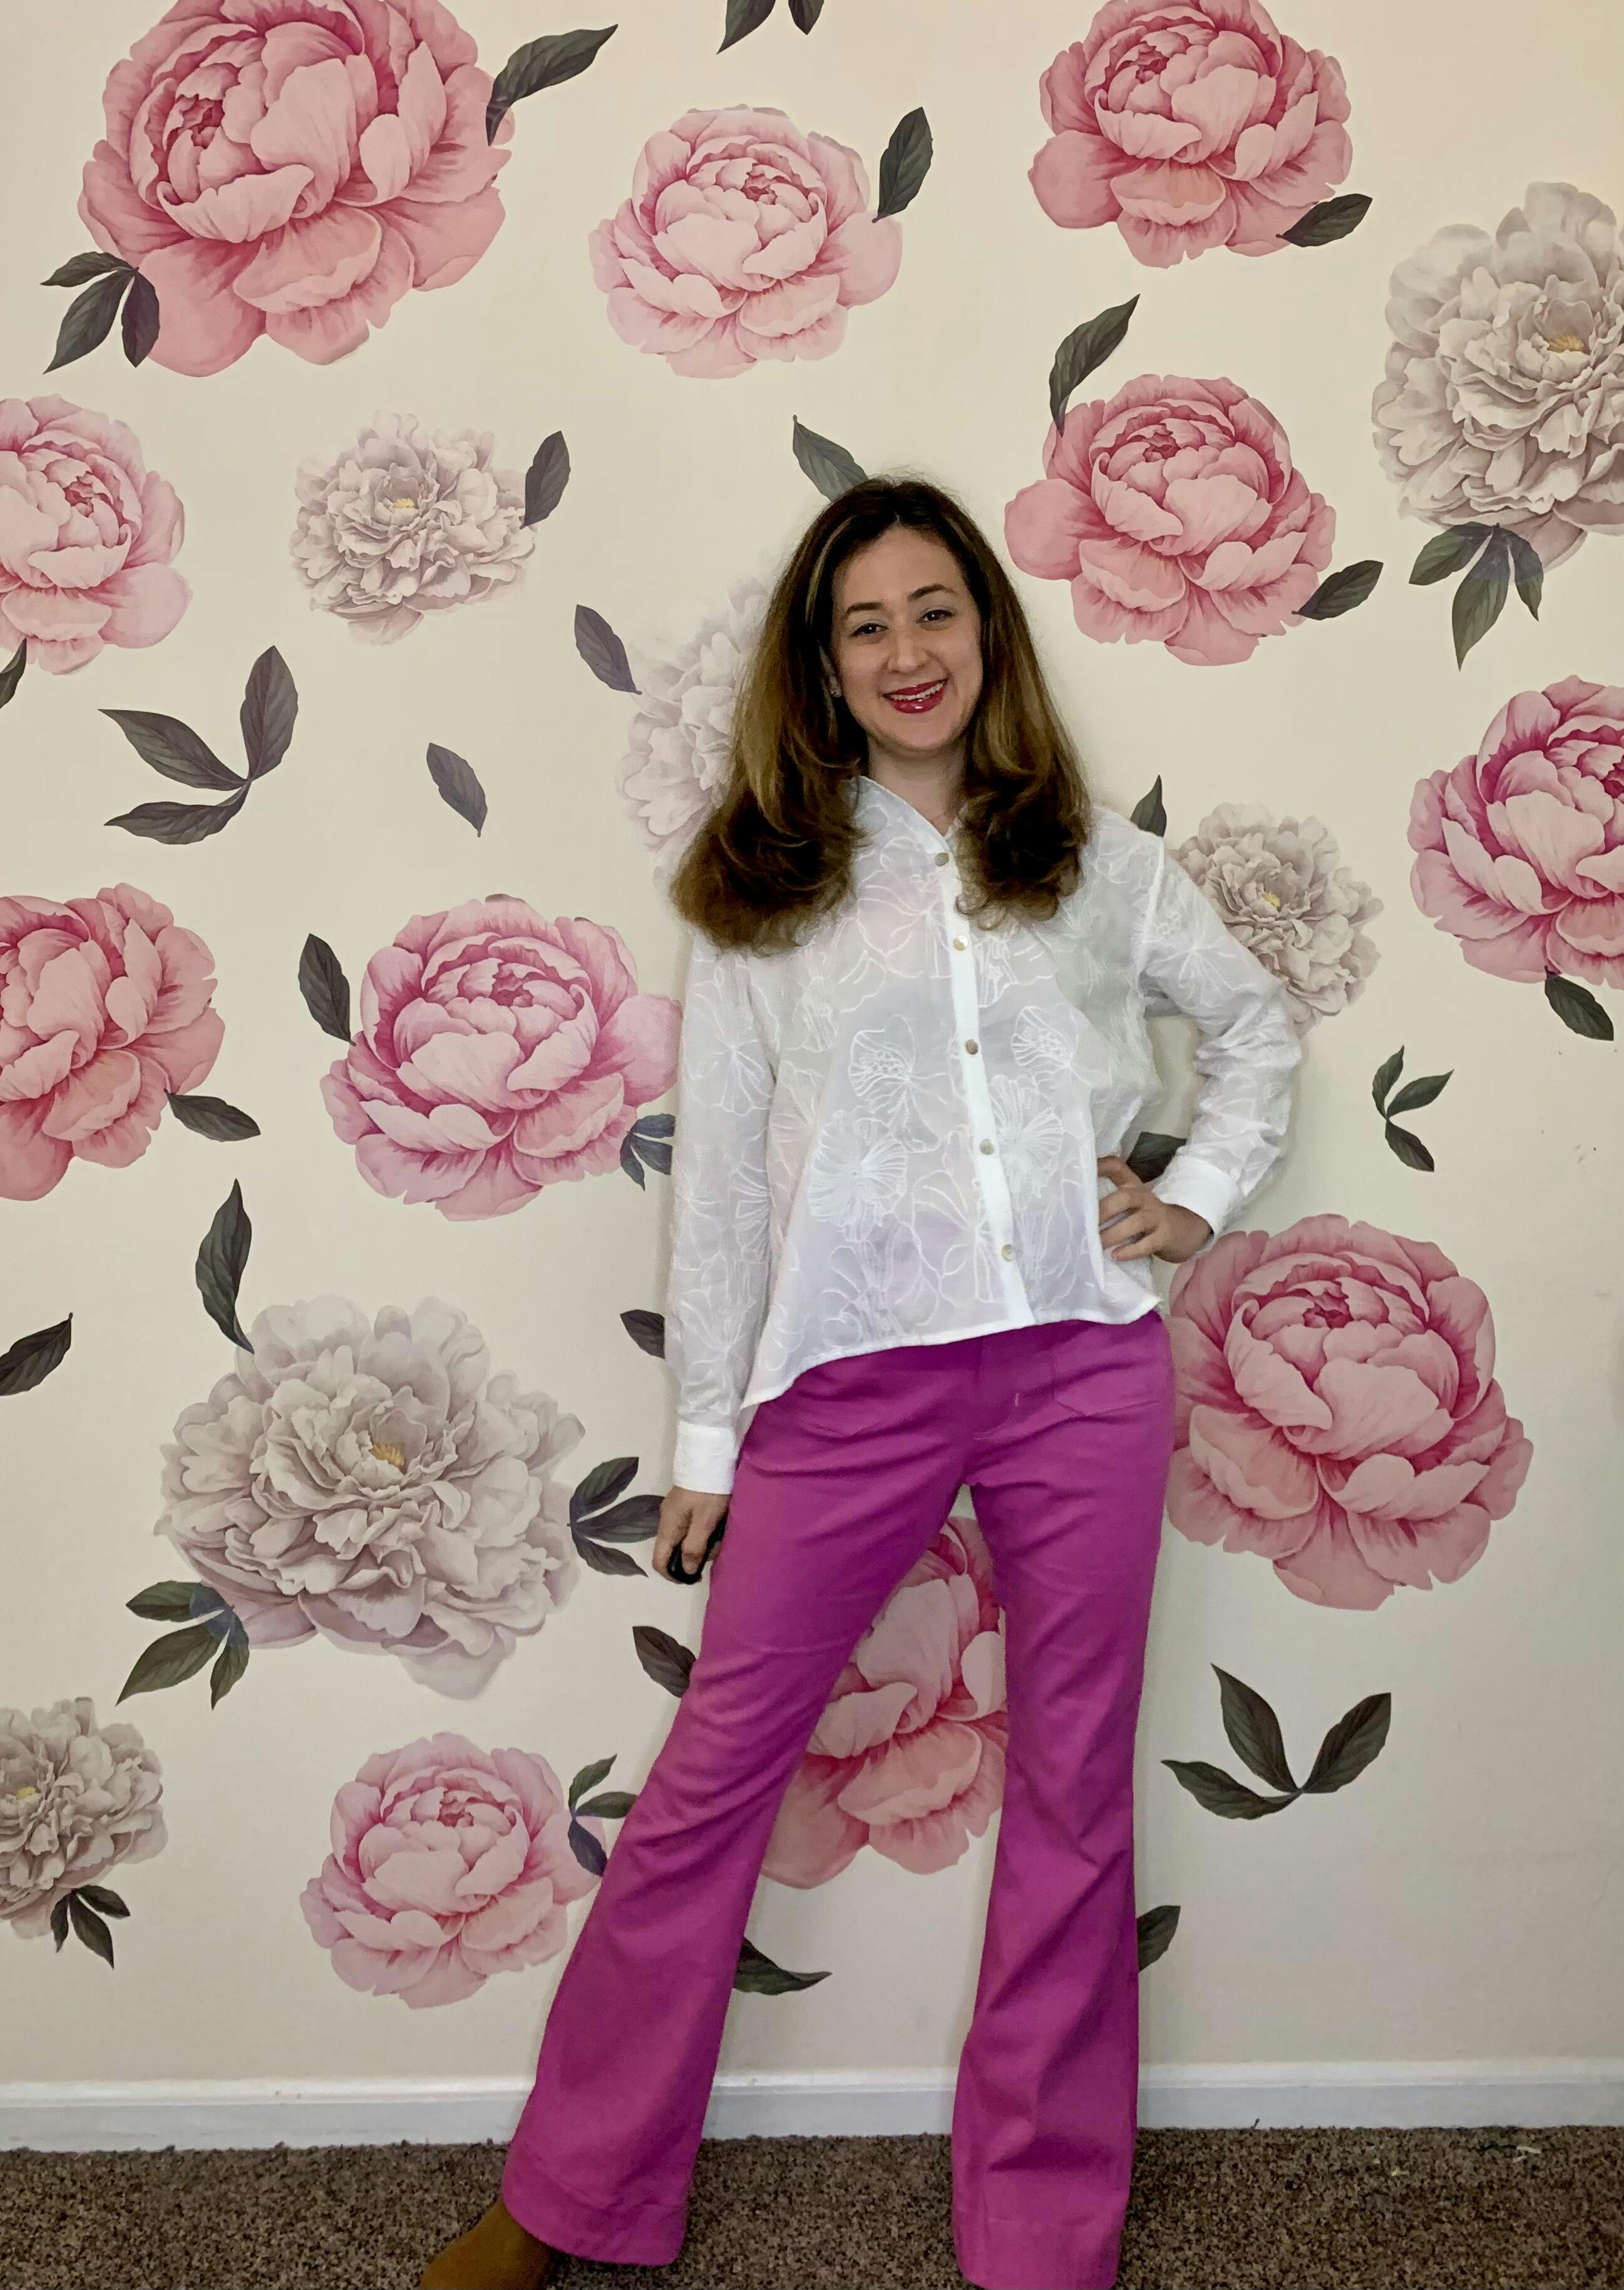
I love this blouse! It has made up true to size and looks very much like the picture, with pleats at the front neckline giving extra fabric for the bust, which are then repeated as a little detail on the cuffs of the sleeve.
The instructions were a little sketchy in places, so this is definitely not a pattern for a beginner, some of it I had to work out on my own. It was not particularly difficult if you have made a blouse before.
I will, I am sure, be making more of these blouses. Next time I will lower the neckline an inch or two as it is a little high-necked for my liking.
I made it in a drapey viscose, and I would recommend sticking with a drapey fabric as the pleats hang beautifully. Not that a stiffer fabric like cotton wouldn’t work, you’d just get a much more pronounced shape without much bust definition. I only had 1.3m but had no trouble fitting it on, despite the pattern recommending 1.4m. Even with the fabric being a one-way design there was still enough left over to make my own bias binding, so the amounts “required” seem to be quite generous.

I didn't believe this dress would be quite as flattering as it looked but I have been wonderfully surprised.
The single dart bodice front in 3 individual cup sizes gives enough shaping to have the top of this dress fit the torso well. I'm a woman of a certain age with a fluctuating middle spread & this dress both accentuates my shape whilst hiding my developing barrel. This was my first Liesl & Co experience so decided to be mildly cautious with sizing. Generally I'm a size 12/14 up top & 16/18 lower down so I cut on an XL & the only adjustment I made was to double the side seam allowance from 1cm to 2cm on the bodice only to reduce any gaping I usually get, which it did. All else was as per the pattern instructions. Perfect! I think I could get a similar fit without the seam allowance adjustment with size L in a jersey with more give.
Unfortunately I finished the dress yesterday, at the end of the May Bank Holiday, missing the wonderful weather but I can't wait for the next sunny spell to wear Liesl's Marais knit dress which I made in a fun colour changing stable cotton lycra jersey....navy floral lace print on ivory which in sunlight the ivory turns into multiple colours! Marvellous!!!
I am planning to make more of these in jersey and in a viscose linen mix which has just enough give to allow it to work. Great pattern!

Sometimes you just need a classic blouse and this is a fab one. I sewed it up on the Creative Spirit Retreat, organised by owner Lisa Falconer and I came back feeling totally recharged and full of sewing enthusiasm. It was a really special experience and I can thoroughly recommend it.
I love how blouses look tucked into trousers or jeans, so I can imagine there’ll be more of these in my future. I sewed a size 3 with upper and lower rounded back adjustments, a small full bust adjustment, widened the sleeve, extended the sleeve cap and the shoulder seam. Yes that was a bit faffy but totally worth the fiddling around. I cut 10cm off the length but it does have a tendency to come untucked so I’d add a few cm back onto my next version.
I used cotton left over from lining my Heather Blazer (see photos in my blog post for the matchy matchy look!). I fancy using a more drapey fabric like viscose for my next version to give a softer look to the collar.
The instructions are superb, plus it also helped to have Lisa’s expert advice in person. I love her attention to detail, and where she points out in the instructions where it’s important to be really precise.
I used self-cover buttons as I didn’t have anything that looked quite right. It was a bit fiddly trying to get the dots in the centre but a bit of fabric glue and perseverance worked a treat.
Lots more photos including my fitting journey and toiles are in my blog post:
https://www.mingmakes.com/post/the-avid-seamstress-blouse-review

This is a fantastically useful basic to have in yours ardrobe. The pattern itself is well drafted with clear instructions. I like the finish I achieved, it's very professional. I sewed it in various different fabrics, including linen, tencel twill and poly-satin. The only downside to Vikisews patterns is that they tend to be single sized patterns, so if you're somebody who needs to grade between sizes it can be difficult depending on your level of comfort and experience.

I really enjoy sewing this top every time I make it. It's super fast if you have a serger and use it to simultaneously insert the elastic required for the neckline and side seams, which ensures that there is minimal chance for gaping. I did add about 2" in length and needed a small sway back adjustment, which is usual for me in most garments. The hem can be finished using fold over elastic, but I usually just use my coverstitch and it's fine.
My only niggle is that I think the sleeve is drafted way too narrow/small in the bicep region. For the size 12 D cup for instance, the finished measurement is 10.25". I am a size 14, with a 14" bicep. The bicep finished measurement for a size 14 is 11.25". Sewing my first version, although the top fit beautifully everywhere else (and I used a super stretchy knit with 100% stretch), I could barely get the sleeves on my arms. I have seen this comment several times in other reviews as well.
Overall however I really enjoy this top as it is a great stylish basic that can work for many different occastions and is a very quick make with great results.

I Made this as a wearable toile and it worked out brilliantly and is now in my wardrobe. Very straightforward construction. Lovely collar - this is the larger of the two options. I went with the long sleeves and statement cuffs too. They fold back for a more conventional look if required.
Planning another in linen - again with the statement collar but I may make the sleeves a little fuller.

I enjoyed making this coat, my first and am very pleased with the result. I made it in a Moon wool fabric (it's not as bright as the photo suggests). It was all very straight forward but I did quite a few practise WELT pockets until I was confident to work on the coat itself. I didn't make the belt and as yet haven't put buttons on as I quite like just wrapping it around. For a contrast it has a pink lining!

A brilliant pj pattern for many reasons: tapered leg, French seams throughout, no piping, modern collar, clear coloured lines for easy tracing.
I cut with double fabric for speed despite their instructions.
And made some small modifications:
Added a pocket to the front top
Lengthened the top - I'm short but didn't fancy a cropped fit
Added tapered turn-ups to sleeves and trousers for interest (and challenge!)
Finished the collar and neck seam with white bias binding.
Linen look designer shirting from Fabworks, and Cotton Sateen in my stash for a second pair.
Lovely to sew, lovely to wear.

I've been wanting to make a denim skirt for a while so when I saw that Bella Loves Patterns had launched the Anna Skirt and it went straight to the top of the list. It was initially the pockets that drew me in, but I really liked the front slit and the length. It has many of the elements of traditional denim jeans, but without the legs - so topstitching, patch pockets, zip fly, bar tacks etc.
I used our railroad denim in dark blue/white (from Bornella Fabrics) which is a touch over 8oz and absolutely perfect for this project. It's light enough that my (very basic) machine didn't struggle on the heavy-duty sections where there are lots of layers of fabric to contend with, like attaching the belt loops to the waistband. But the denim also sturdy enough that the finish skirt looks structured.
Fit-wise, my measurements put me between a 12 and 14. I decided to cut a size 14. I'd rather it was too loose than too tight. It has ended up a little roomy but not too much. I'd say it was definitely true to size. For my next version I'll size down so I have that as another option.
So onto the pattern. I had always known that Bella Loves Patterns takes a lot of care in the drafting of the pattern and the instructions, and this is clear from the offset. The patterns are really detailed - lots of pictures at every stage - and there are lots of extra steps to make sure your garment is built to last. For example, I used interfacing AND stay tape for the waistband, which I've never done before. There were a mix of tailoring techniques - chalk markings that you add yourself feature heavily - plus hand basting some areas. Normally I don't hand-baste ANYTHING but I was having such an enjoyable time sewing the skirt I thought I'd spend the extra couple of minutes doing it. And blow me down, the finish is much better. Turns out Bella knows her stuff! Also the level of detail is super - the topstitching matches up really well when pattern pieces are joined and it just has a really neat finish.
I love are how considered the inside of the skirt is too: it definitely as pretty innards! I used a few offcuts of our Superbloom fabric for the pocket linings. Normally I'd make the right side of the fabric face the inside of the pocket so when you put your hands into the pocket bags you see the fabric. Not so for these. The wrong side of the fabric is what you put your hands into, but when you open up the skirt you get your colourful cotton facing you. It gives me a lot of joy to see it! Plus the binding for the inner waistband is in the same fabric so it really has a super neat finish inside. Beautiful!!
So I do have a couple of gripes about the pattern which I'm really sorry to say. The first was attaching the binding to the waistband. The instructions just said to add binding to the bottom of the waistband. BUT I failed to appreciate the waistband is asymmetric, to allow for the fly closure. So I effectively bound the OUTSIDE waistband instead of the inside one. Not the worst mistake ever and it just meant a lot of unpicking.
The second gripe was more problematic. Zips!!! My nemesis. By far this is the best zip I've ever put in BUT it was not without headache. The pattern specifies which size zip to buy. The zip went in great but the instructions then require you to remove about 1cm-ish of the zip - including the zip stop, a few of the top zip teeth (in my case 4 teeth each side), and replace the zip stop. All without damaging the zip tape. It was an absolutely pickle and I lost the zip stop in the process. So my skirt does NOT have a zip stop now but luckily the waistband is right above the teeth so the zip can't go any further north.
Anyway, that's a very convoluted way of saying, it's such a shame that this step was needed. As the rest of the drafting and instructions are so good, it just seems very out of place.
So all in all, I'm absolutely over the moon with the finished skirt and I'll be wearing loads over summer. I'm already planning my next version in some plain denim (which I've ordered for the shop - the perks of being a fabric shop owner!). Definitely a 5 star pattern. You can read a full review with more photos on my blog here.
Happy sewing
Tanya xx
@bornellafabrics

Review
Highly recommend this pattern and easy and quick enjoyable make. I made it for Autumn in a heavy black linen and a baby cord brown corduroy. My favourite version is in linen. The front fly construction images and details are very easy to understand so please don’t be put off if you have not tried one before! I suggest you make a toile (trial version with scrap fabric first) I found the waistband came up large and needed some adjusting on both versions. Next time I will go down a size. For summer I plan on making a version with two slits, front and back in a medium linen, I’m thinking lime green!
Sewing ability In my opinion suitable for an Intermediate Beginner, due to the fly front, but very well explained in the instructions. One of the best methods I’ve used so far.
The front fly construction images and details are very easy to understand so please don’t be put off if you have not tried one before!
More details on my blog
I've tried all sorts of hemming tools, and I've tossed them all except for this one. It's in constant use in my sewing room.
Because it's heat resistant, you can fold the fabric over the edge and press. Because it's flexible, you can use it over a ham.
Because it has holes, you can use it to mark a stitch line on a tricky spot.
Ditch your seam gauge and get this too.


