
Prix régulier
£20.50 GBP
Prix de vente
£20.50 GBP
Prix régulier
£20.50
Check out our latest patterns and get free UK delivery on orders over £50.

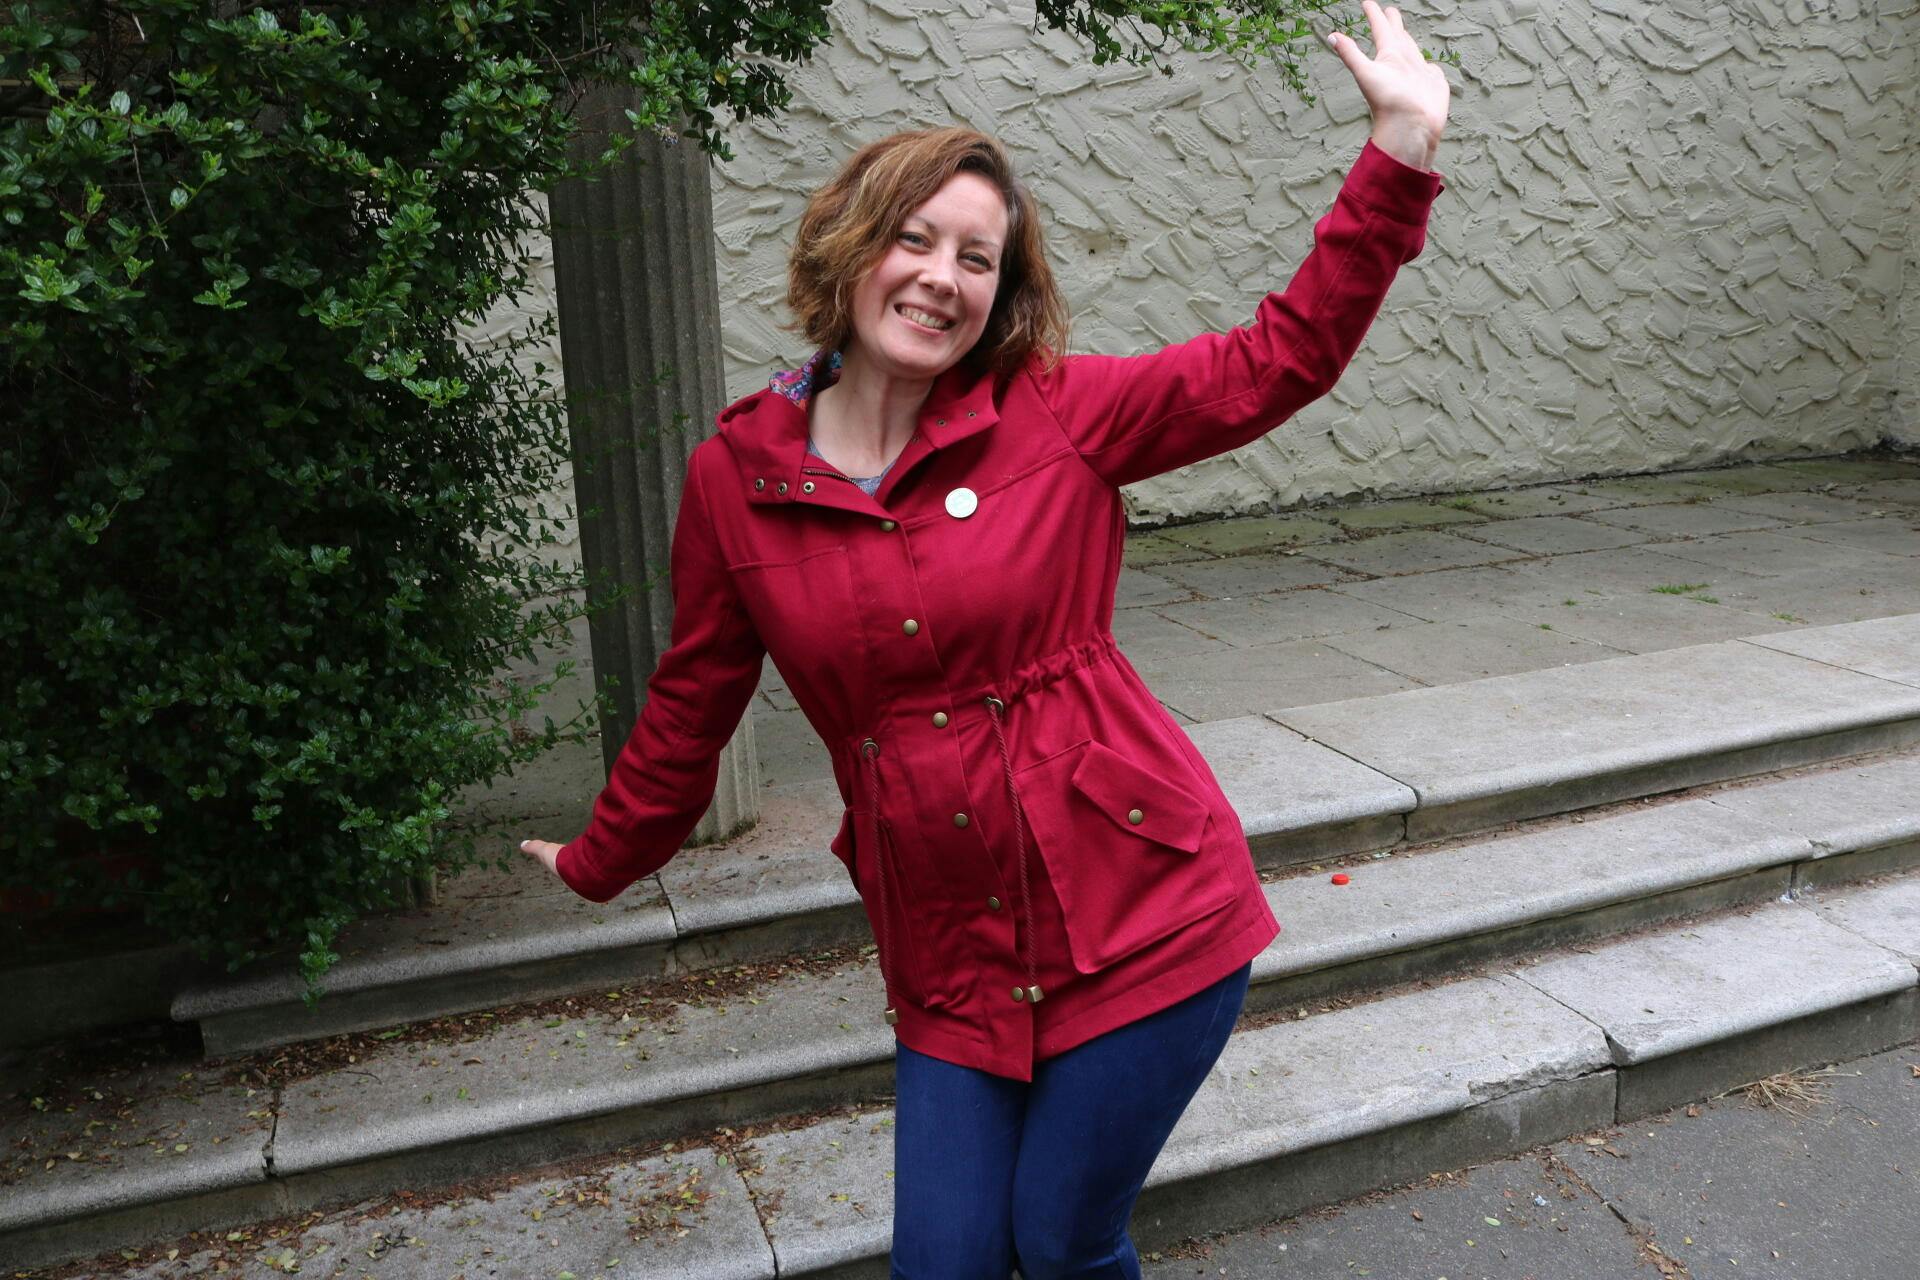
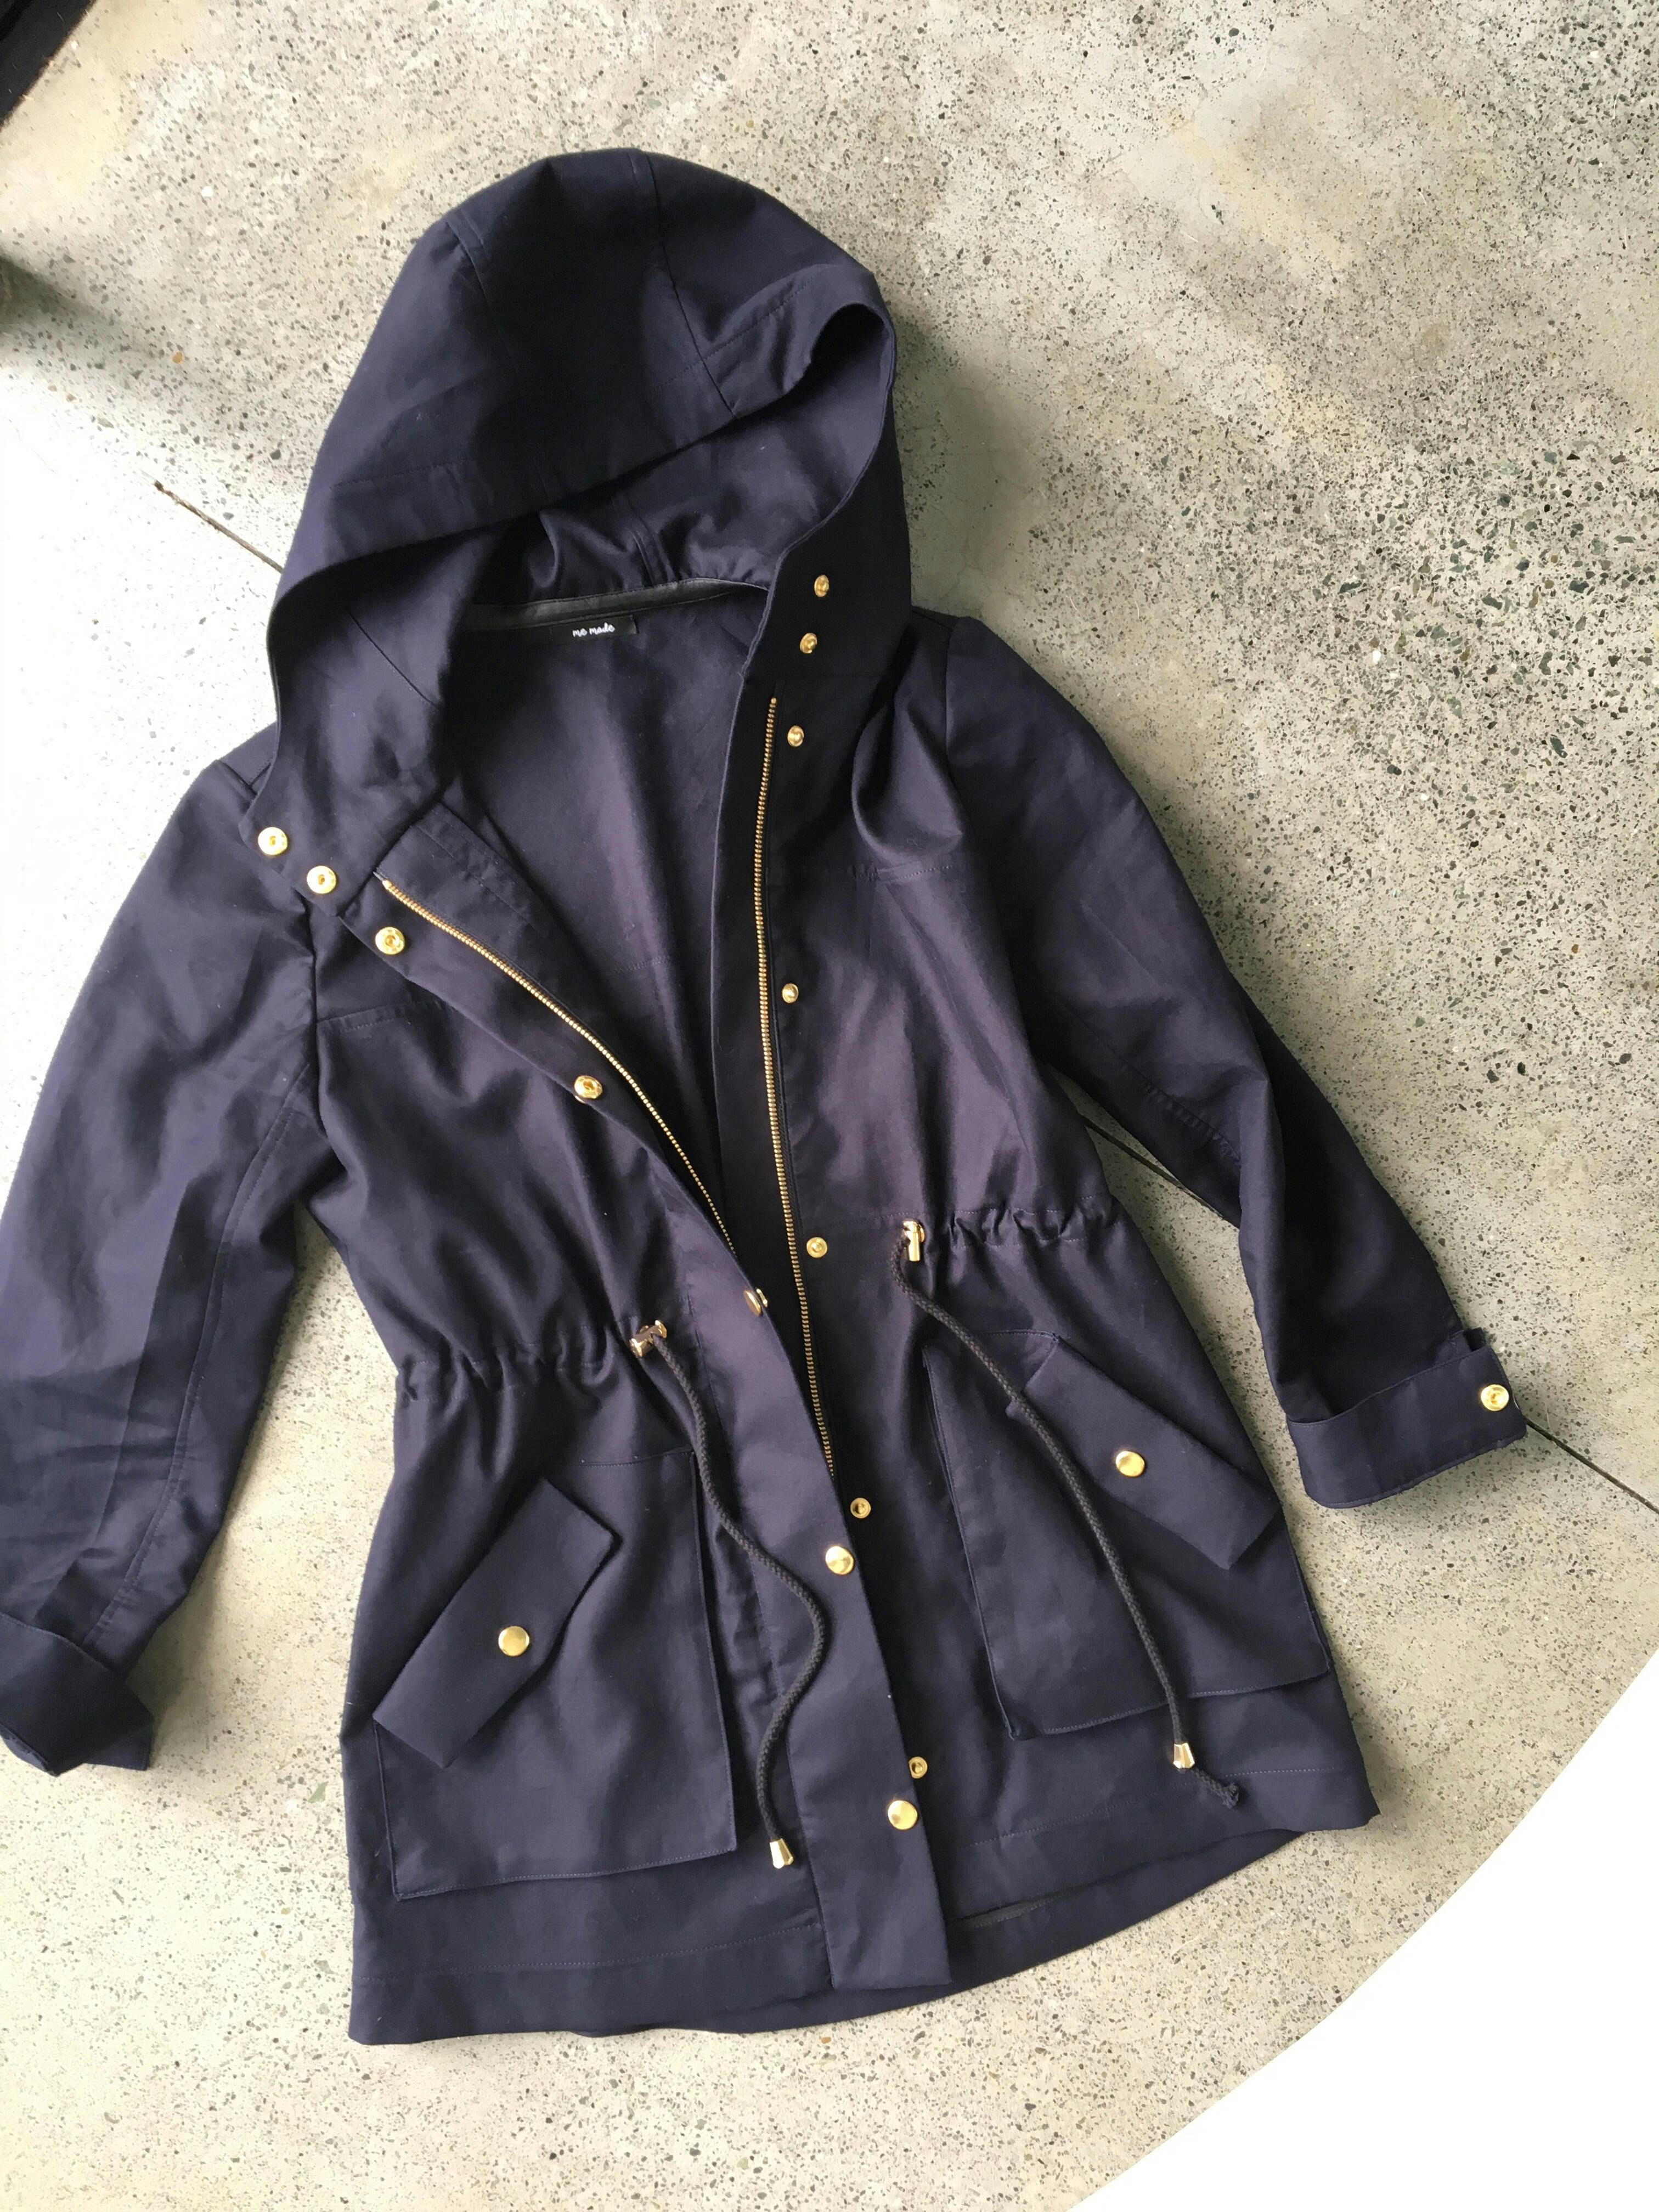
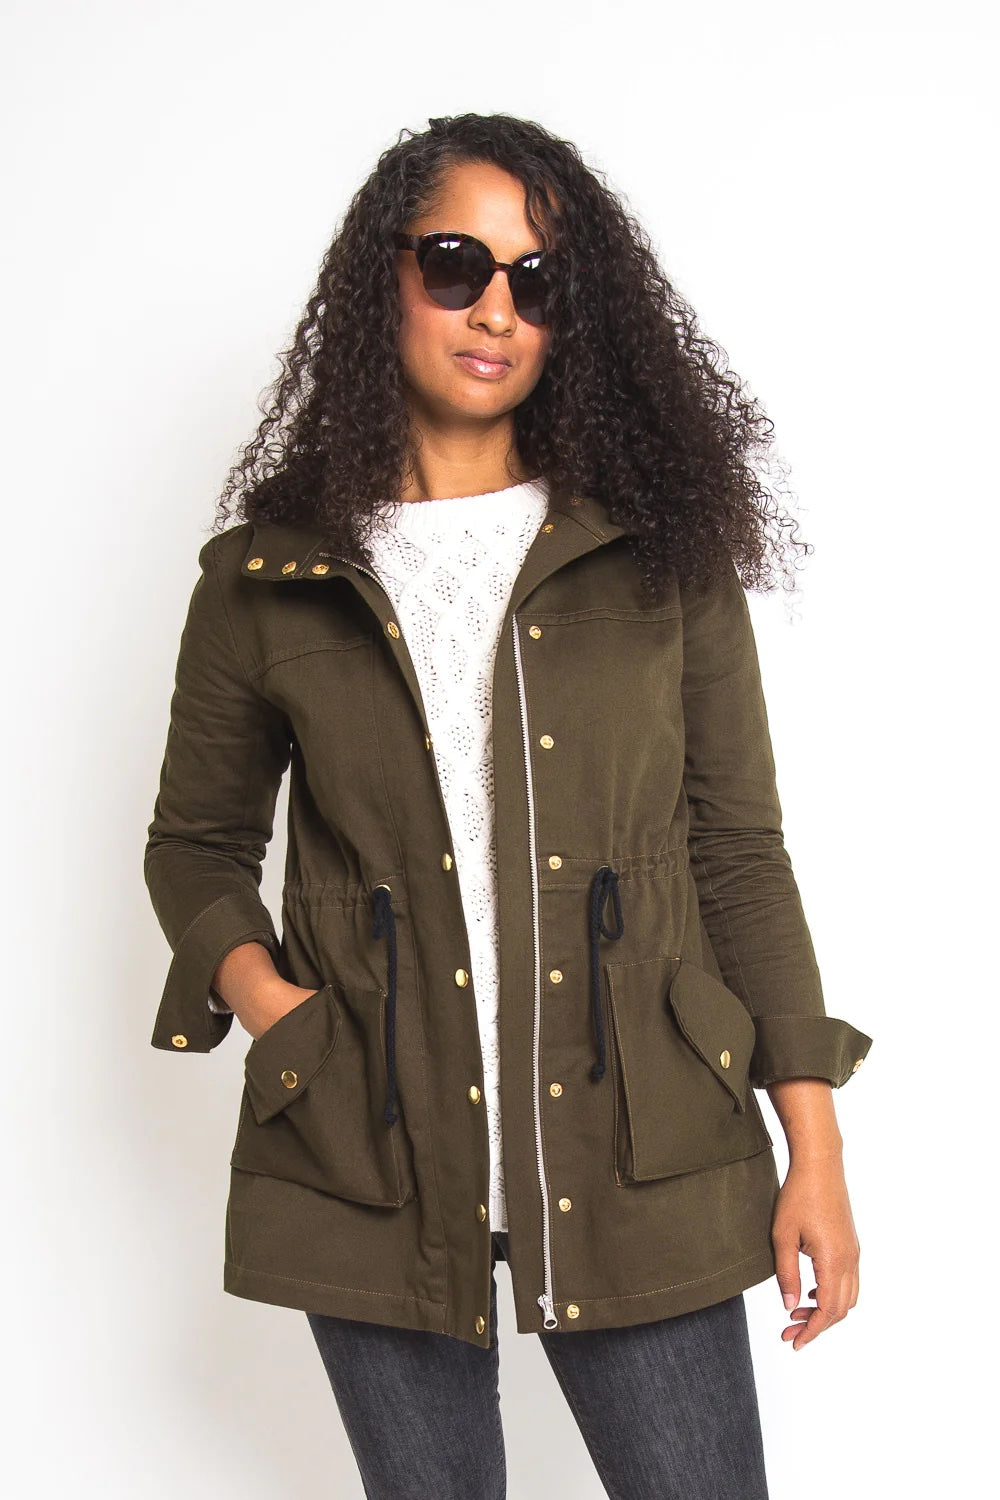
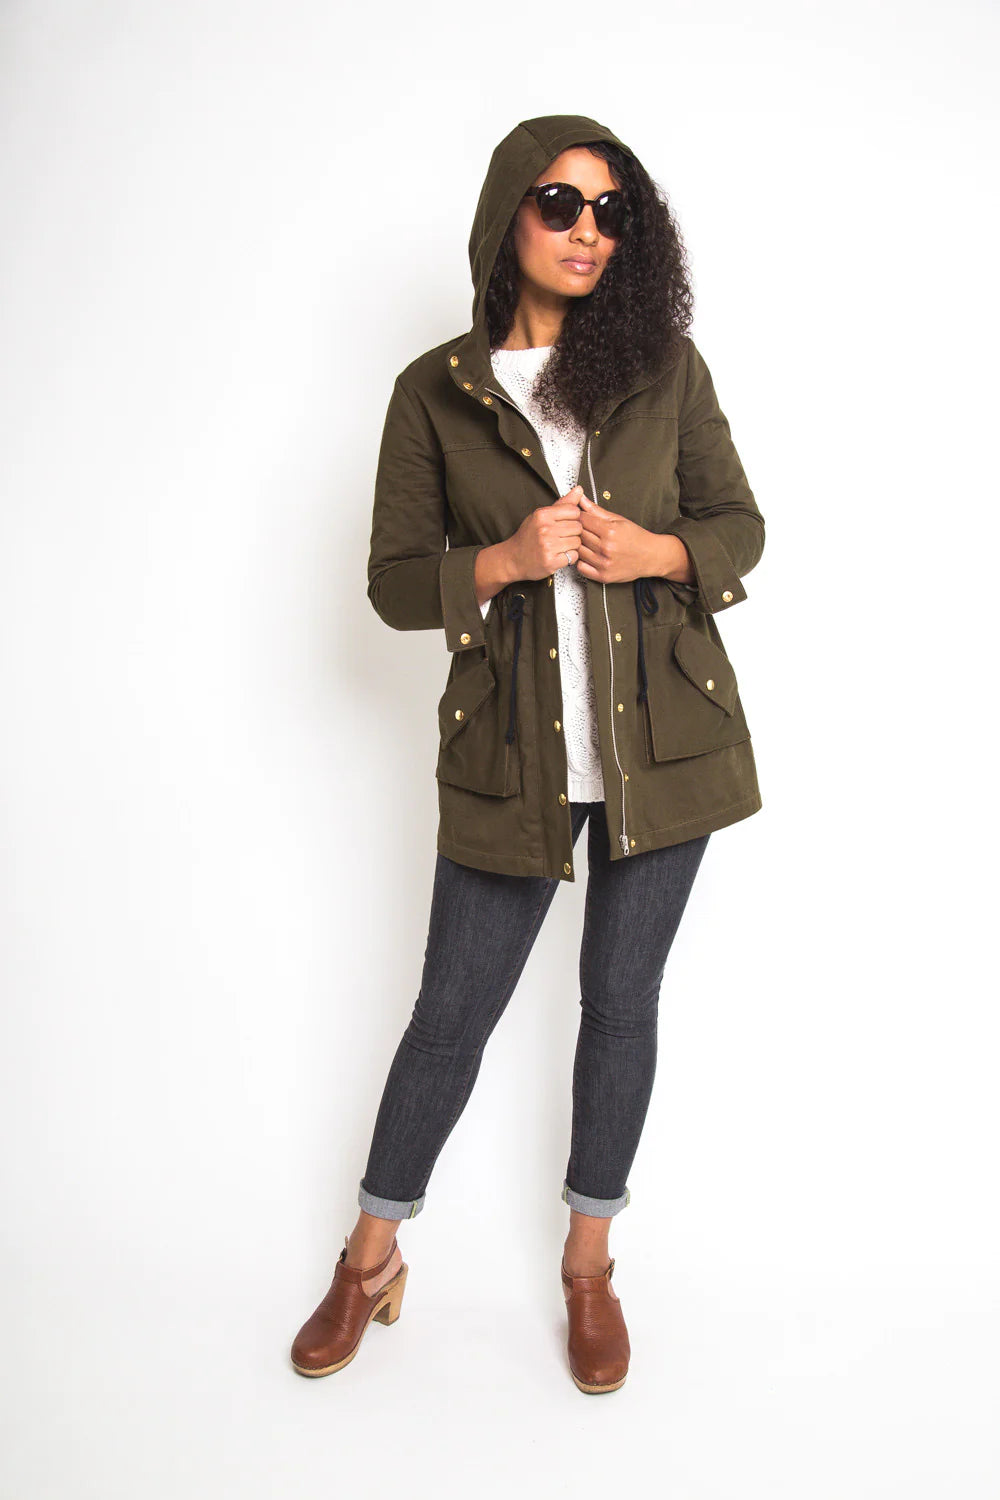
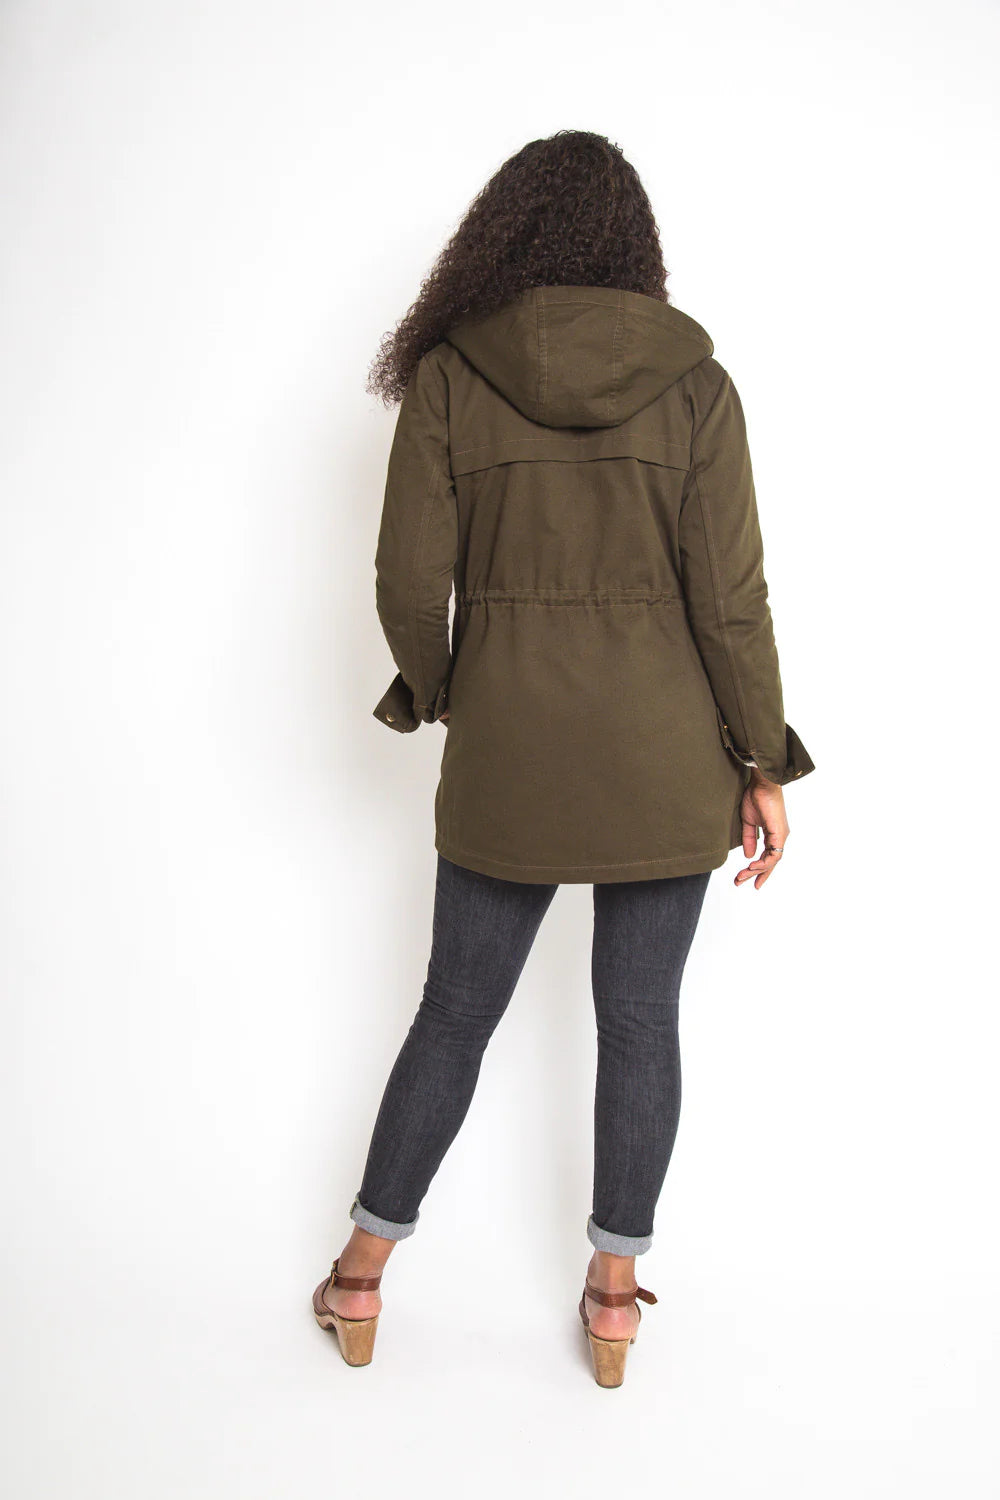
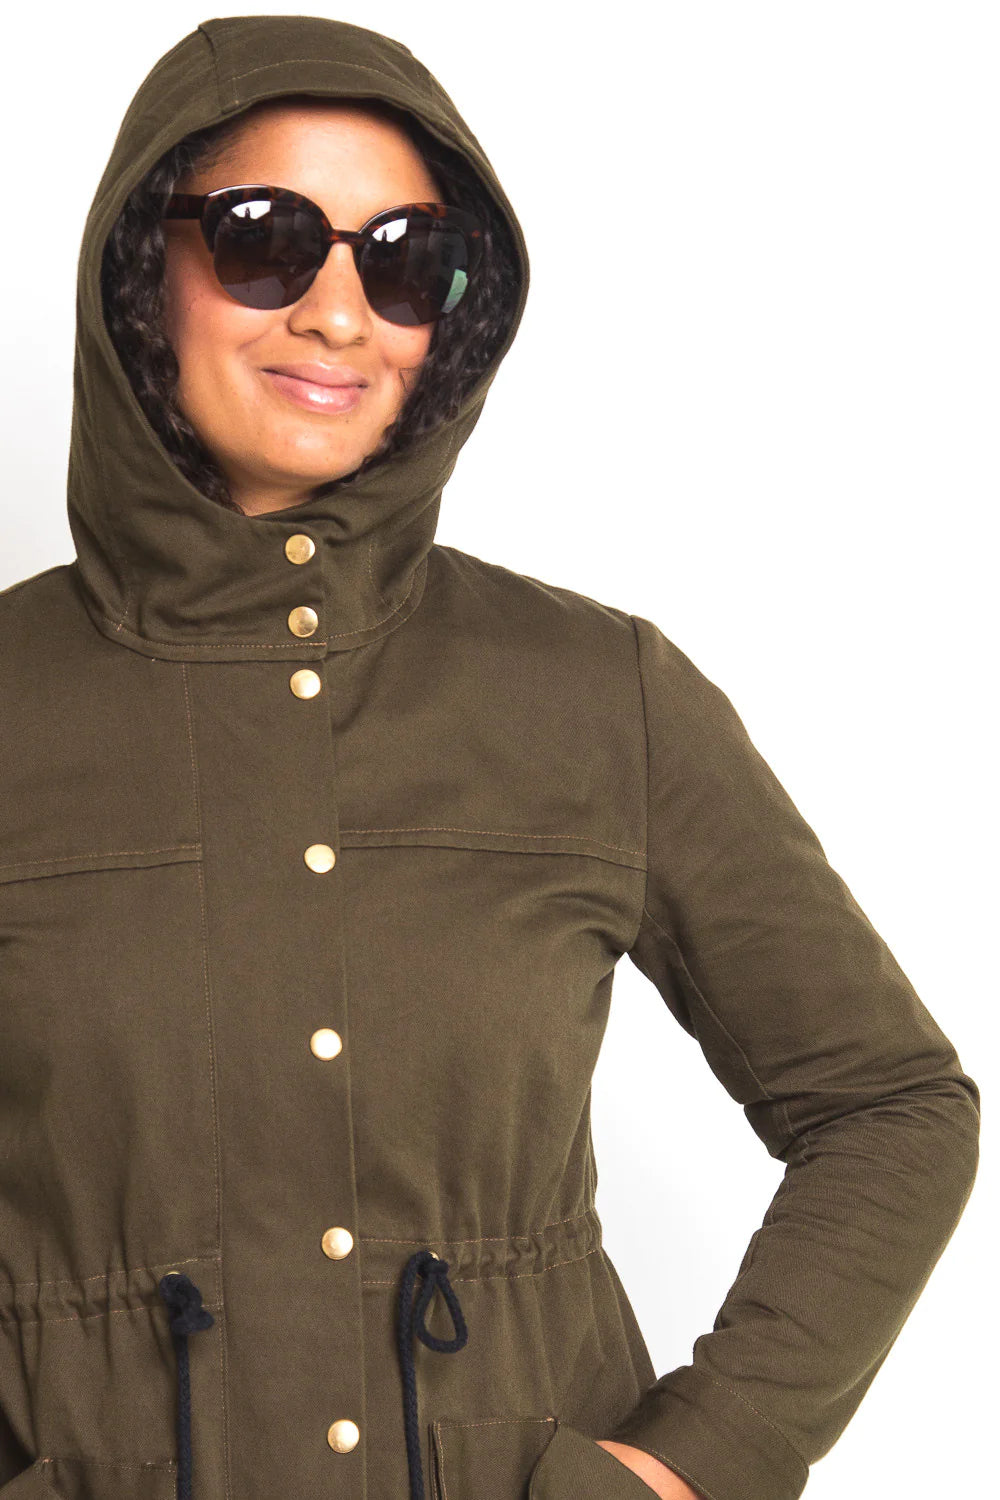
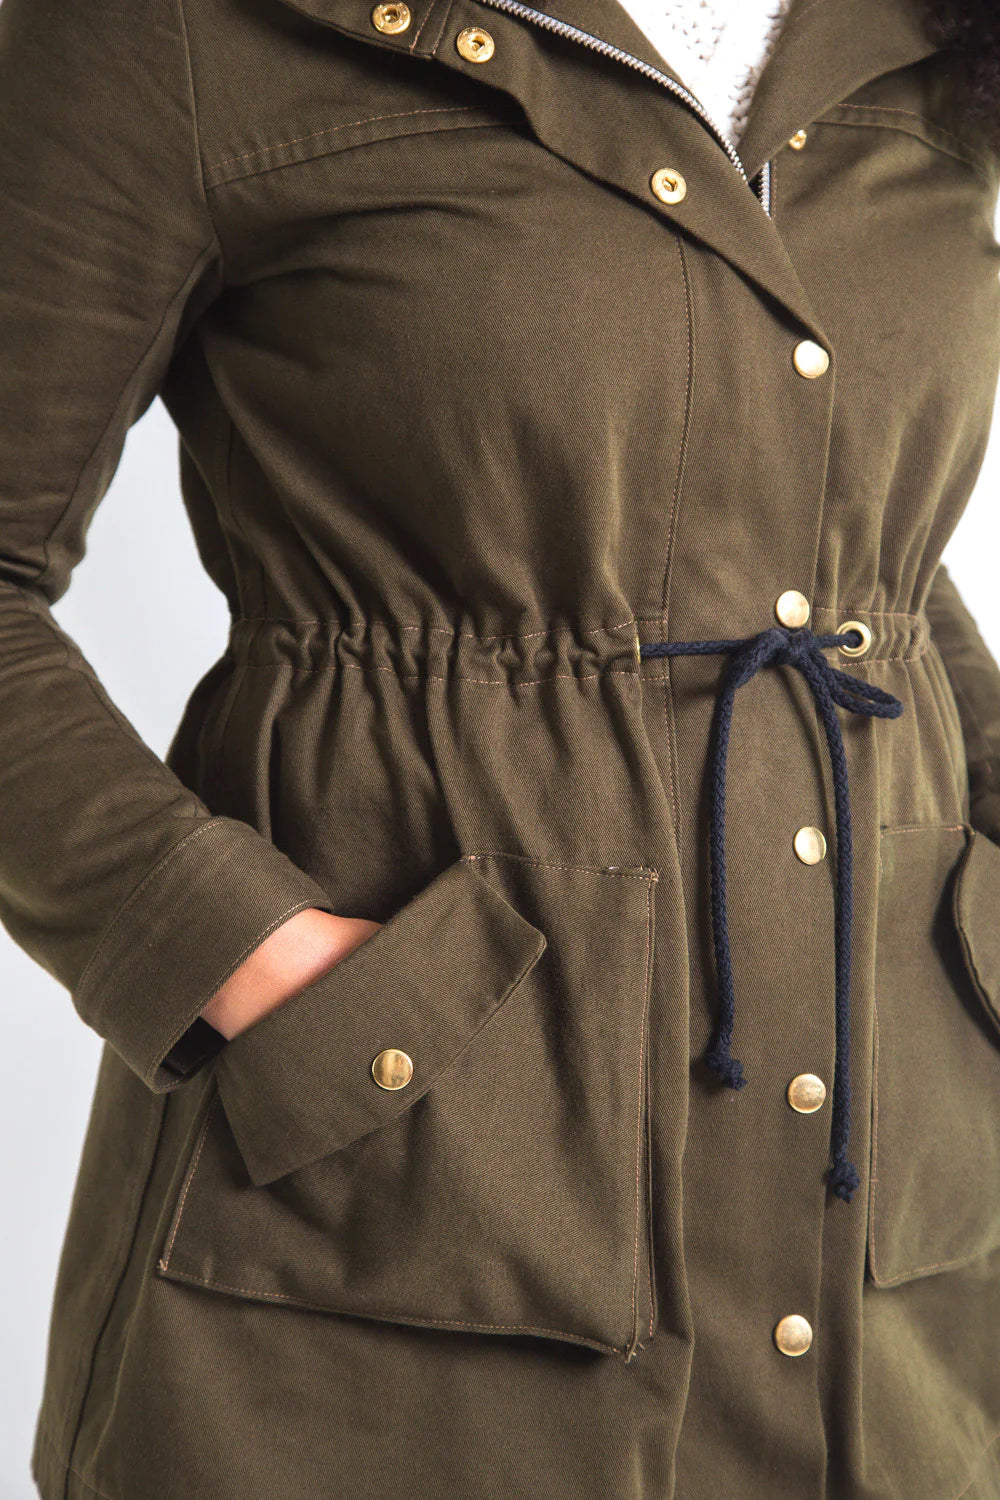
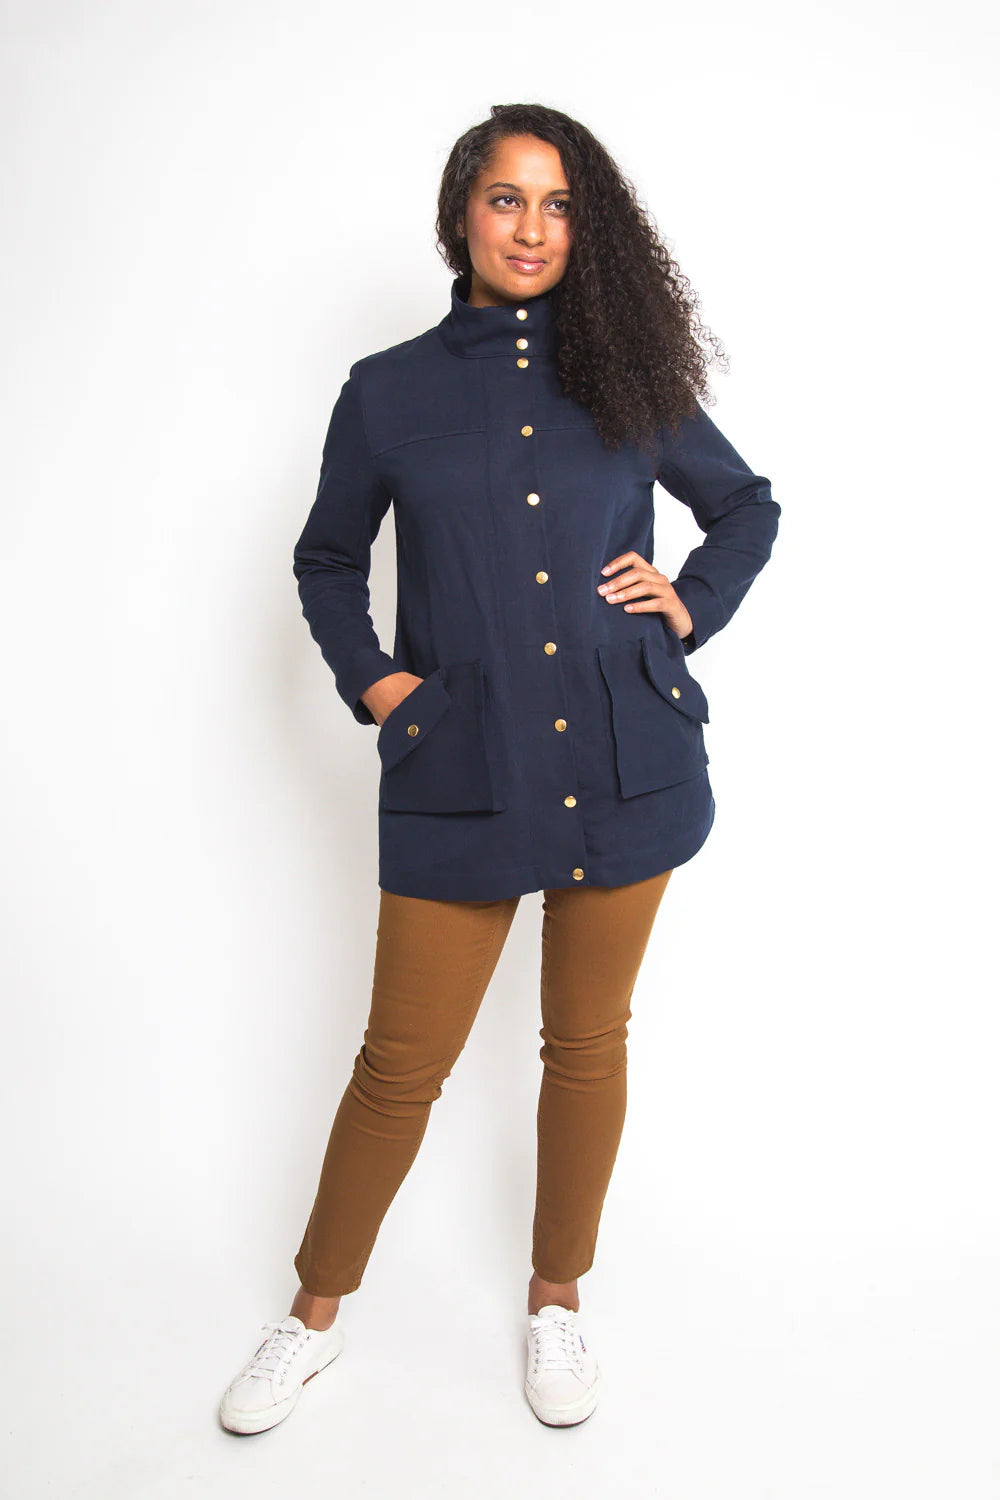
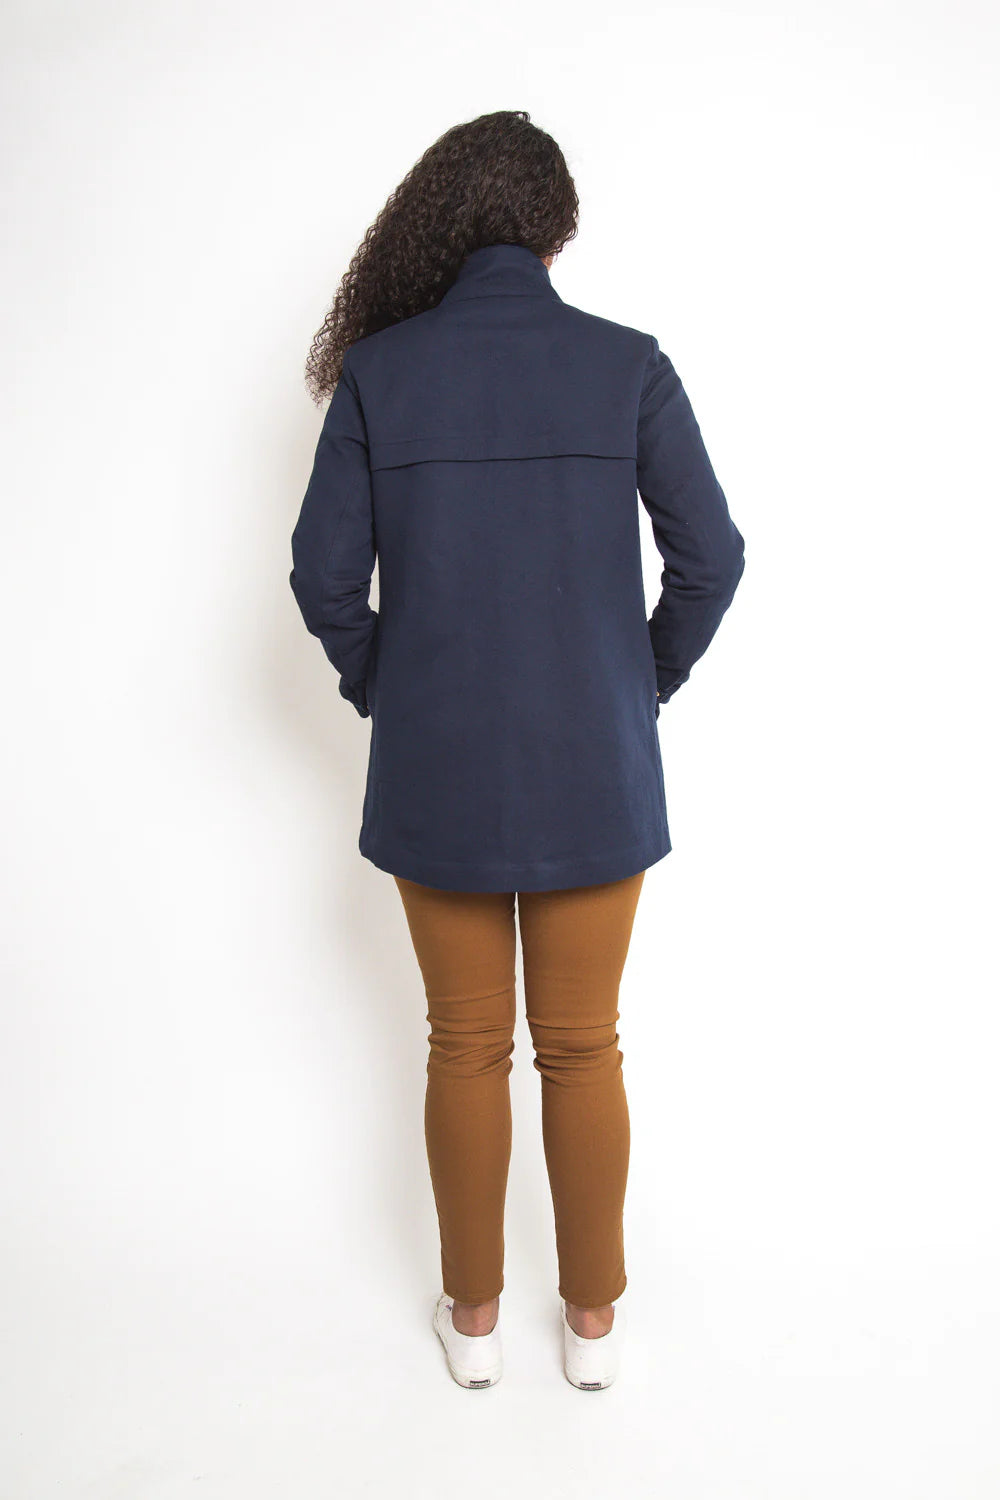
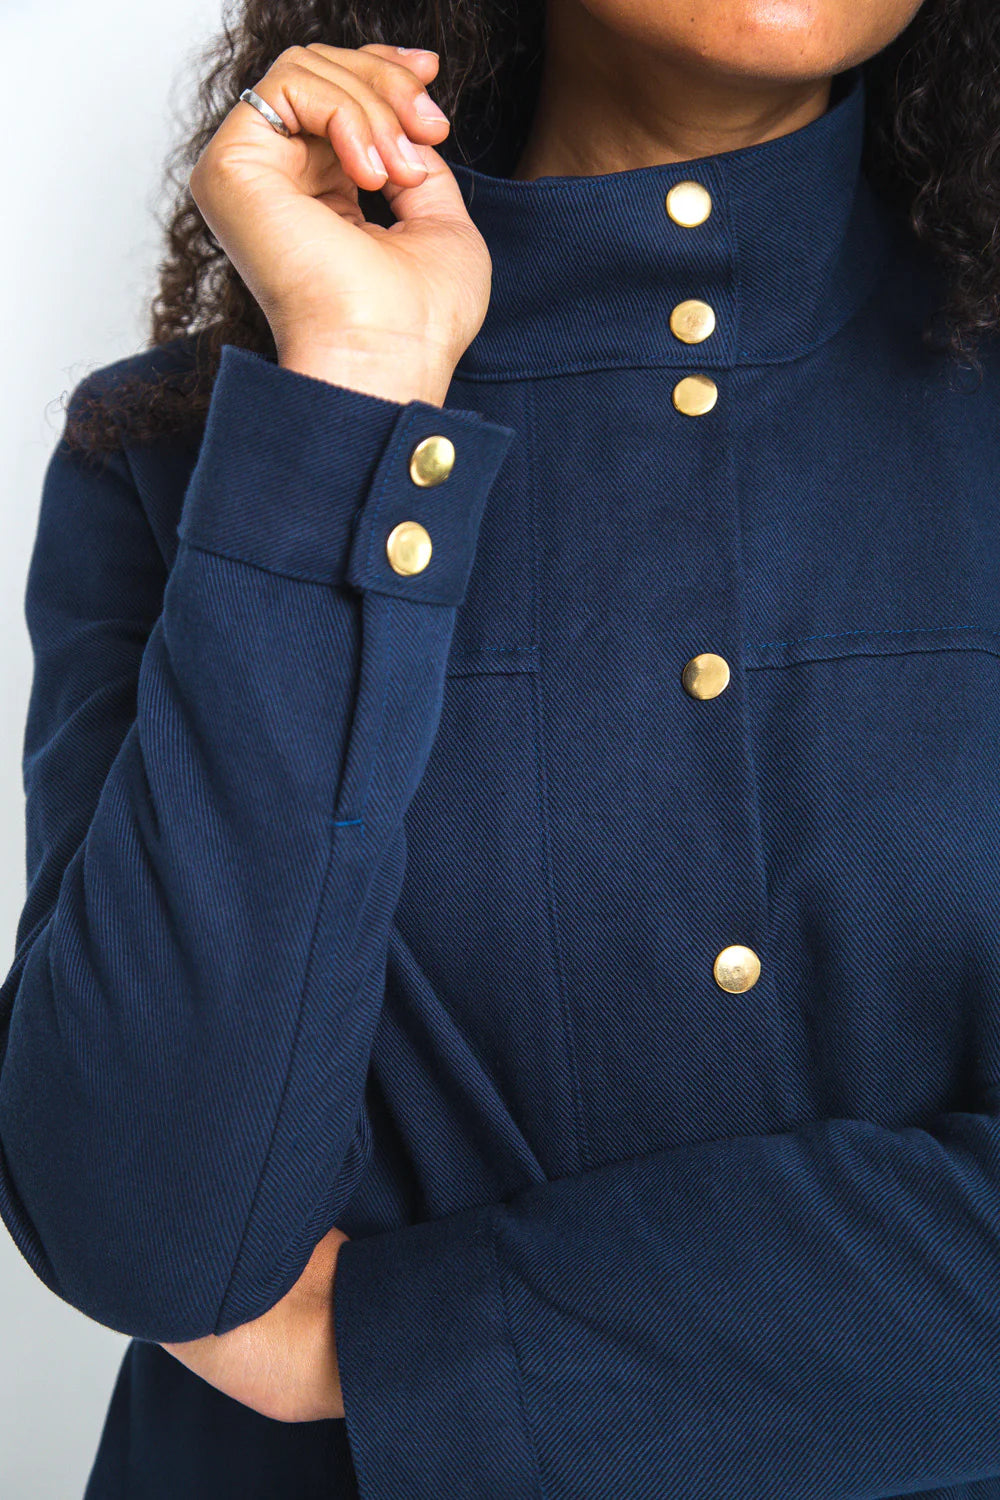
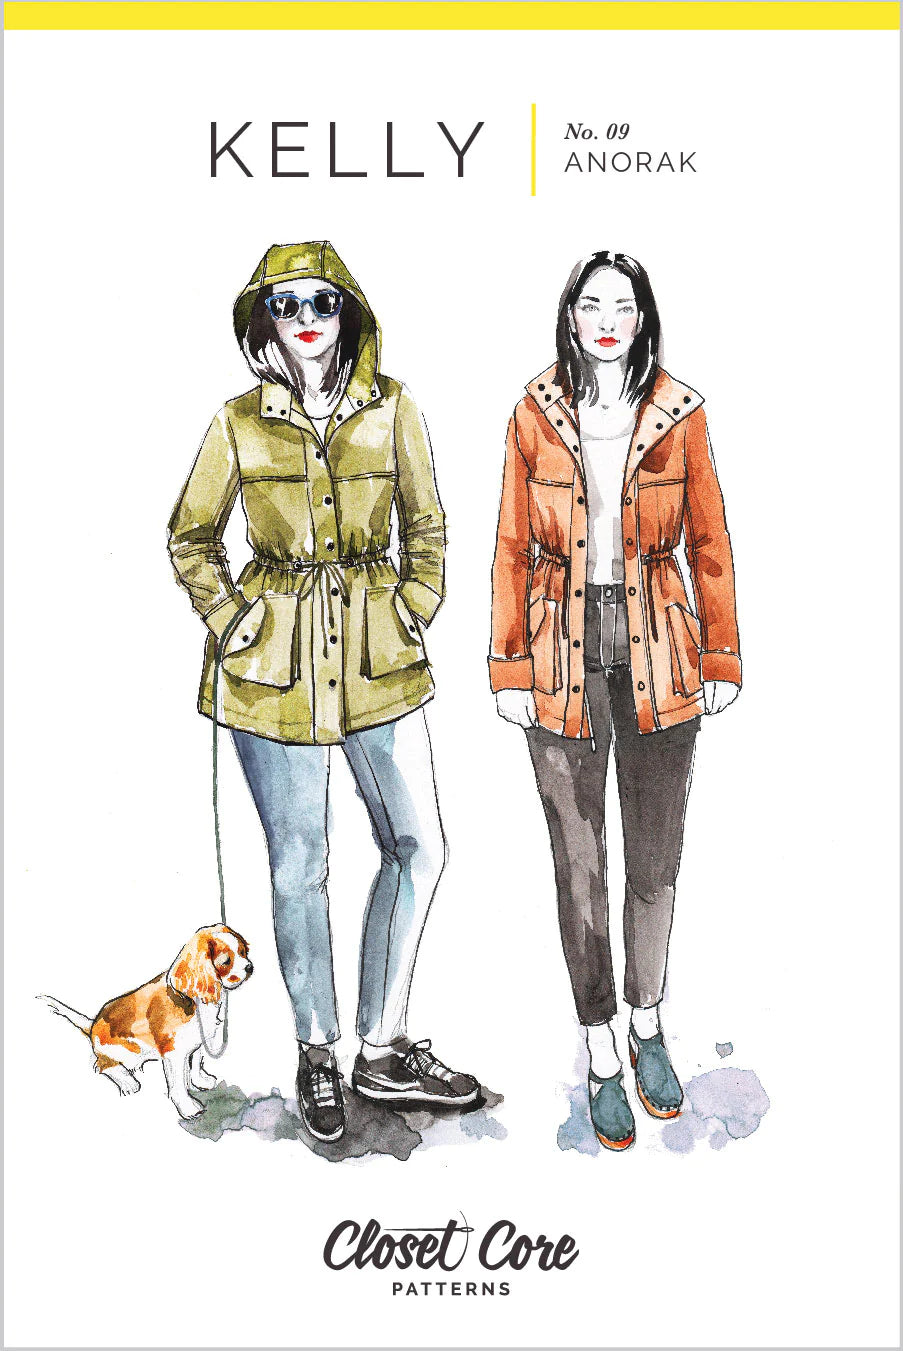
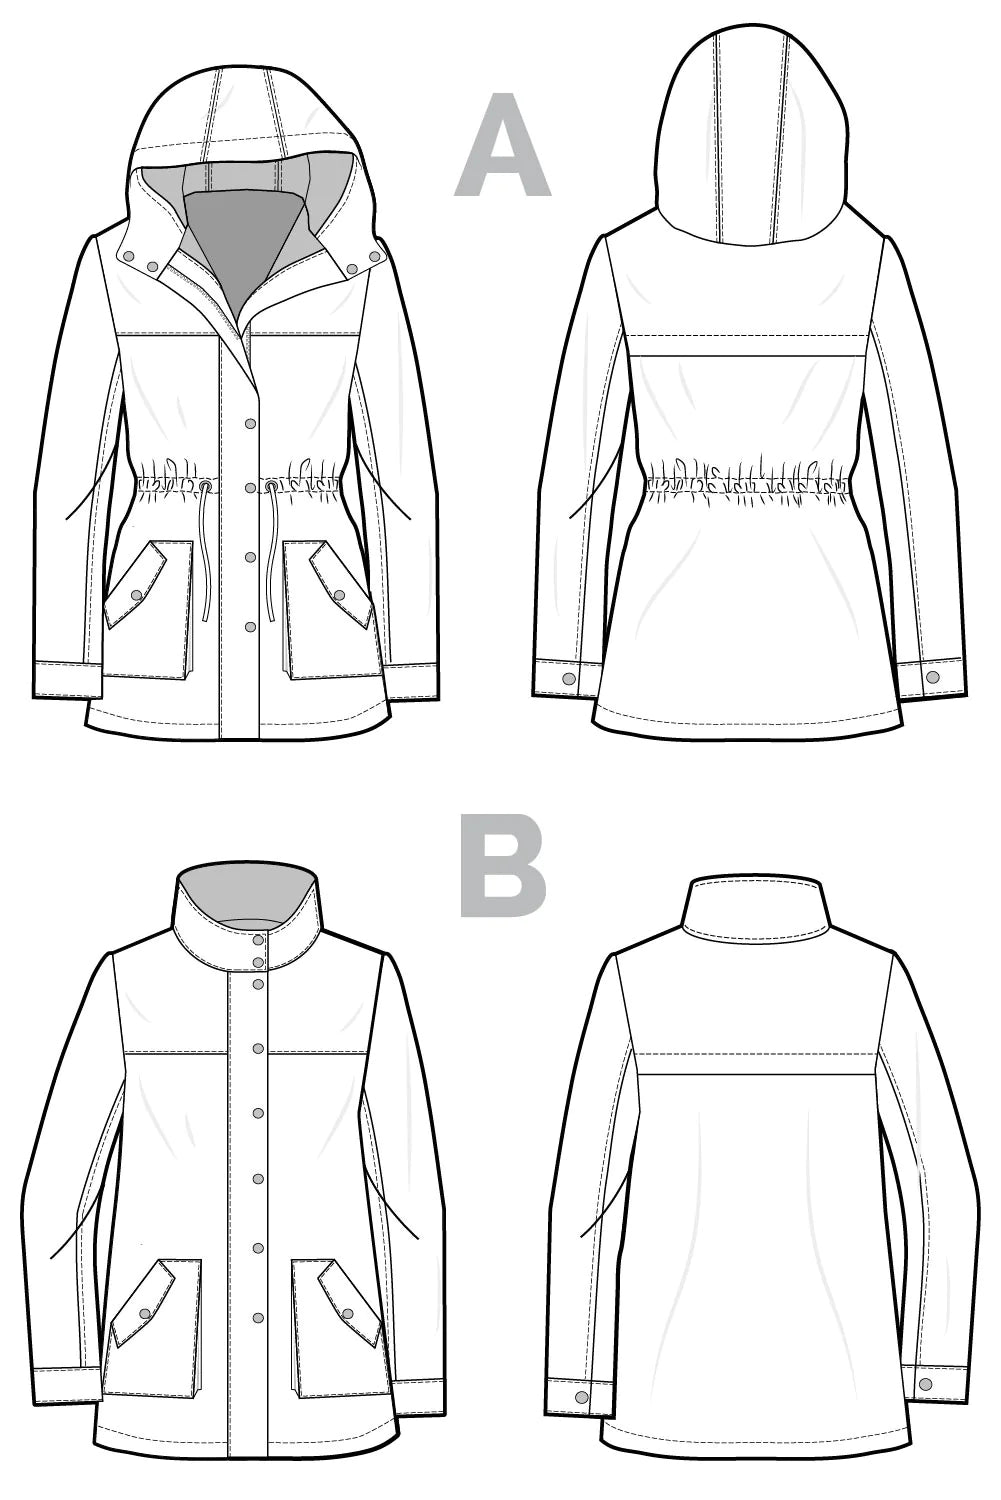
Buy the Kelly Anorak sewing pattern from Closet Core Patterns. Style meets function with the Kelly Anorak. A classic shape with a modern cut, this jacket is the perfect choice for transitional weather. Lightweight and unlined, it features two piece cuffed sleeves, an optional drawstring waist, gusseted flap pockets, and a zipper placket with snap buttons. View A will keep you warm and dry with a roomy three piece hood, while View B features a classic stand-up collar.
This sewing pattern is available to buy in the following format:
- PAPER (next working day dispatch on orders and FREE UK delivery over £50)
Suggested fabrics: Choose medium to heavy weight woven fabrics such as twill, canvas, denim and linen. Make the ultimate raincoat with a waterproof fabric like ripstop, waxed canvas or Gore-Tex.
Fabric requirements:
45" (1.14 m) wide fabric: Sizes 0-8 = 3.5 yd (3.2 m) // Sizes 10-20 = 4 yd (3.75 m).
58" (1.5 m) wide fabric: Sizes 0-8 = 2.5 yd (2.3 m) // Sizes 10-14 = 3 yd (2.75 m) // Sizes 16-20 = 3.5 yd (3.2 m).
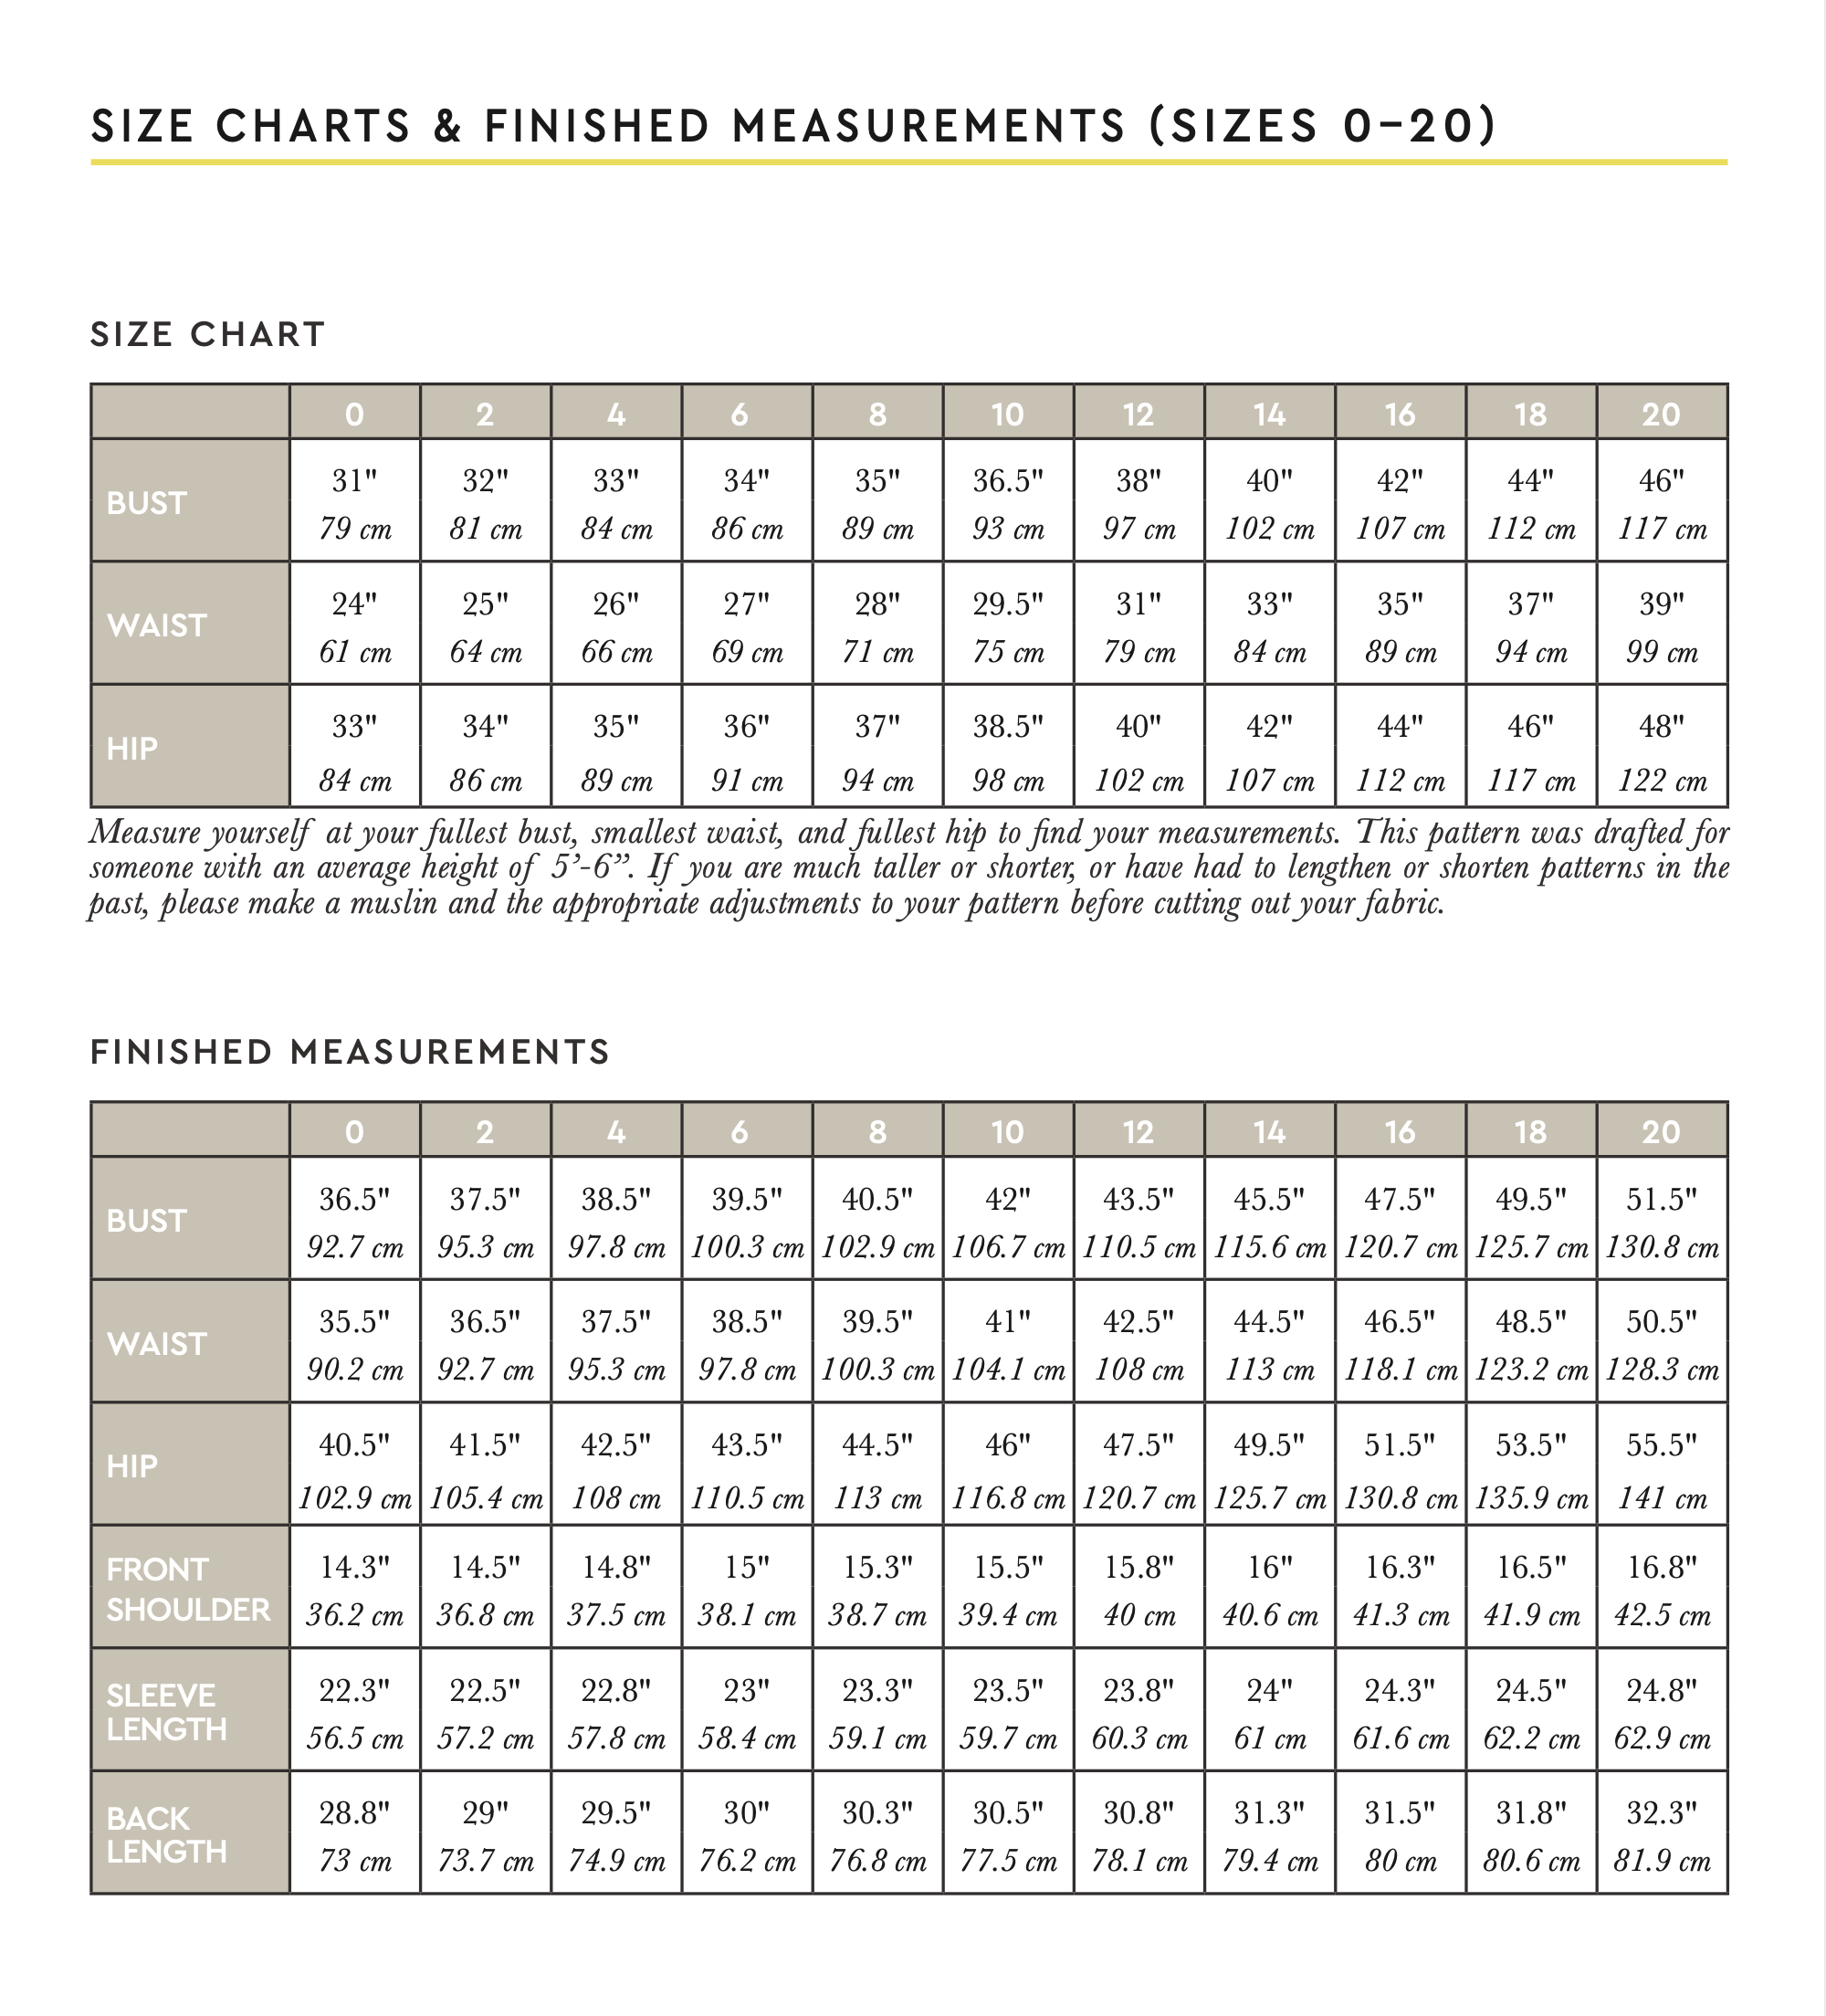
Sizing: 0 – 20 (approx. UK 6 – 20, based on our standardised size chart). Please also check the designer’s size chart and finished garment measurements.
This size range is based on a B cup bust and an average height of 5’6″. Please note that B cup does not refer to bra sizing, but rather to the difference in inches between high and full bust. A 2″ difference between those measurements is equivalent to a B cup.
Notions: 1 yd/m of fusible interfacing; thirteen 1/2"-5/8" (12-15 mm) metal snap buttons; separating 26" coat zipper with pull on left side; 1.5 yd (1.3 m) of drawstring // Optional: 3 yd (2.75 m) of double fold bias tape to finish neckline and coat hem (can be replaced with serged stitch or homemade bias tape); two size #0 or #1 (inside diameter 6-7 mm) grommets (can be replaced with machine buttonholes); topstitching thread.
Note: This pattern is available in an expanded size range on the designer’s website (PDF only).
Note: If you would prefer to line your Kelly Anorak, you can buy a lining expansion pattern directly from the designer (PDF only).
If you're looking for more maker inspiration, check out the latest sewing pattern reviews from the sewing community. We also have a sewing blog to keep you up to date with all the news from the world of sewing.
If you’re looking for maker inspiration check out our blog. With weekly updates on new patterns, styling ideas and maker inspiration, it's not to be missed.
Behold my sunny yellow Kelly Anorak! I always love my most recent make the most, but this one is so practical and needed in my wardrobe, it’s had a lot of love and wear. It’s absolutely perfect for the wet spring we are having here in the UK. This yellow just pops against the grey background and amongst the sea of black and blue anoraks out there.
I made this on a 3 day workshop with Claire Tyler two months ago. Good thing too as it would have taken me months on my own. I’m not the fastest at sewing and wanted to get through as much as possible in those 3 days so I didn’t bother with the topstitching but this is something I’m really regretting. I get topstitch envy when looking at other people’s versions! The pocket and hardware details really make this jacket.
Fit:
I bought the lining expansion pack and used the sleeves from that, which are slightly wider and without a cuff. I cut a size 6 and did an upper rounded adjustment of 1.5cm. This fit pretty well but it’s still a tad tight around my upper back, I might have benefitted from a lower RBA as well.
Fabric:
Outer - Yellow dry oilskin from Merchant & Mills. This was really nice to sew with and has a lovely soft matt feel.
Lining - I used some flannel from my stash to line it, leftovers from the very first garment I made 4 years ago, some PJ bottoms. The jacket was still pretty lightweight and I was surprised how warm and windproof it felt.
Sleeves - Royal blue Bremsilk from Bloomsbury Square Fabrics left over from my Eden Coat
I redid the zip 3 times, as having sewn it on one side, I was 1cm too long on the other side. This meant the yoke and drawstring channels didn’t match up but I finally managed it with a lot of easing in.
I used silver hardware which was a faff for me to find for some reason, they were either out of stock or the wrong size or needed a very specific search term. On some sites ‘cord ends’ seemed interchangeable with ‘cord stoppers’ or toggles …
Also folks, don’t do what I did and attach one side of your snaps before marking the other side through the hole. This will add plenty of time to your project, ask me how I know!
Lots more photos and details on my blog if you're interested.
https://www.mingmakes.com/post/kelly-anorak
This is exactly what I was looking for in a coat pattern! I love all the features: hood, drawstring, cuffed sleeves and the option of beautiful finishes on the inside.
The pattern is unlined, but I chose to underline it with liberty cotton lawn. I did purchase the lining expansion, but that requires a different sleeve and for this coat I wanted to keep the original cuffs.
The instructions were easy to follow and I also used the sew a long on the closet case patterns website for extra reassurance.
I would recommend using a ruler to make sure the drawstring casing is straight.
The seam finishes have been well thought out, with the option of using flat felled seams and bias binding which give a really professional looking finish.
It's quite close fitting, which I like, but if I make it again for winter I would probably grade out or size up to accommodate bigger jumpers. I made the size according to my bust measurement (after checking with a tape measure that my waist and hips would fit in this size) but in hindsight I should have graded out.
It took 12 evenings to cut and sew, a more involved make but definitely worth it!
I sewed the lined Kelly Anorak with the waterproof pockets. Something to note is that if you are using the lining expansion, both the outer and lining pattern pieces for the sleeves come from the lining expansion pattern. The outer sleeves will not fit with the lining right if you cut that piece out from the main pattern.
Fabric used:
Main fabric: 3-ply Ultrex in Forest Green from Seattle Fabrics
Lining fabric: from my stash
Size traced and sewn
Graded from a size 12 at the bust to a size 14 at the hips.
Alterations*
,Did a 1" bicep adjustment
,Lengthened sleeve by 1"
,Lengthened body by 1"
*Made all adjustments to the lining as well.
Construction Notes
Here are some of my key take-aways:
,I didn't find the Ultrex difficult to sew, but I did have to get a special microtex needle and finish all the seams with iron-on seam tape to keep it truly waterproof.
,The Ultrex fabric is available in 2 and 3-ply and what makes it 3-ply is an attached tricot lining (the idea is that this fabric could be sewn unlined). I learned not to use steam when interfacing this fabric as it seemed to melt the attached lining and cause wrinkles. This didn't really matter as the insides end up completely enclosed in the lined version, so when it was all said and done you couldn't see any wrinkles from the outside.
,Use Wonderclips and lots of them! I had to use pins in a couple of places, such as pinning the lining to the body to sew the drawstring casing on and when encasing the bottom of the lining. Other than that, I did not use pins, even on the sleeves.
,Use Wondertape for placing and basting on the drawstring casing (before attaching the lining).
,For the size jacket I made, I used about six yards of seam tape.
,Ironing on the seam tape at the armholes made the sleeve seams pucker. Stretching the fabric as much as possible around a tailor's ham and sleeve roll helped.
,Don't be tricked into thinking this jacket is too difficult to make by the fancy hardware. I realize that is a big part of what makes this jacket so impressive, but I just used the hardware kit from Closet Case Patterns. Everything I needed was in there and I just followed the installation directions on the Kelly Anorak sewalong on the Closet Case Patterns blog.
,The only dumb thing I did was to hammer one of the snaps against the fabric, which made a tiny mark in the fabric that I can't get out. After that, I made sure to place the outer part of the snap directly against my cutting mat before hammering.
,My total sewing time was about 45 hours. This does not include the time it took to trace the pattern, do a muslin, or make pattern adjustments.
Fit
After wearing this jacket for a bit—with a lot of bulky sweaters underneath since it's been winter—I'm thinking I maybe should have done a broad back adjustment or sized up. The back feels a smidge restrictive. I added an inch to the sleeves, and even pressed the sleeves in a way that gave me a bit more length, but I could have benefitted from another inch. Speaking of which, when I put the jacket on, the lining rolls way out with my hand and I have to tuck it back in. I have no idea if this is because of the lining fabric I chose (which is rayon) and either it is not slick enough for my arm to slide in or it stretched out a bunch during sewing or if this is also a size issue. Is it because the arm is made too tight with all the layers I have been wearing? It doesn't really feel too tight. I used a rayon lining with my Ellsworth Coat and the sleeve is constructed in much the same way and I don't have this problem with that jacket, even when I am wearing multiple layers under it. Anyway, my solution was to stitch in the ditch a few inches up along the sleeve seams at the cuff, which keeps it from pulling way out of the sleeve like it was, but it still feels a little weird when I put it on.
This jacket has been great in the rainy Seattle winter weather. It keeps me dry and there have been zero leaks! I could see this jacket not being warm enough if it got unusually cold for this region, but the fabric by its nature seems to have great wind-breaking properties. As long as I layer sufficiently and zip it up, I am quite comfortable.
Overall, I am very happy with this jacket and sewing it was a lot of fun. Between sewing mostly without pins and having to enclose all of the seams with seam tape, this project was a great one for slowing down and focusing on getting it right, not doing it quickly.
More on my blog at www.rakeandmake.com/waterproof-kelly-anorak/
What a great pattern! This is my second Kelly (my first was a wearable toile) and for this jacket I made sure to use quality hardware - it does make such a difference! I used a Tory Birch cotton twill from The Fabric Store, and the findings kit from Closet Case Files. To suit our climate, I made up the unlined Anorak (you can purchase the lining pattern seperately). I flat felled the seams as instructed to give a lovely finish. This is such a classic design and I know I'll be wearing it for years to come.
Size made: 6. Modifications: forward shoulder adjustment.
I purchased the pattern and the lining extension and made the hooded, lined version with the drawstring waist. I made a size up from normal so I could fit a jumper underneath. The fabric I used was a lightish weight drywax cotton and I also decided to waterproof all the seams (you need 12 metres to cover all the seams). I also added an internal zip pocket in the lining to keep my phone dry. The combination of clear instructions and excellent sew alongs make this an involved but uncomplicated make as long as you follow the instructions and tips in the right order. Although if you are waterproofing the seams its best not to sew the lining to the outer along the drawstring as that would ruin the integrity of the waterproofing, I left my lining loose.
Votre panier est vide
Dépensez £50.00 de plus et obtenez la livraison gratuite!