


Prix régulier
£14.00 GBP
Prix de vente
£14.00 GBP
Prix régulier
£14.00
Check out our latest patterns and get free UK delivery on orders over £50.

We print out the A0 pattern sheets, but you’ll need to download the digital instructions, as we don’t print these. The PDF files will be emailed immediately after purchase, and the printed A0 pattern sheets will be dispatched next working day.
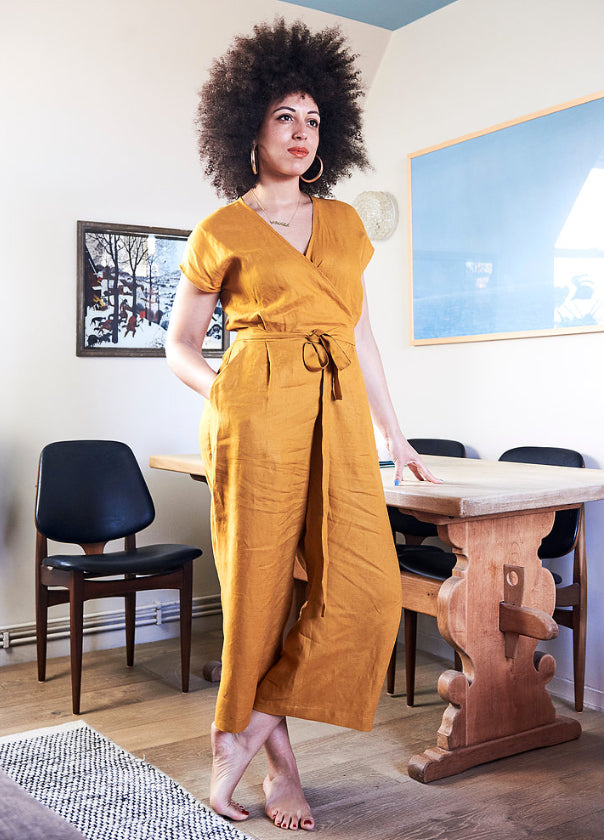
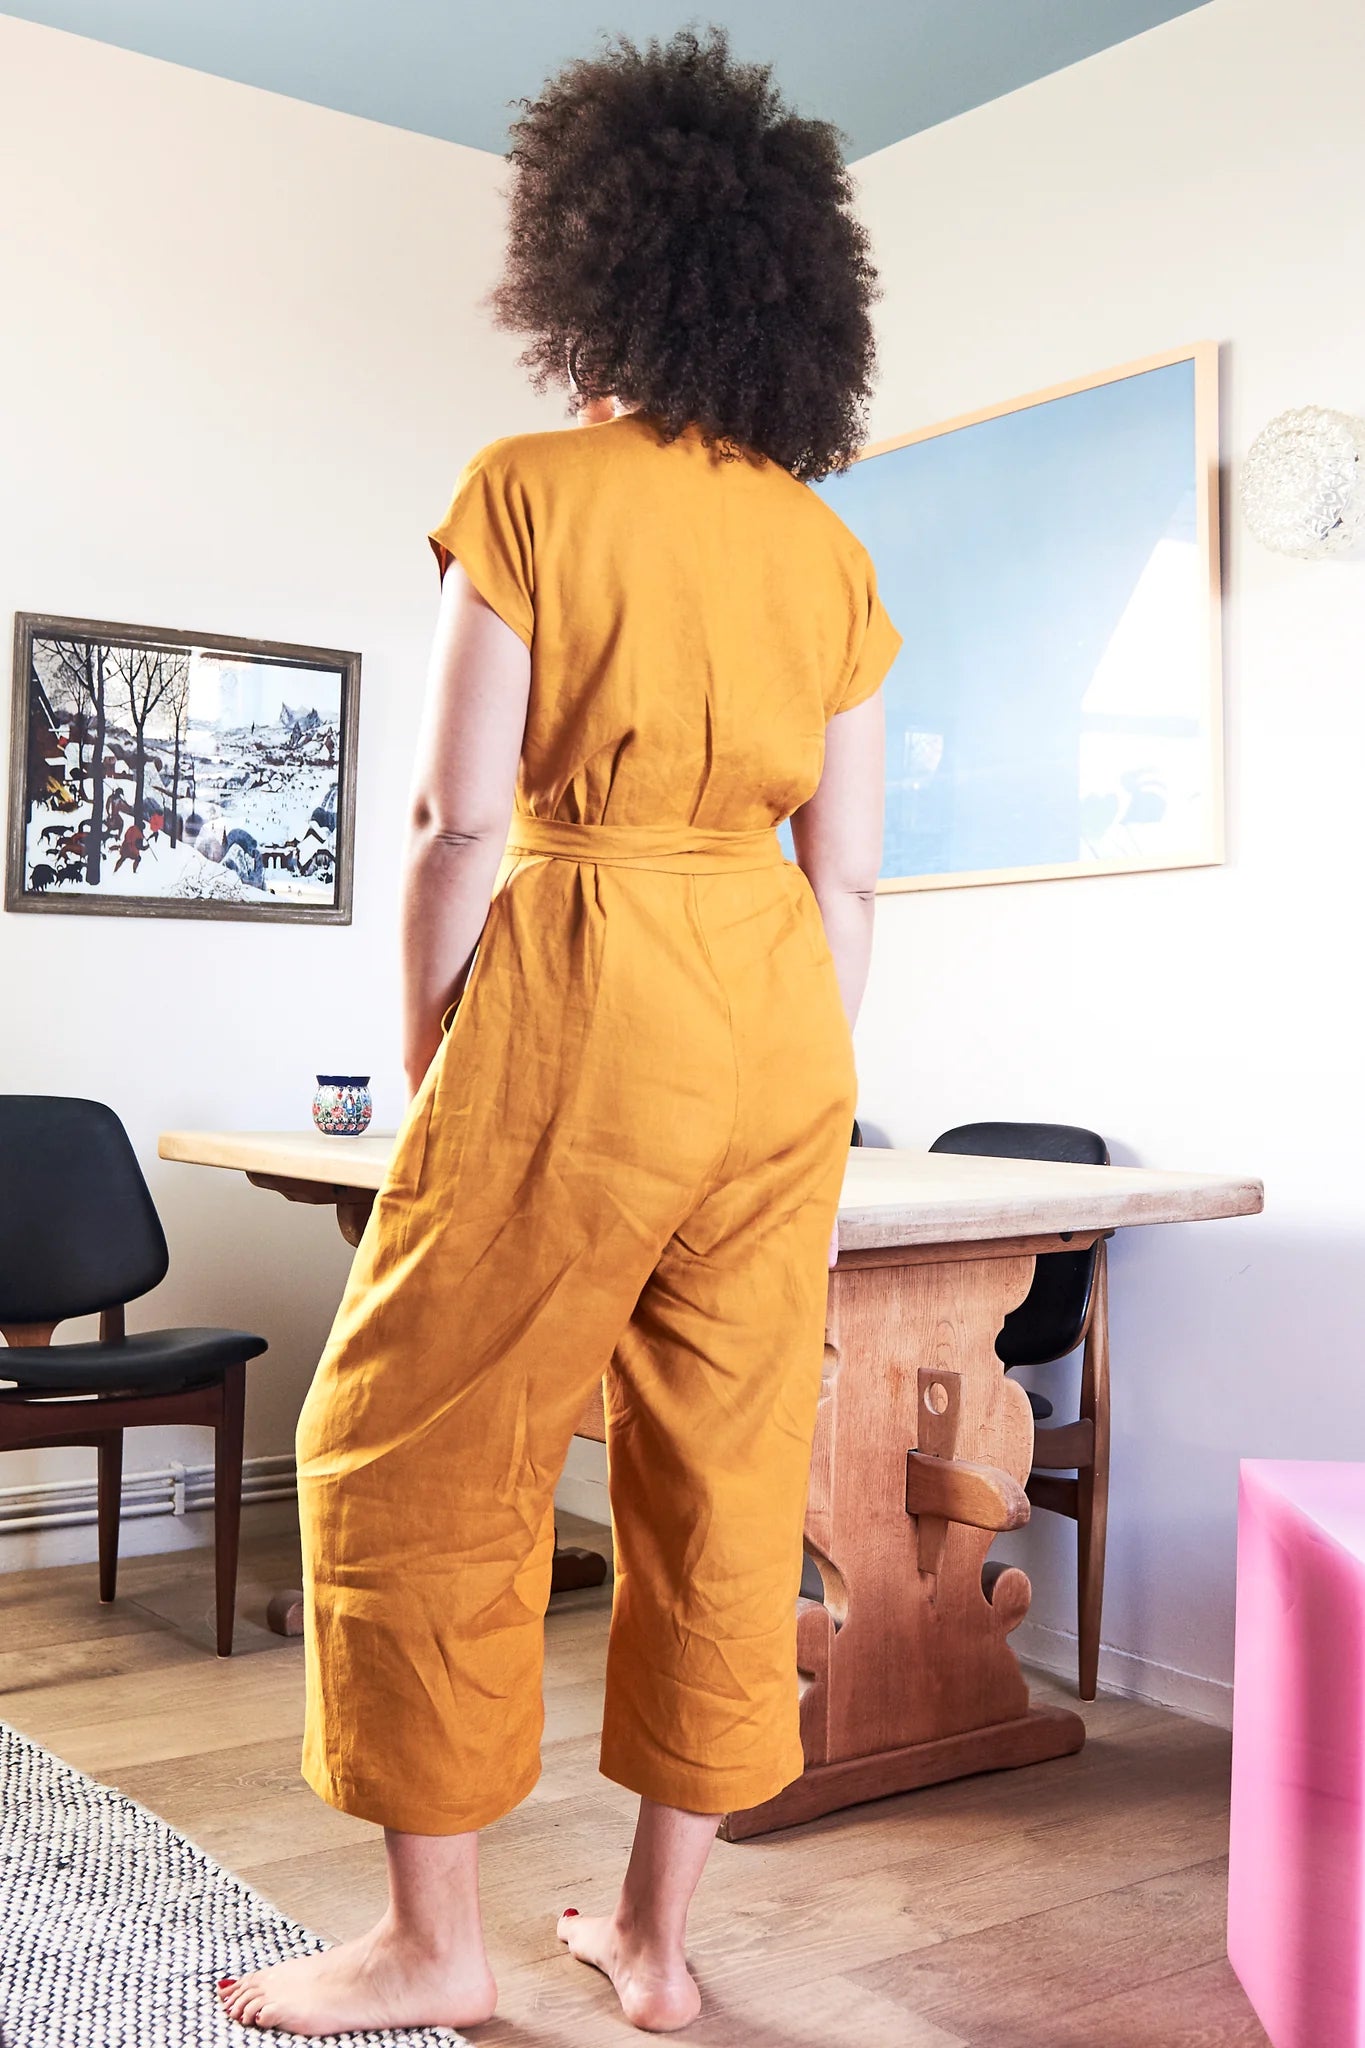
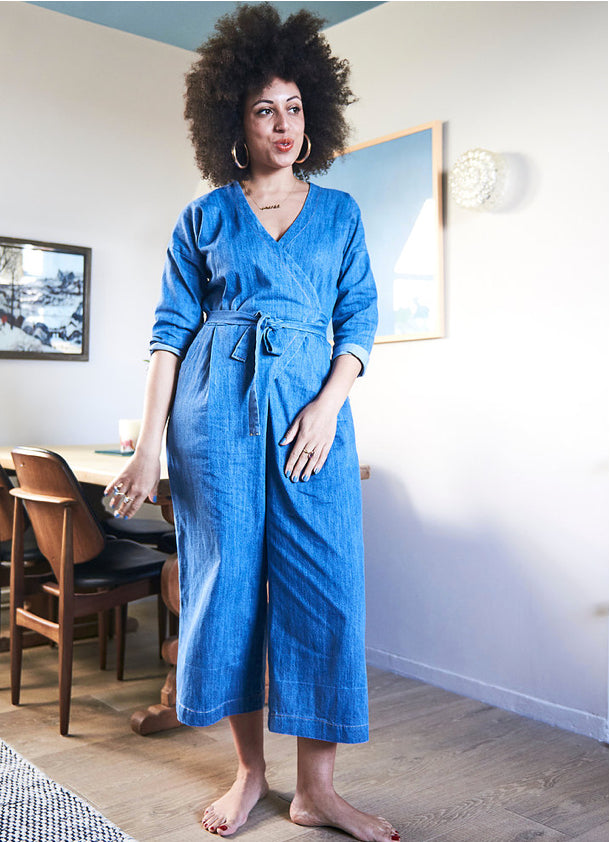
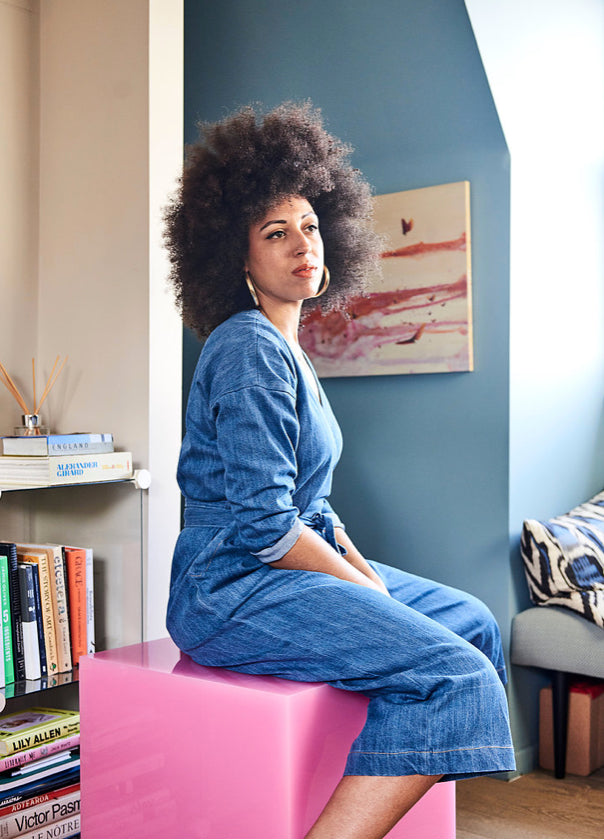
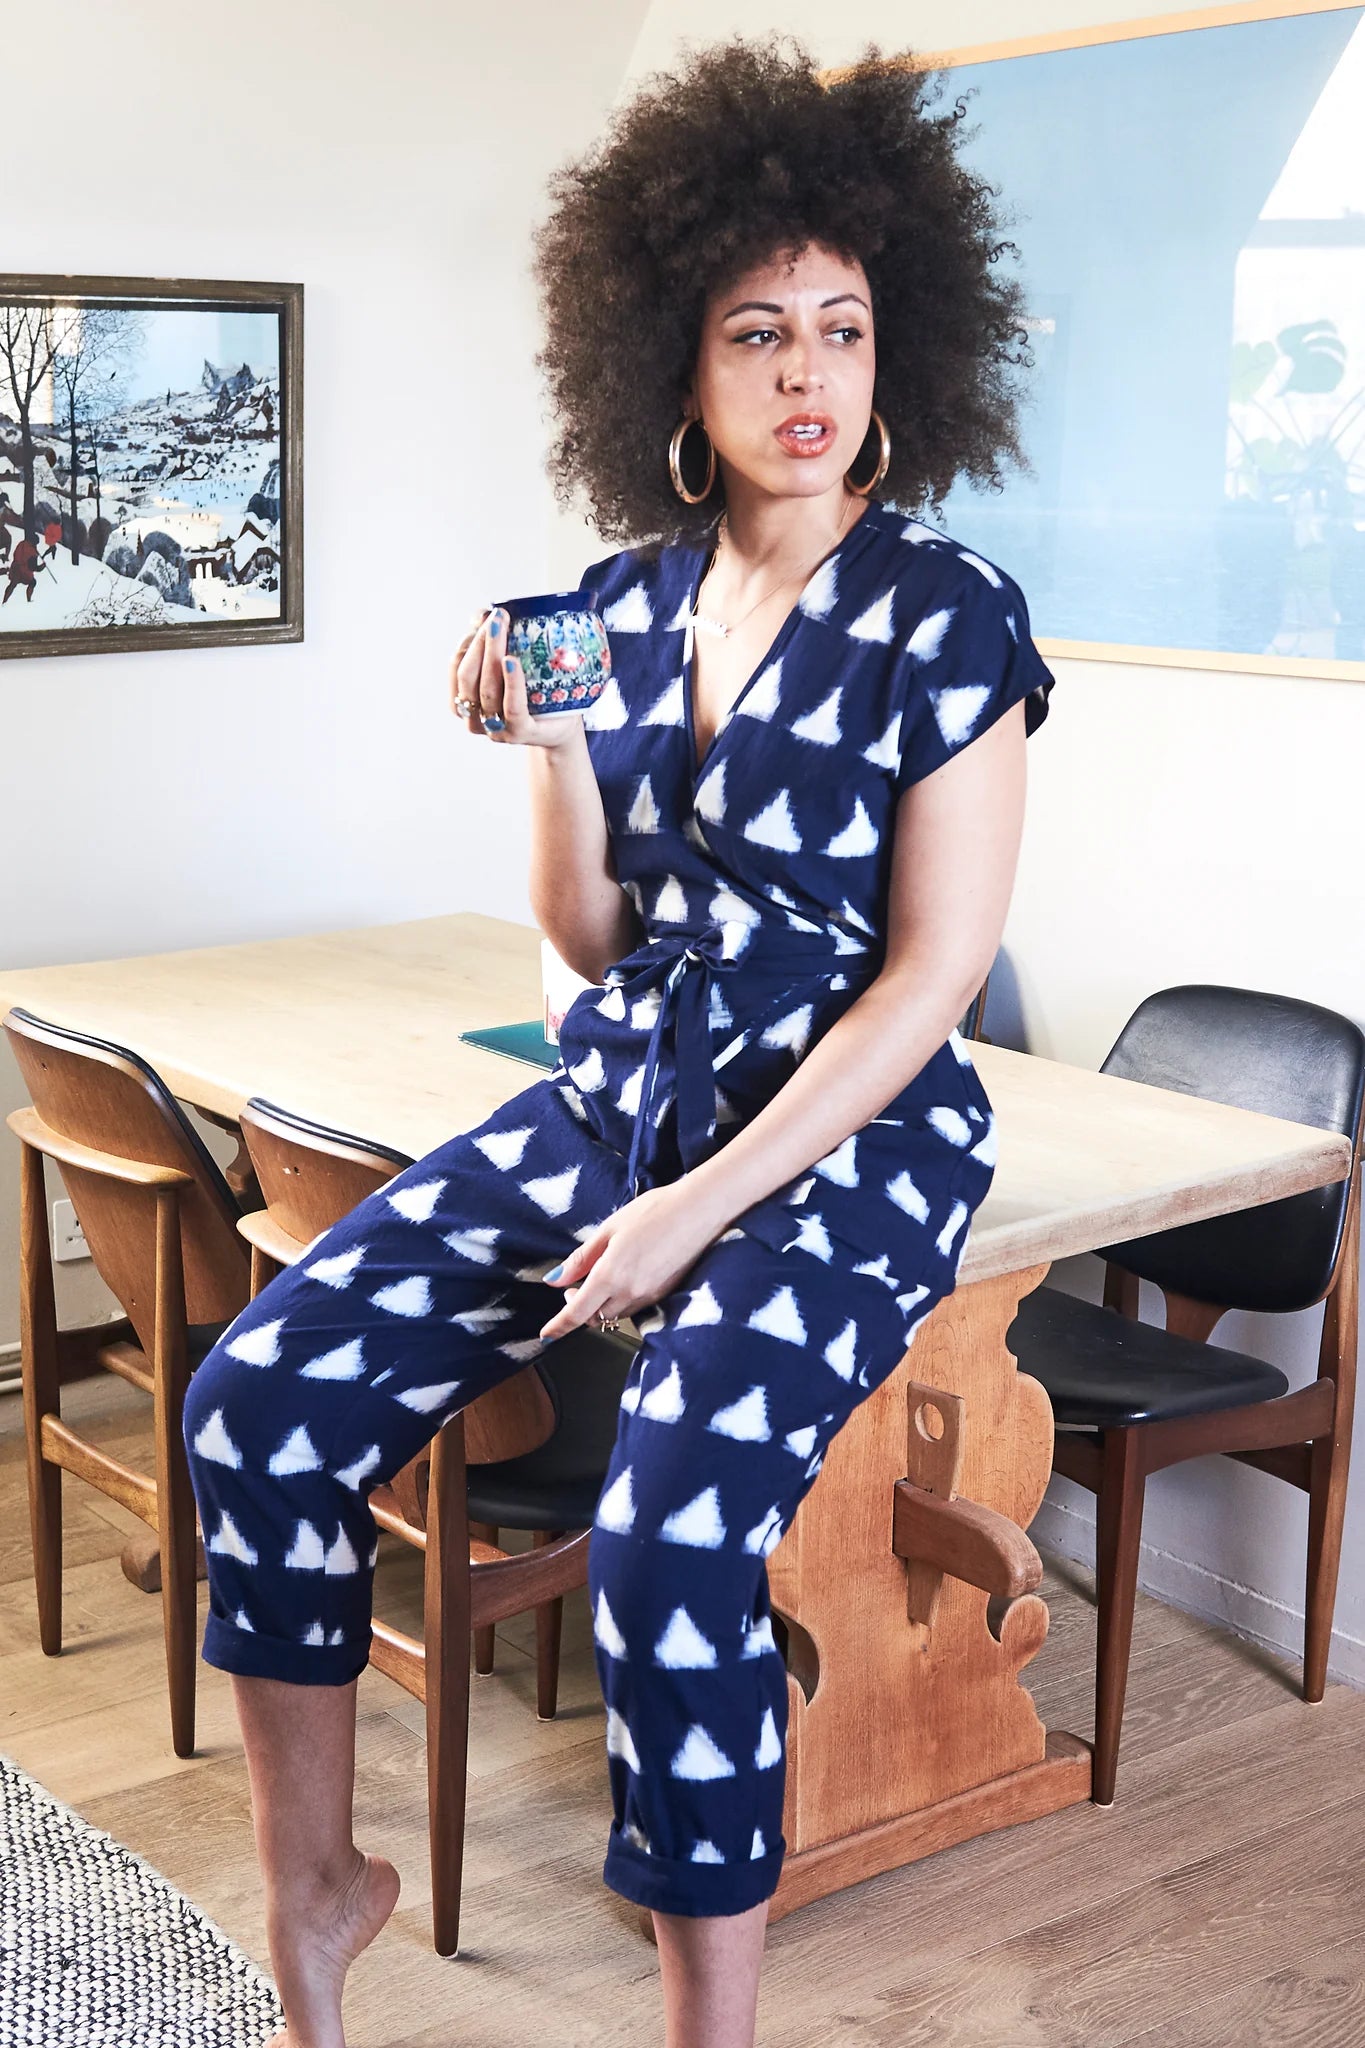
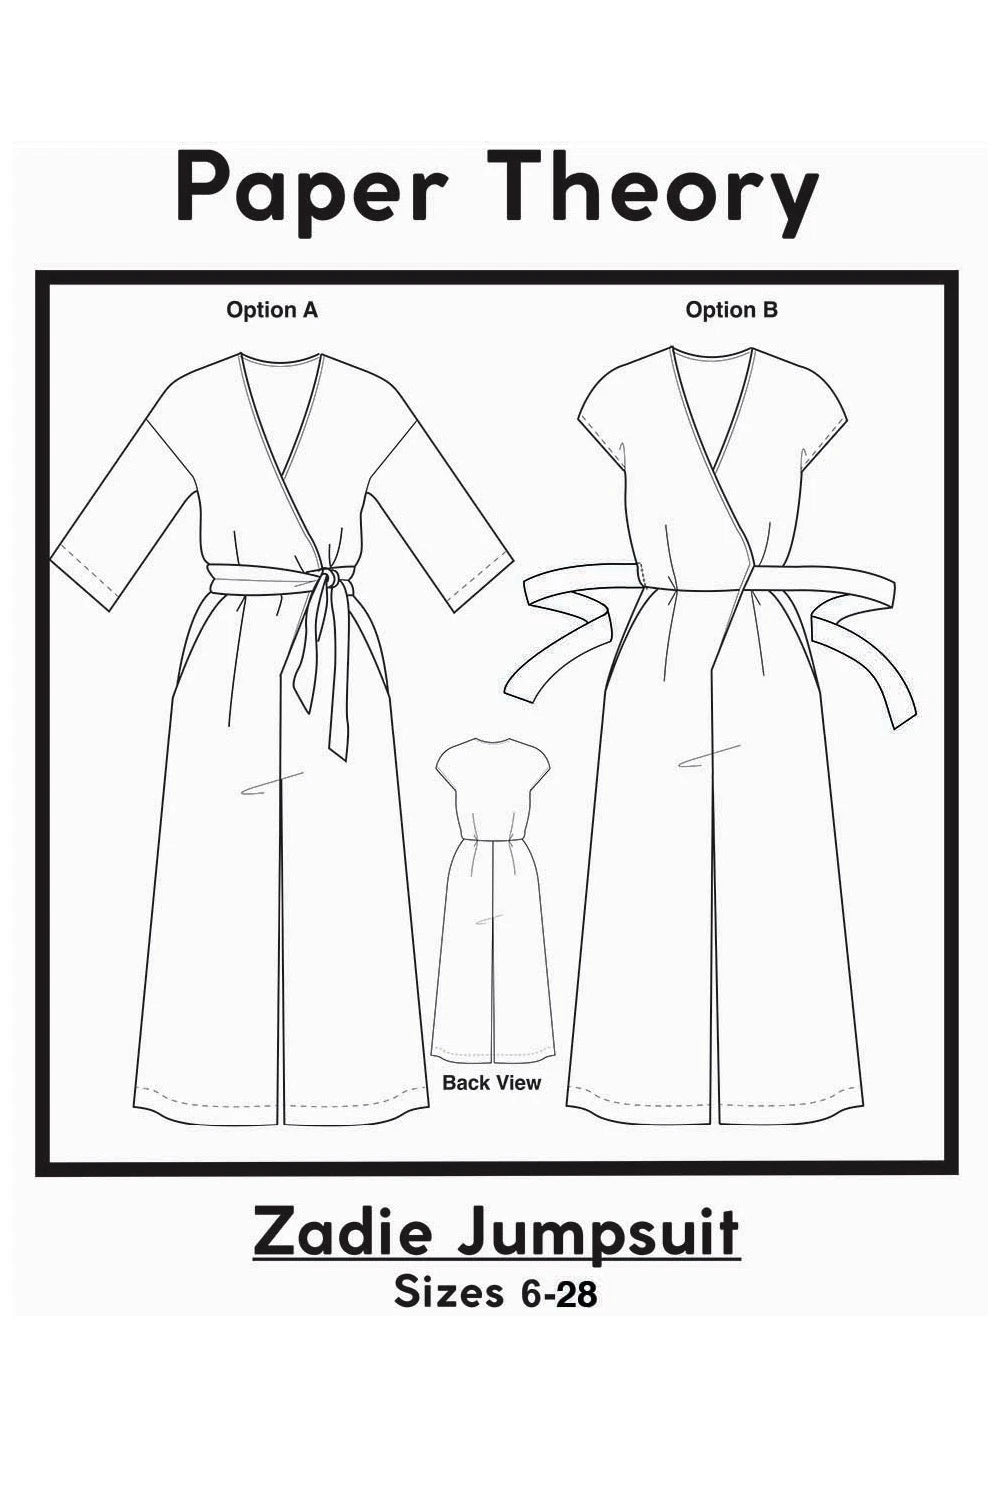
Buy the Zadie Jumpsuit sewing pattern from Paper Theory Patterns. The Zadie Jumpsuit is a relaxed and easy to wear one piece. It wraps around the body and fastens with a tie so there is no need for buttons or a zip - making it quick and easy to sew, and quick and easy to get on and off. The jumpsuit can be sleeveless with a dropped shoulder or have wide 3/4 length sleeves. The legs are cut wide and skim above the ankle. It has deep slant pockets on the front, and small pleats at the waist on both the front and back. The neck edge is finished with bias binding.
Note: A pattern expansion (sold separately) is available for the Zadie Jumpsuit. Use the Zadie Dress Expansion to make a wrap dress version of Zadie!
This sewing pattern is available to buy in the following formats:
– PDF (available to download immediately after purchase). What is a PDF?
– PDF pattern + Printed A0 copy shop (We print out the A0 pattern sheets, but you'll need to download the digital instructions, as we don't print these. The PDF files will be emailed immediately after purchase, and the A0 pattern sheets will be dispatched next working day). What is Copy Shop?
Suggested fabrics: This pattern was designed especially for woven, medium weight fabrics like cotton and linen and would look great in fabric that has a draped quality like crepe, viscose twill or satin. It would also make up well in some heavier fabrics like drill and light weight denim. It is possible to make this in knit or stretch fabrics like jersey but the binding technique around the neck is tricky in a stretch fabric so be warned that would take the difficulty degree up a few notches.
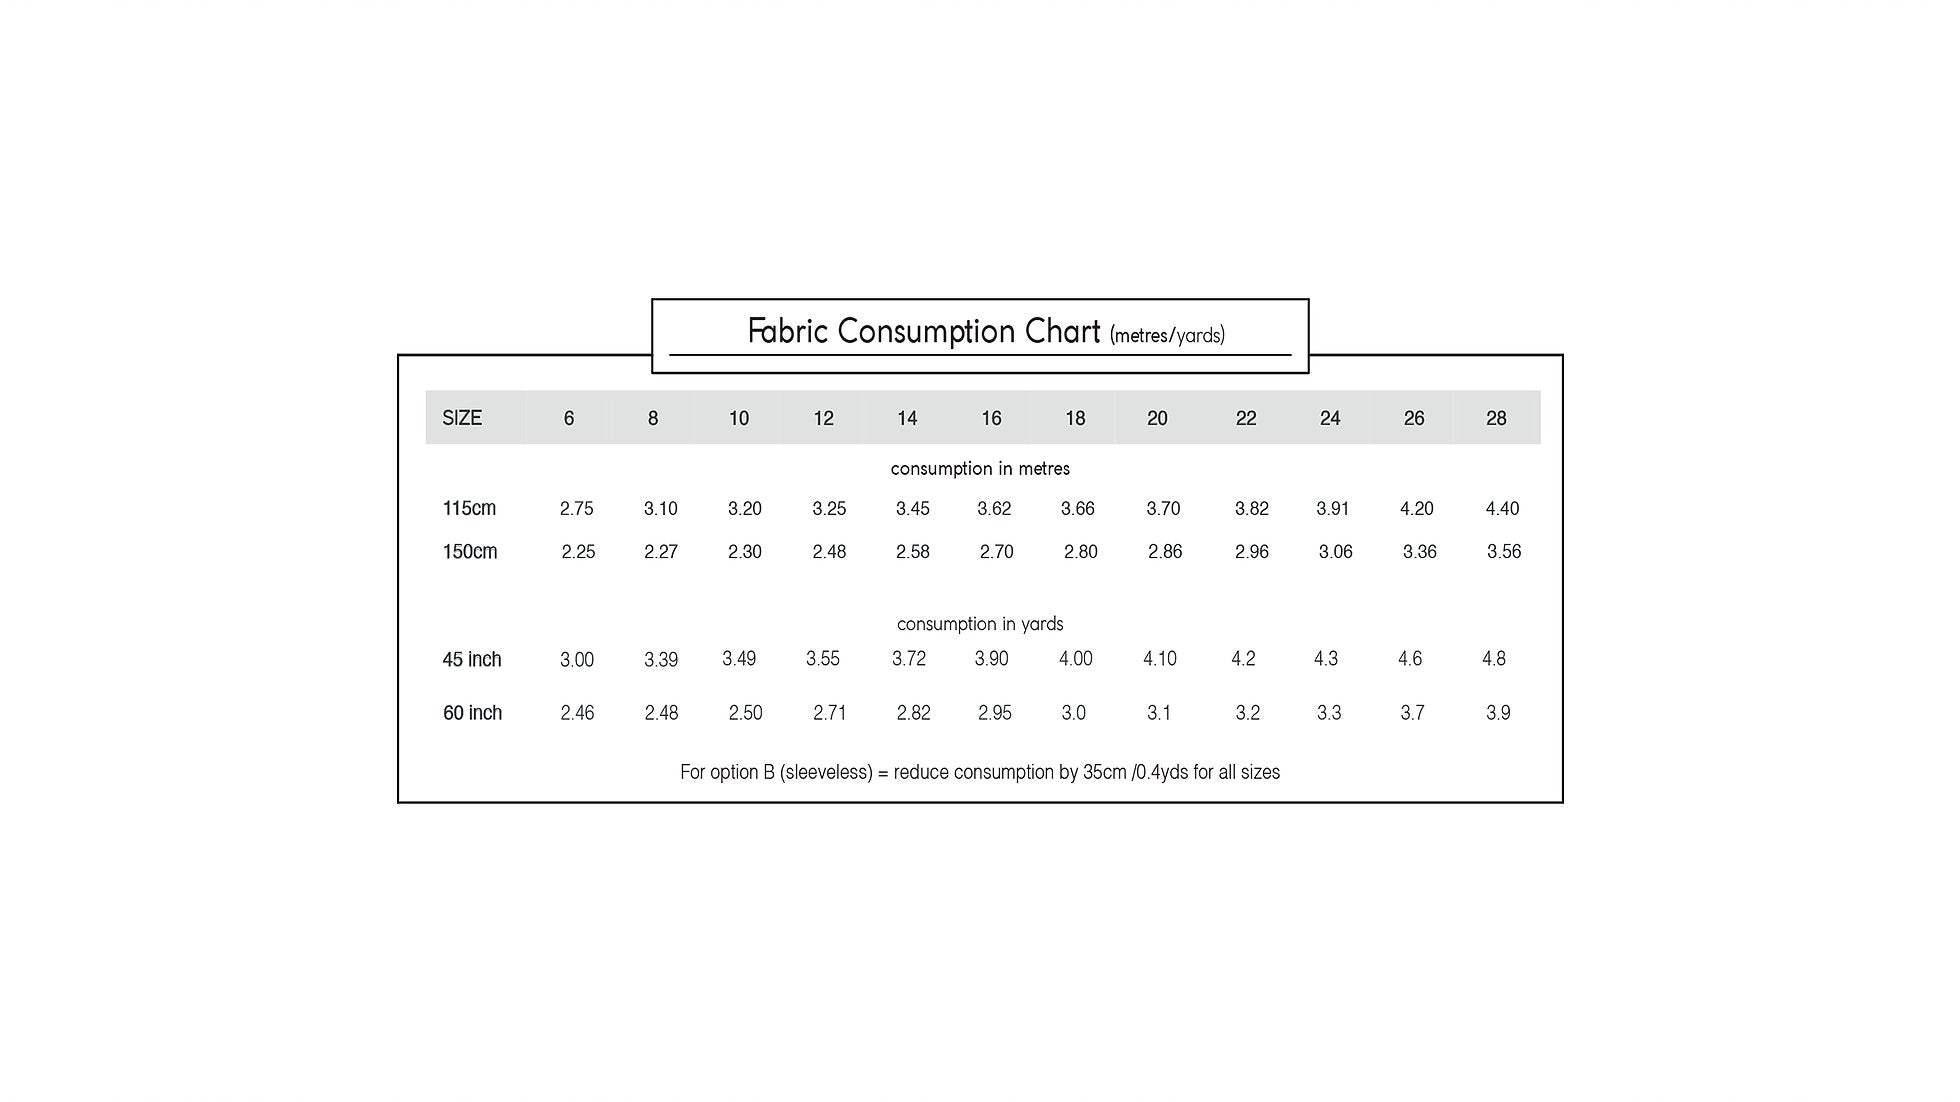
Fabric requirements: For Option B (sleeveless), reduce consumption by 35 cm (0.4 yd) for all sizes.
115 cm (45") wide fabric: 2.75 - 4.40 m (3.00 - 4.80 yd).
150 cm (60") wide fabric: 2.25 - 3.56 m (2.46 - 3.90 yd).
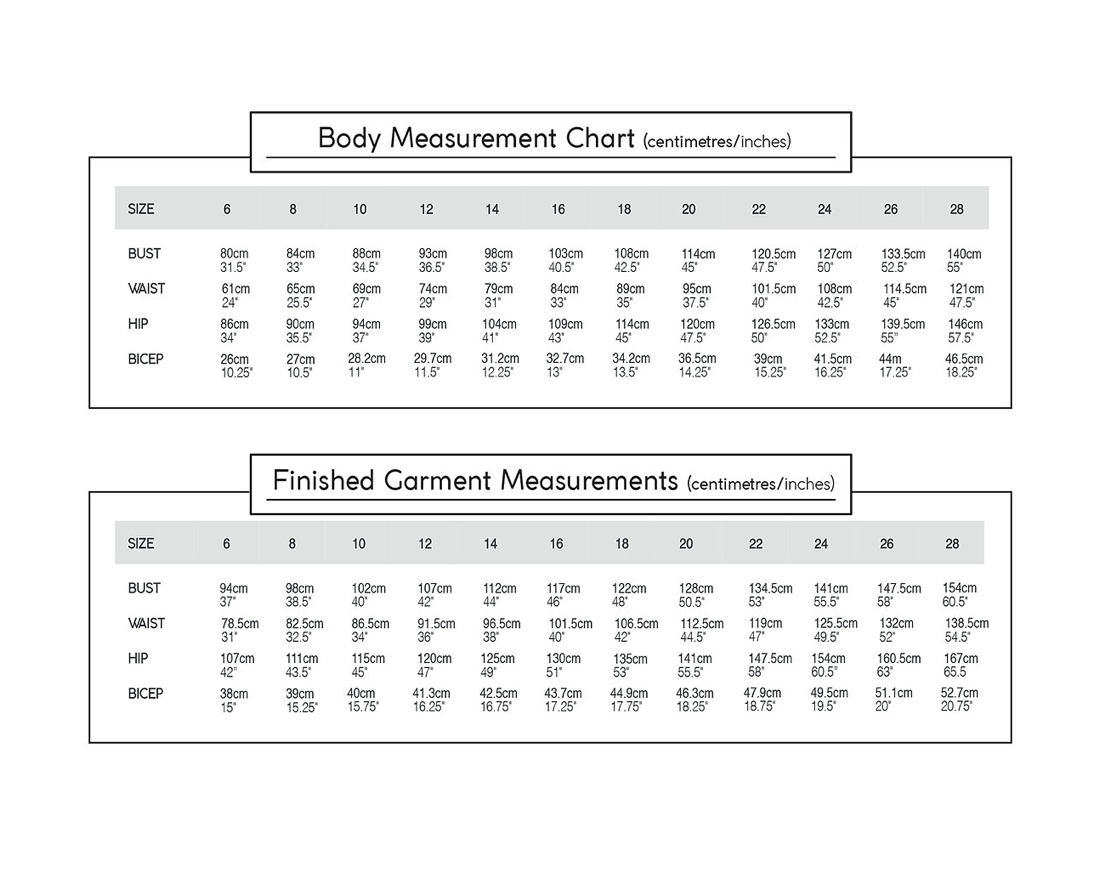
Sizing: UK 6 – 28 (approx. UK 6 – 30, based on our standardised size chart). Please also check the designer’s size chart and finished garment measurements.
This pattern was drafted for the height of 170 cm (5’7″) and a C bust cup. However, the pattern was sampled with models who had A, C and DD bust cups, and no fitting alterations were necessary for any of these cup sizes.
The model pictured is 5'10" with a 34D bust. She is wearing a size 12 with 2" of length added to the legs at the hem. This was the only modification for her.
PDF pattern includes: Instructions; A4/US letter print-at-home pattern (42 pages for sizes 6-20, 55 pages for sizes 16-28); A0 copy shop pattern (3 sheets for sizes 6-20, 3 sheets for sizes 16-28); US copy shop pattern (2 sheets for sizes 6-20, 3 sheets for sizes 16-28) // Layers: Yes // Projector file: Yes.
If you’re looking for more maker inspiration, check out the latest sewing pattern reviews from the sewing community. We also have a sewing blog to keep you up to date with all the news from the world of sewing.
If you’re looking for maker inspiration check out our blog. With weekly updates on new patterns, styling ideas and maker inspiration, it's not to be missed.
This is such a beloved pattern in the sewing community and if you have not made a zadie so far then what are you waiting for! Another review of this much loved pattern is not really needed I guess, but I did want to share a couple of things that I have found are really helpful in getting a nice result. Firstly, the fabric choice is really important i.e. a tighly woven fabric with a nice drape. The only Zadie-fail I have experienced is I made a pair with a (really beautiful) woven linen from merchant and mills but the fabric was a bit loosely woven and therefore did not stand up well to the tension needed at the tie waist and has bagged out a bit. I made a version in a very inexpensive drapey chambray and it was a winner and a version in a Liberty tana lawn which also worked v well. The other thing is to make sure that the wrap tie is sitting on the natural waist which may mean taking a bit of length out of the bodice if you are shorter like me. The pants include a lot of rise - again this has been commented on a lot - but I would say don't be shy in taking out rise if you are short, it definitely gives a better fit. Happy Zadie making!
Yowsers, this turned out so much better in real life than I could even imagine. This was my first time sewing with velvet which was really shifty to cut and sew with, but this pattern is not particularly fitted so any dodgy bits are not obvious.
Fit
My measurements matched size 8 at the bust, 12 at the waist and 10 at the hips. I knew from my first Zadie that there’s a fair amount of ease at the waist so I went with 10 at the waist, and 8 for the hips/legs to slim it down a little.
Details on how I fit my first Zadie are here, but I added an upper rounded adjustment to this one.
Fabric
Silk viscose velvet. Oh my goodness, this felt absolutely gorgeous. The silkiness against my skin felt luxurious and the velvet pile was so soft. I put it in the washing machine on the woollens cycle at 30 degrees, spin at 600 and into the tumble dryer on the smoothing setting - an 8 min cycle at low temperature to remove creases, and then air dried. It came out absolutely fine. (I don’t have the patience for hand washing!).
General advice seemed to be to have the nap running down the garment, but I preferred the look of it running upwards giving it a deeper and more uniform colour.
Pattern changes
I did change the order of construction because I wanted the satin binding to only go round the bodice, and not down the trousers to avoid it ‘pointing’ to the crotch. This is the order I sewed it in:
1. Before attaching bodice to trousers, sewing the binding to the bodice neckline, leaving gap for where the tie belt attaches.
2. Sew the leg pieces together including the crotch. I finished the wrap edge of the trousers with binding folded to the inside (having already cut this section 1cm wider to allow for the binding to be folded under)
3. Attach bodice to trousers at the waist seam.
4. Attach belt ties to bodice with hand stitching.
I overlocked all the pieces before sewing the seams as they would be pressed open to reduce bulk.
Other changes I made:
1. Used the satin binding to finish the raw edges on the wrap section of the trousers and hem, by folding it to the inside.
3. Lengthened the sleeves by 7cm (but no hem allowance needed in this due to the binding finish rather than folding it under)
4. Cut and spread the sleeves to give an extra 6cm in width for the gathering at the wrist, using satin binding as a cuff.
5. Made the trousers full length.
Conclusion:
I am totally in love with this version of the Zadie. The fabric and pattern combo is such a winner for me, and I love that a few changes have made a more casual outfit into occasion wear. I love the wrap front and tie belt to give shape. The wrap front gives me enough coverage and it feels so chic yet very comfortable to wear. This is my second Zadie and it won’t be my last.
Loads of photos, details of the changes I made and the tips I used for cutting/sewing/pressing velvet are in my blog post here.
I don't understand why this pattern is so popular. I've made two-- hope against hope-and I never wear them and I can't get anyone to take them off my hands. Since they use so much fabric, I'm going to take them apart and make something else. They are unflattering on everyone and they're uncomfortable unless you take a seat and don't move. Too much fiddling with the neckline.
After following advice from others I made the top true to normal shop size & bottom one size down. Also took 2 inches of rise. Fitted perfectly. Looking forward to wearing it out.
I’ve been thinking that I’d love a light-weight Zadie for an up-coming holiday but also something glitzy for Christmas. I’ve never made up a jumpsuit so this was new territory!
I was hoping to make up a wearable playsuit toile but knew this first version may not be perfect.
After much research I sized down one size to a size 8. I also took 2 inches from the rise in the leg pieces, at the shorten/lengthen pattern line near the hip. I did not touch the upper pattern pieces.
The result was miraculously perfect!!! I wouldn’t change a thing! What luck!
I used a very cheap light weight seersucker fabric.
It literally feels like wearing nothing!
There’s lots of tips and images on my blog post if you’d like to read more. Click Here
Votre panier est vide
Dépensez £50.00 de plus et obtenez la livraison gratuite!


