The Sewing Pattern Tutorials: 5. Sewing with vintage patterns


Vintage patterns
The Sewing Pattern Tutorials is a year-long FREE sewing course where we will demystify dressmaking patterns. We’ll begin with the basics so that if you are new to sewing you can join in from the start. We also know that lots of you want to learn new sewing skills so as the year progresses we’ll begin to cover more complex topics so that you will finish with the skills needed to deal with fitting problems too. In each post we will also have a sewing jargon busting section explaining any terms used that might be confusing. We’ve already covered the pattern envelope, now we are moving onto interpreting the patterns themselves. This week we explain how to use vintage sewing patterns. Catch up on previous posts in the series here.
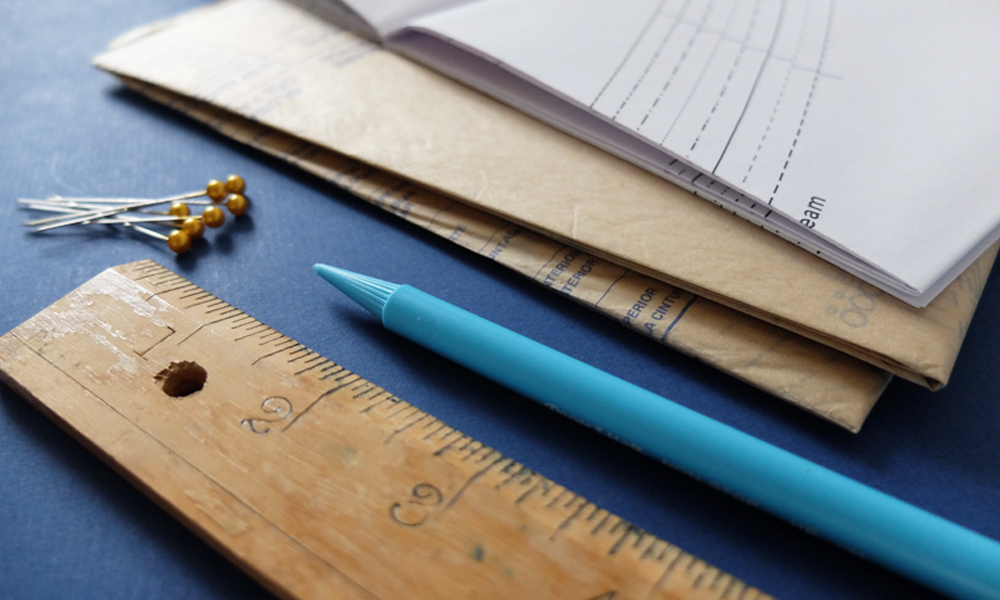
Whether you like to sew vintage style clothing or not, the design details and illustrations from earlier decades are some of the most beautiful sewing patterns you will find. Several of the patterns in my collection I bought simply because they were lovely and I have no intention of using them!
How old are ‘vintage’ patterns?
As a general rule, if something is over 100 years old it is categorised as an antique. Vintage is a more general term for something that was fashionable in a different era and is usually over 50 years old. With this in mind, vintage decades are most often thought of as the 1920s – 1960s. The revival of vintage fashions has generated a whole new sector of ‘vintage-inspired’ sewing patterns and styles though. These patterns were not made in the vintage decades but share characteristic design details giving them a vintage look.
How do vintage patterns differ between eras?
The styles from the 1920s to the 1960s varied tremendously in women’s and men’s fashions. Many of the outfits were inspired by icons of the decade such as Rita Hayworth, Audrey Hepburn and Coco Chanel, to name but a few. In the 1920s women’s fashions were glamorous and highly accessorised with hats, bags and jewellery. The most iconic style of this era (and into the 1930s) was the flapper dress; designers including Coco Chanel and Paul Poriet defined the fashions of these decades. Elegance continued into the 1930s but styles became more feminine and shaped to a woman’s figure, as opposed to the boy-like andogyny of the 1920s. Pattern styles used smaller pieces in their designs to minimise fabric waste and cost (as a consequence of The Depression).
Designs became much more stylised in the 1940s with exaggerated shoulders and trousers. The Second World War restricted clothes people were able to buy and this generated a whole new generated of home sewers using all sorts of fabrics to make outfits. In the post-war era, fashions became more romantic, lead by designers such as Christian Dior. By the 1950s full skirts with nipped in waists and pencil skirt style suits defined the age. There was an increase in the number of patterns available to home sewers, offering a much greater choice. By the 1960s more time was being dedicated to fashion and printed sewing patterns offered the greatest range of styles. At the start of the 1960s designs were still influenced by the 1950s but by the end of this decade, mod British styles from designers such as Mary Quant, who introduced the iconic mini skirt and A-line flared dresses, predominated.
Taking a closer look at a vintage pattern
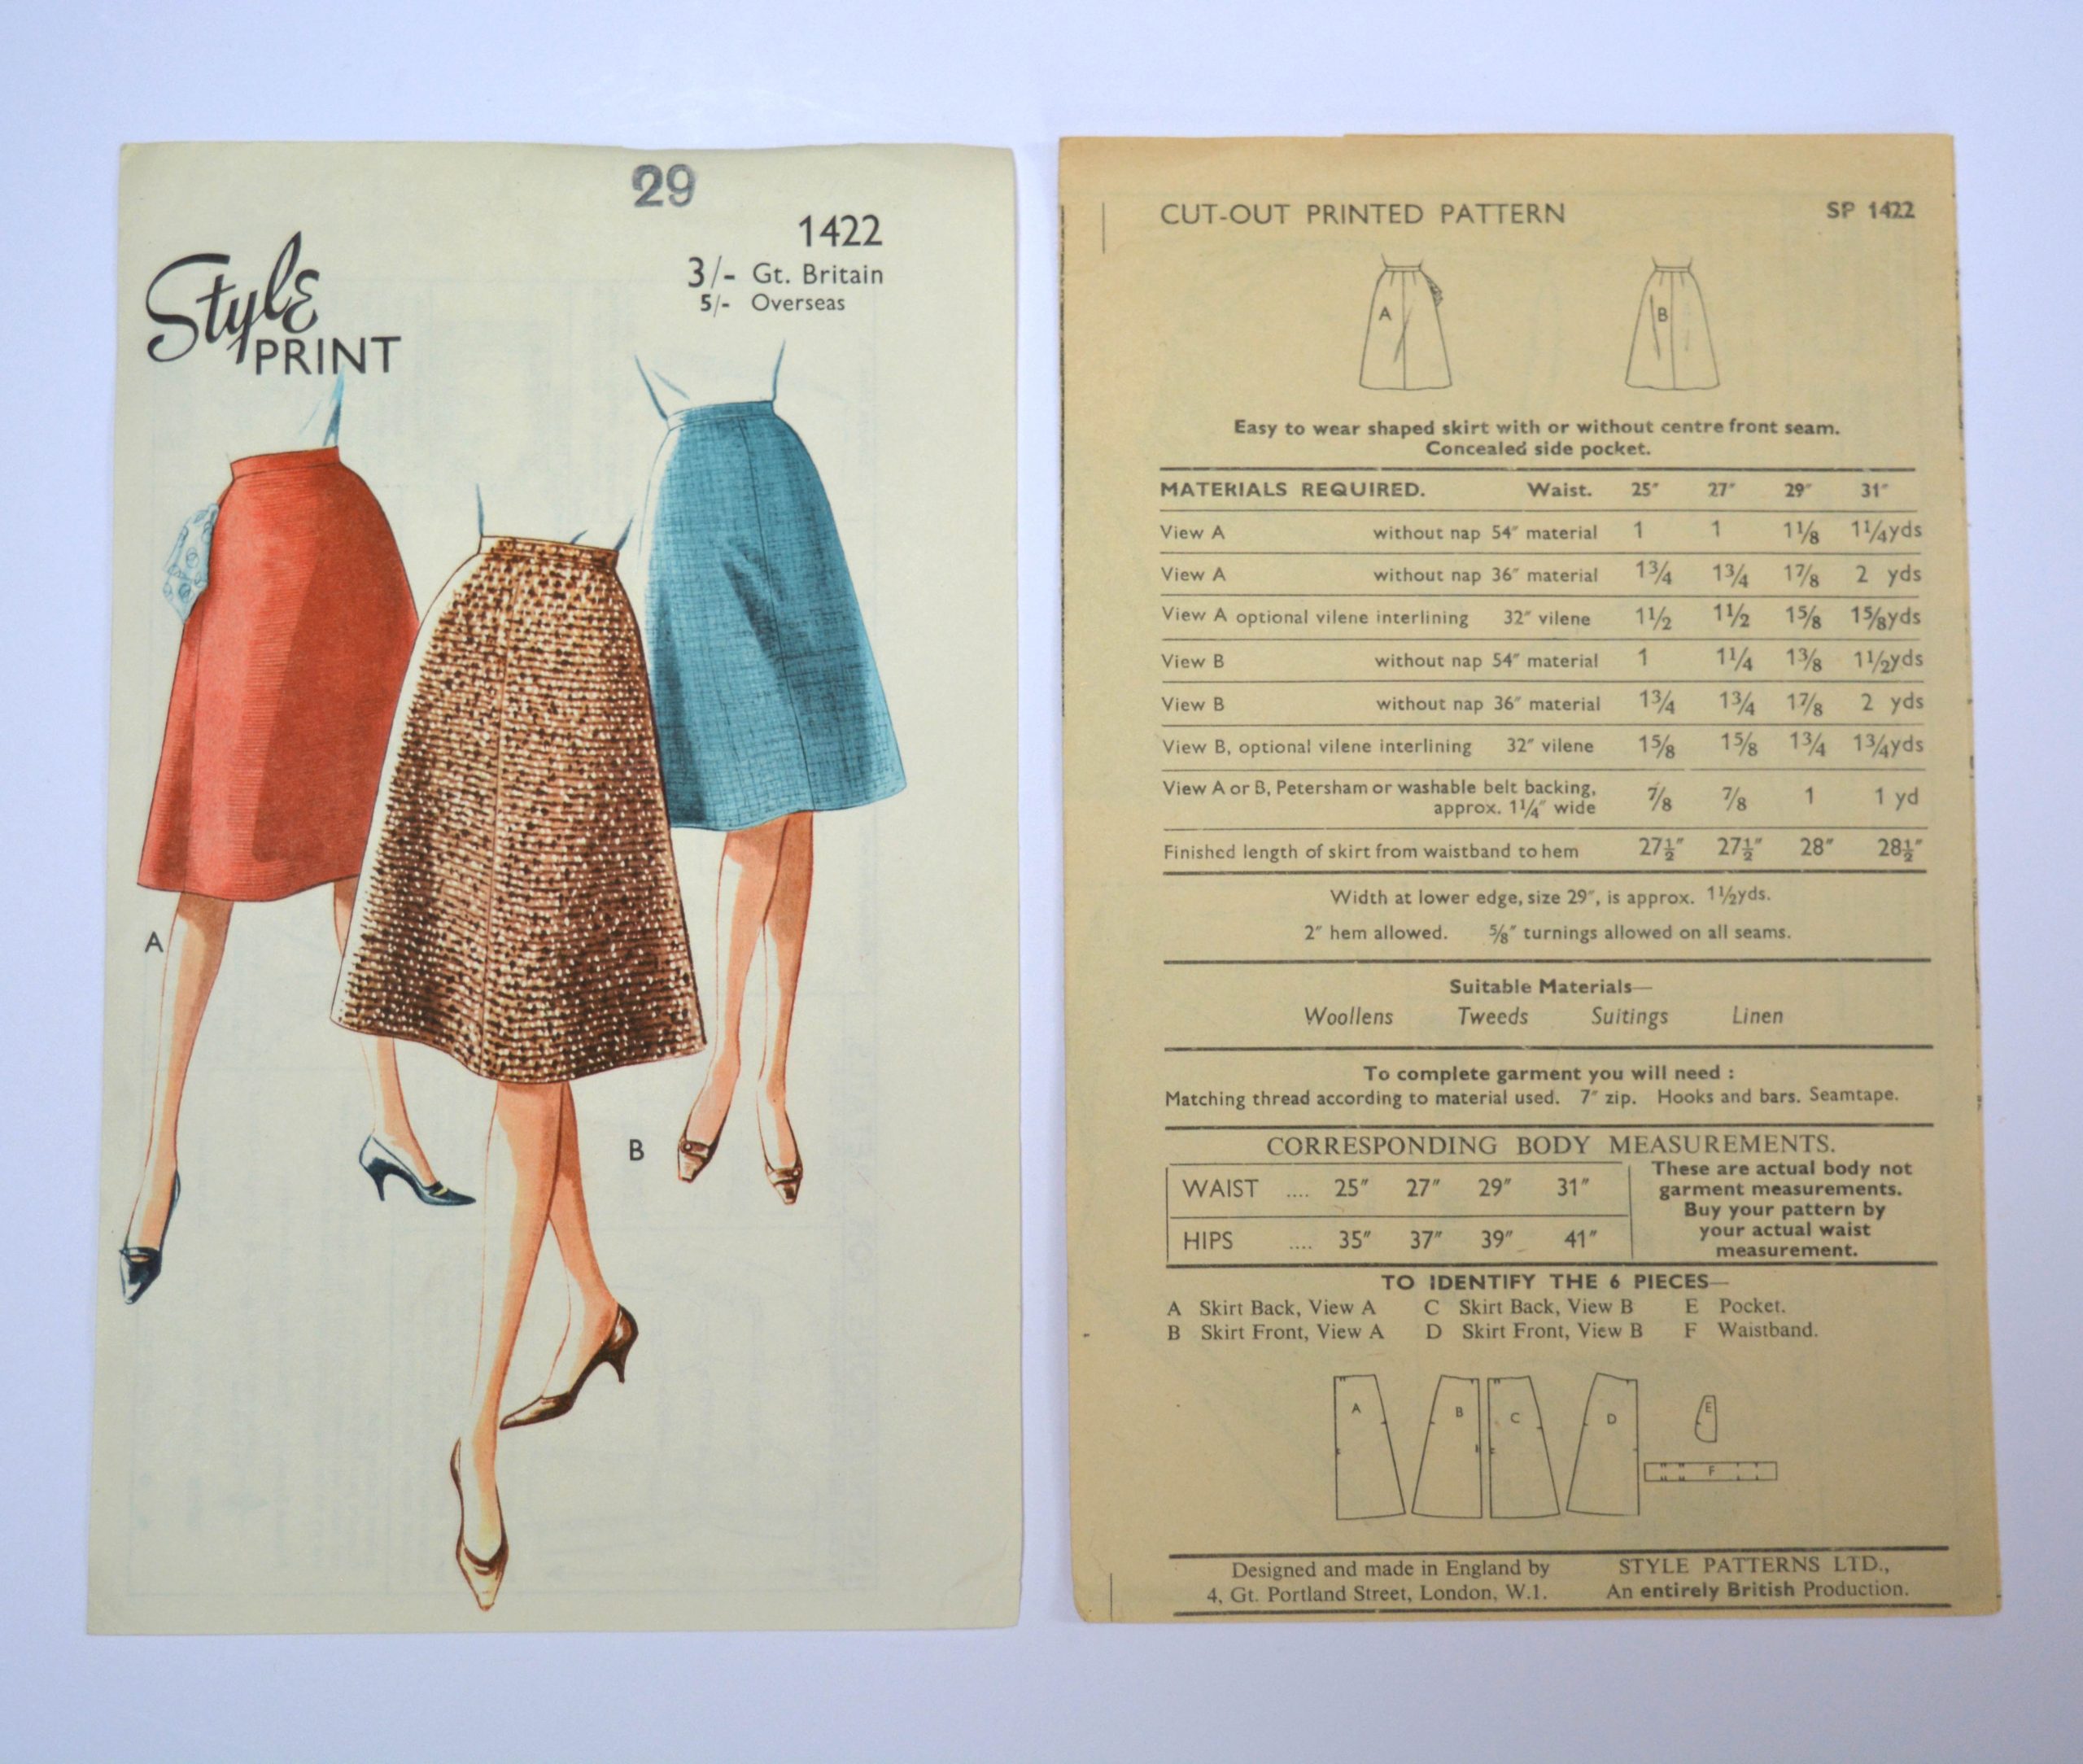
This vintage sewing pattern from Style Print was printed in the 1950s and belonged to my Granny. I remember her wearing these skirts when I was young and she would usually make the pattern with wool fabric. The pattern includes a simple printed cover (rather than an envelope), some instructions on measuring yourself and general fitting alterations plus a step-by-step sewing guide (including a range of seam finishing options!).
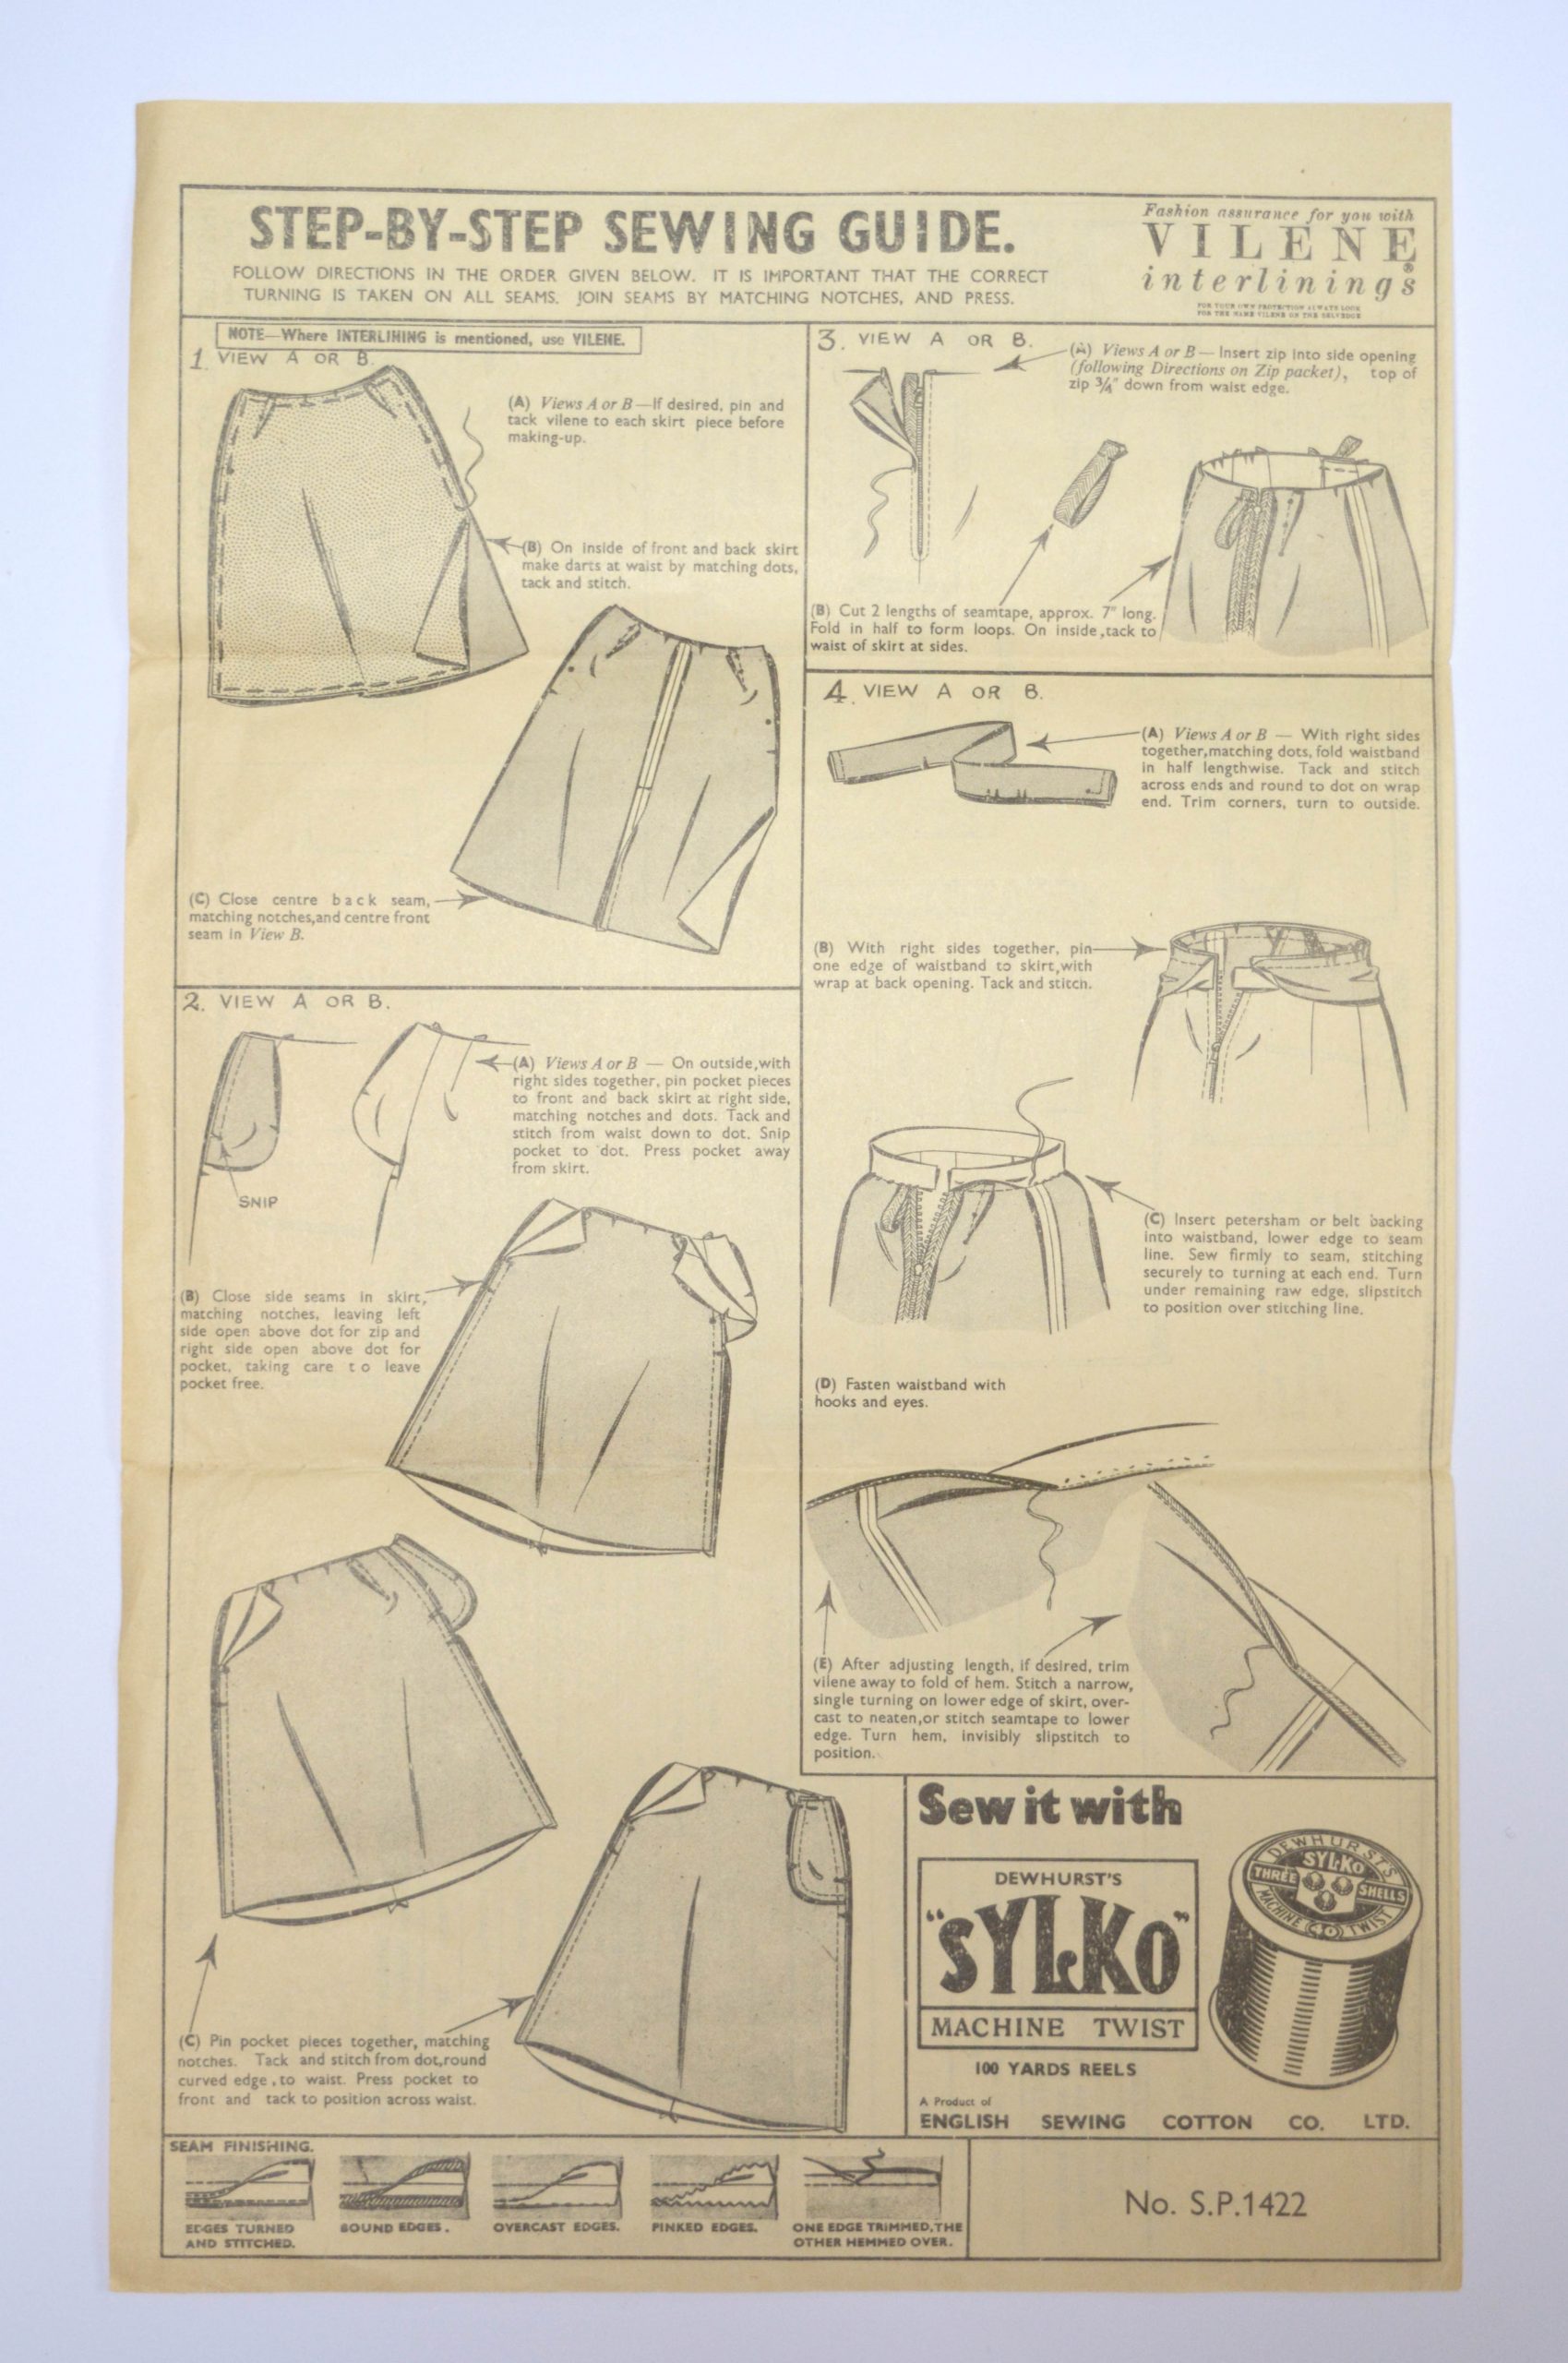
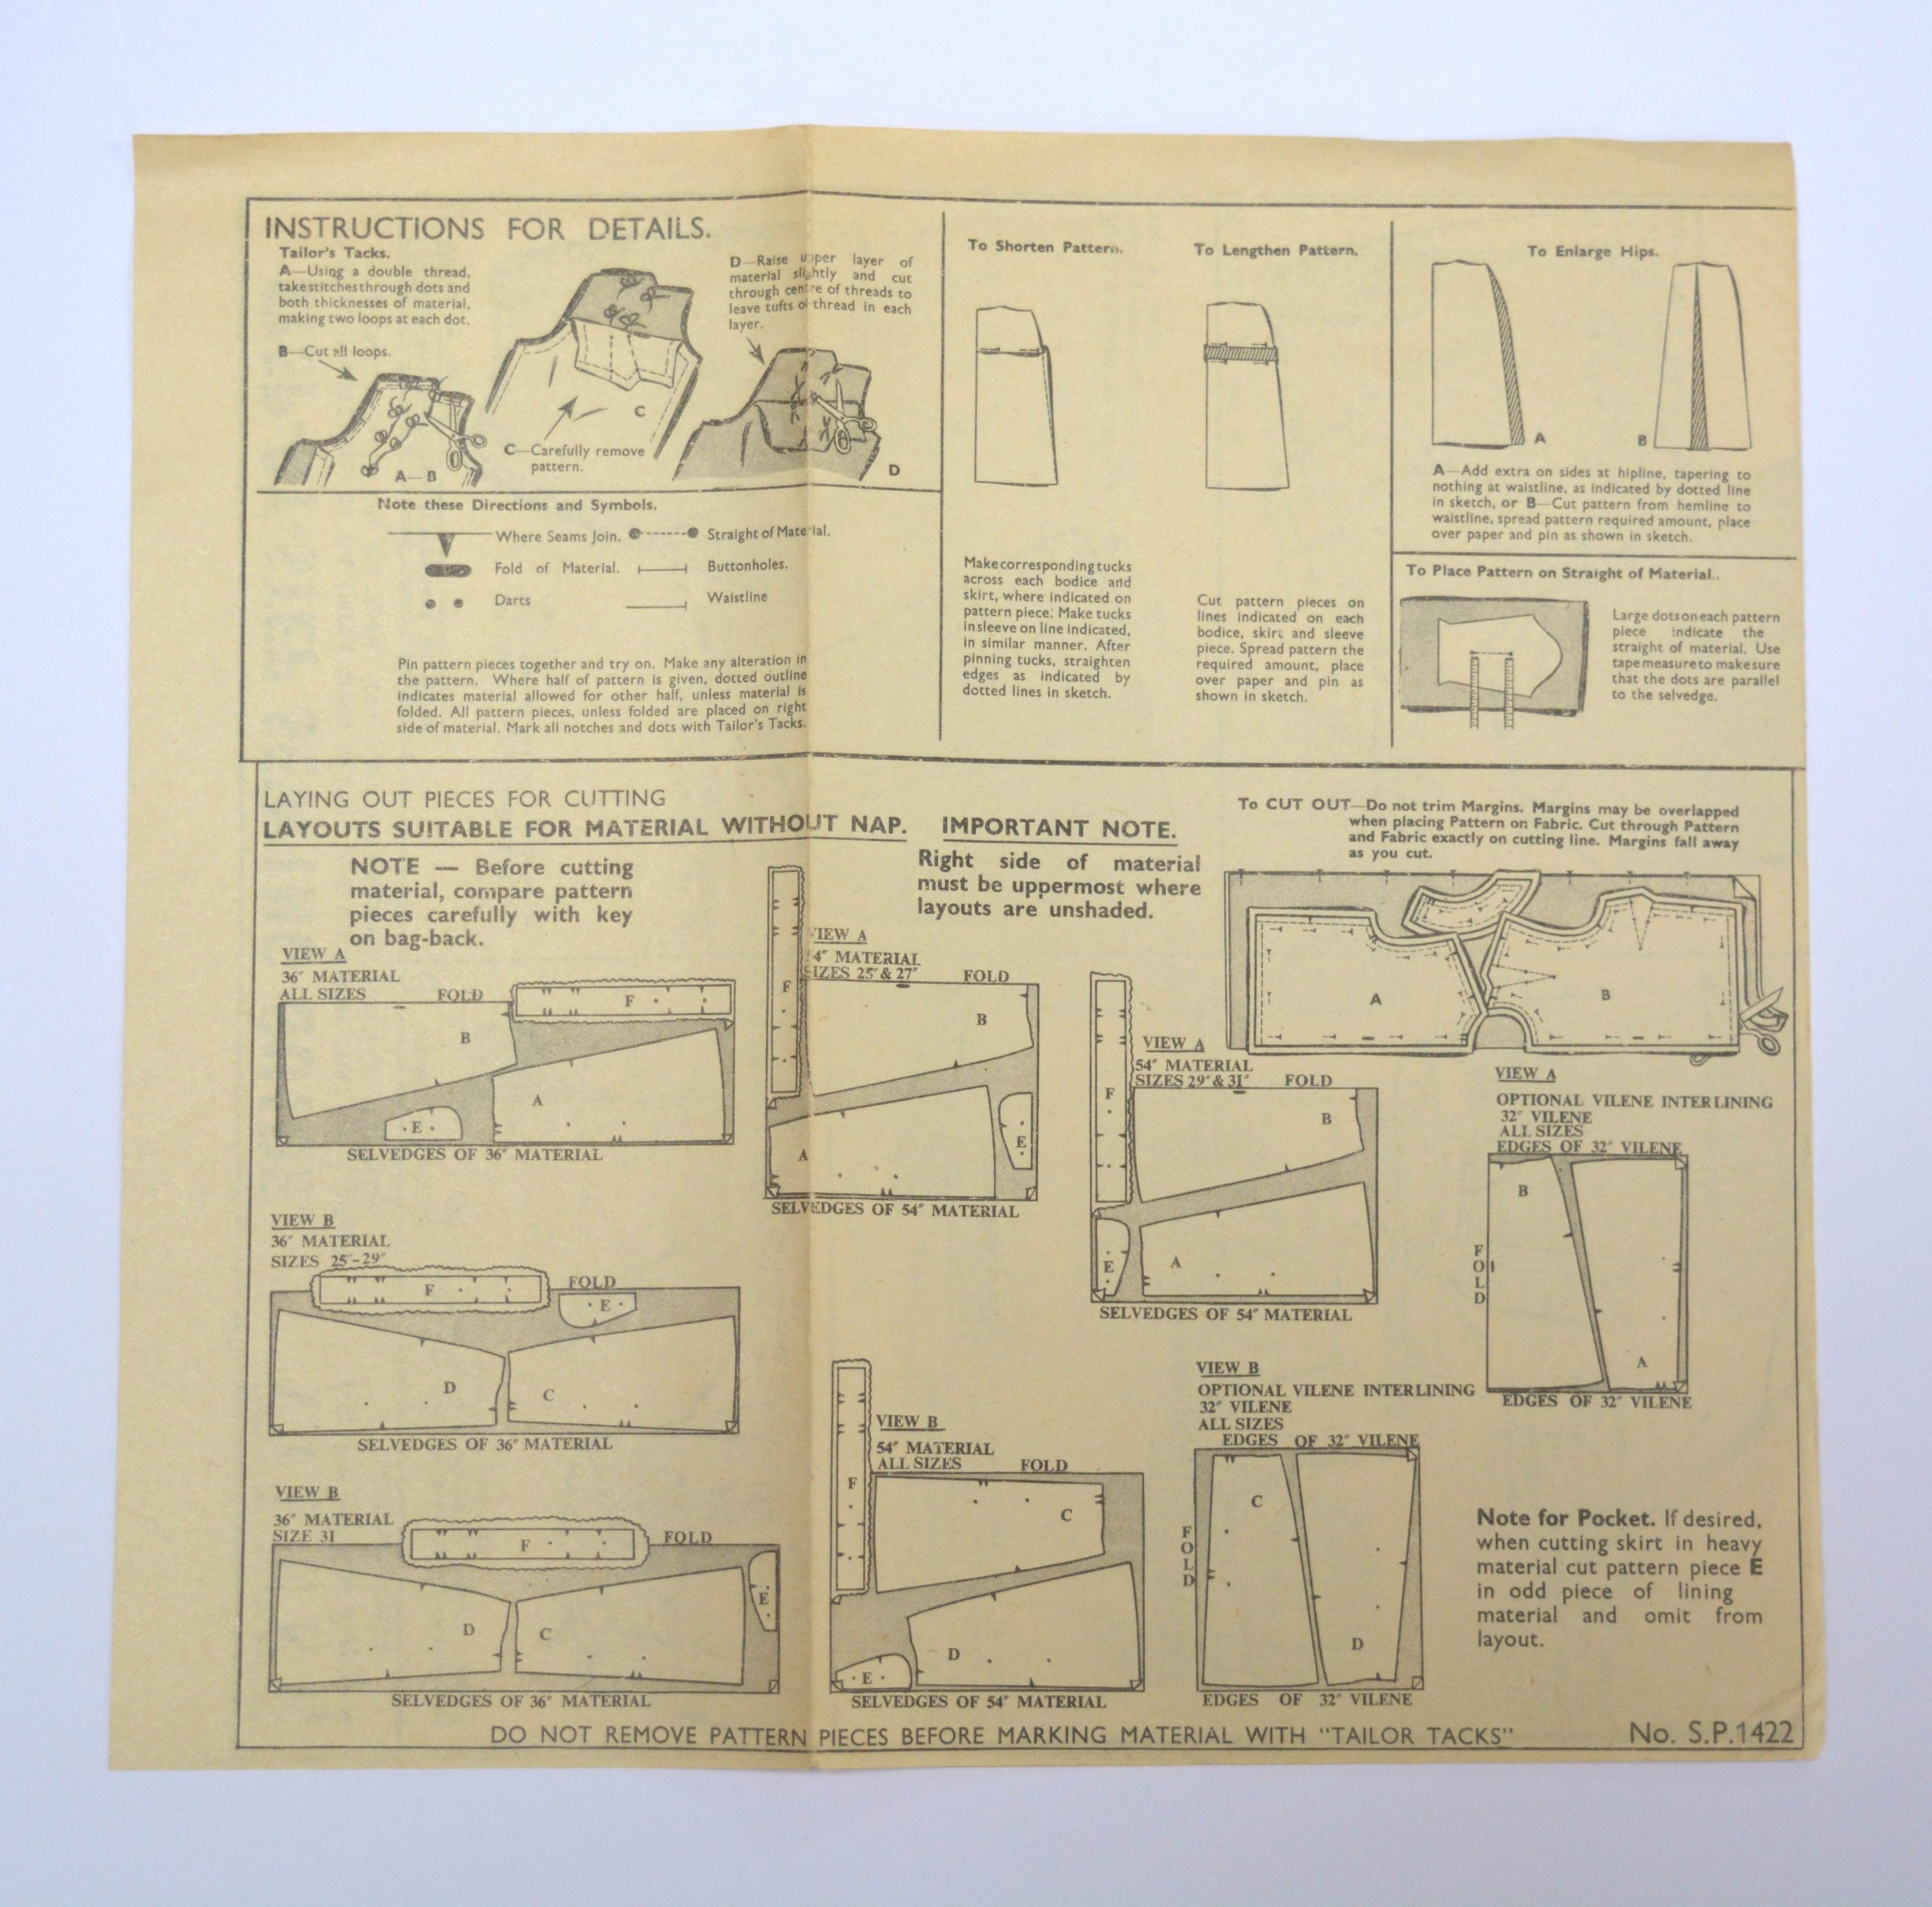
On the front cover the A and B letters refer to the two style options (with or without a centre front seam).’29’ refers to the waist measurement for this pattern. Although there is a body measurement chart in the instructions, this envelope only contains pattern pieces for a size 29″ waist. Below the size measurement is the pattern number ‘1422’ and the price to buy in the UK and ‘overseas’, wherever that may be! The instruction leaflet inside shows a multitude of lay plan options to minimise fabric waste. The step-by-step instructions are illustrated and sponsored by well known brands of the day – Vilene interlining and Dewhurst’s Sylko machine thread. I love the fact that the first step is ‘If desired, pin and tack vilene to each skirt piece before making-up‘! Instructions for inserting a zip are not included because it is assumed you will follow those given by the zip manufacturer.
How do I interpret symbols on vintage patterns?
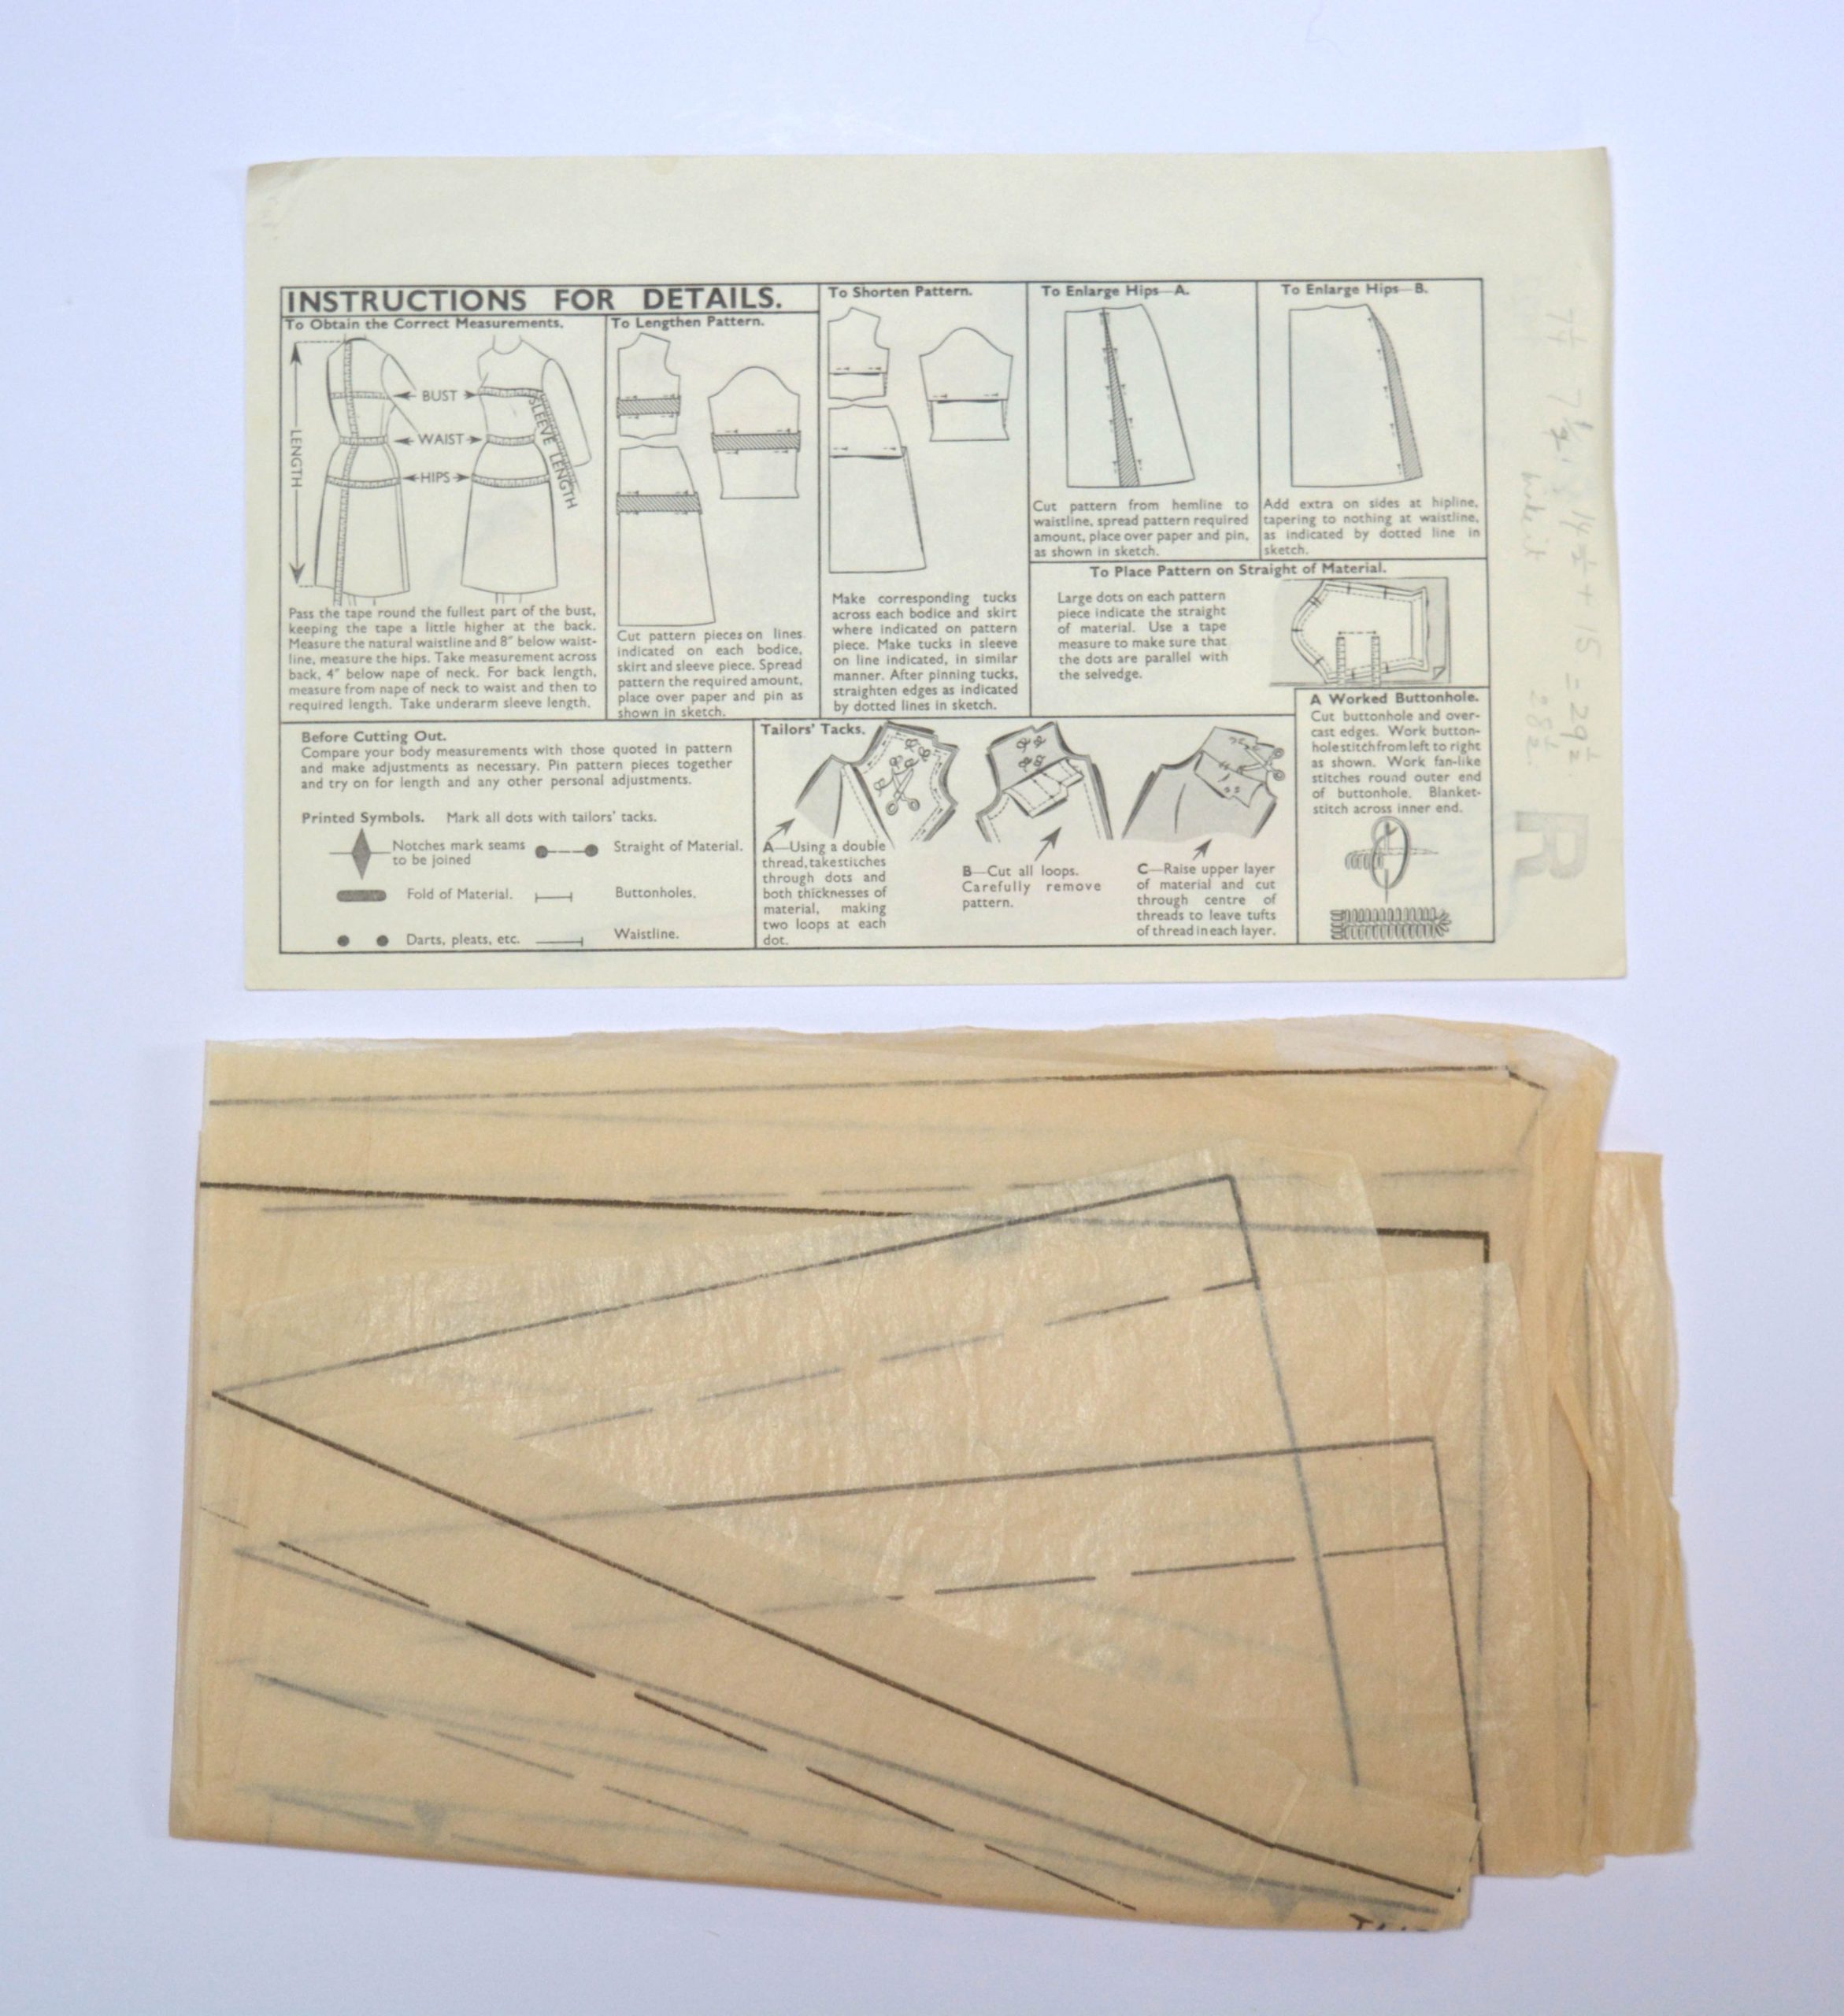
The earliest vintage sewing patterns didn’t actually have any lines printed on them, instead the tissue sheets had small perforated holes creating the outline of the pattern pieces. Style designs such as darts and pleats were also marked out with circles. These holes were designed to be used for tailors tacks or chalk. There were other symbols to interpret as well, two or three large vertical circles indicated that pattern pieces should be cut on the fold. Two or three horizontal circles indicate the position of the waistline and where you should make fitting adjustments to lengthen or shorten the torso. Pattern piece labels were also created by punching out small holes to make the shape for that letter. Sewing patterns in the later vintage decades were almost exclusively printed, so you only need to worry about this when sourcing vintage patterns from approx. pre-1940s.
One thing to be careful of is how delicate vintage patterns can be. The tissue is usually quite fragile and easily torn. Also look out for any missing sections or edges that are ripped, these could be obscuring important pattern marks. Without lines on pattern pieces it can be tricky to know which way to lay them out so use the lay plan to guide you.
In some of the older sewing patterns smaller pieces such as facings weren’t included. It was expected that you had the sewing experience to draft these yourself! Learn how to draft a facing piece with Colette’s tutorial.
Do vintage pattern sizes differ through the decades?
A big difference between vintage and modern patterns is that vintage patterns are not multisized, so you only get one or a few sizes in a pattern envelope (if there is only one pattern size this means you can’t grade between sizes). Before I did much sewing I bought several vintage patterns because they look lovely, only to realise later that they weren’t the right size for me. There is also a more limited range of sizes in vintage patterns, so it will be difficult to find patterns for sizes 18 plus. The single or limited size range of patterns will restrict the amount of resizing you can do simply as well.
The amount of ease was also different in vintage patterns, this was partly to do with style but also the difference in body shapes. The bust shape is a good example of this, which varies considerably through the decades. Also look out for size and ease differences between the bust, waist and hips. In the 1930s and 1940s body measurements were not as exaggerated as they were later in the 1950s and 1960s where the bust-to-waist ratios were often much smaller.
Making a muslin is really important if you need to make fitting alterations and resizing for vintage patterns. Also take a closer look at the sizing chart, the body measurements for a ‘size 12’ in the 1940s is different to the standard body measurements for a ‘size 12’ today. Both body sizes and pattern sizes were smaller when vintage patterns were printed. The best thing to do is pick the pattern with body measurements closest to yours rather than using the size on the front as a guide.
Where are the best places to find vintage patterns and inspiration?
We’ve put together a list of the best places to find vintage patterns and fabrics on our vintage supplies page in the Sewing Resources section. The biggest sites to find patterns are market places such as Ebay and Etsy, although you can often end up paying quite a bit for patterns on there. Collector Weekly shows the most watched and collected patterns on Ebay. One of the best places to look for patterns is The Vintage Pattern Collective, which is home to several vintage pattern sellers. Keep you eye out in charity shops for sewing patterns too, you can often pick them up for very little. Make sure you check all the pattern pieces are still in the packet though.
There are also several bloggers who make vintage-inspired outfits including Marie of A stitching Odyssey, Emmie of My Oh So Vintage Life, Gertie’s blog for better sewing and Laura of Sew for Victory. The Vintage Pattern files also has lots of inspiration. When vintage patterns were sewn up, many of the finishing details would have been done by hand as greater emphasis was placed on these techniques then. Taking the time to finish your garments with details such as blind hems or handmade shoulder pads will give them that special vintage look. Hand stitching can seem intimidating when you normally use a machine to sew clothes. To make it easier use a good quality needle and thread. You could also try waxing your thread to help it move through the fabric more easily and if you have a big hand sewing project try using a thimble to save your thumbs!
Sewing with vintage or vintage-inspired patterns?
If you are undecided about whether to tackle an original vintage sewing pattern just yet, why not check out some vintage-inspired patterns. This way you’ll create an authentic looking vintage outfit with some of the key design details but you will use a modern pattern and instructions. There are several designers now with vintage-inspired pattern collections including Jennifer Lauren Handmade, Selkie Patterns, Christine Haynes and How To Do Fashion. Don’t forget that the commercial sewing companies have reprinted a lot of their vintage pages with modern up-to-date sizing and complete instructions, this offers the best of both worlds. See patterns from Vogue Patterns and McCalls here.
Sewing jargon explained
Blind hem
By folding and stitching the fabric you can sew a machine hem on trousers or a skirt which can’t really be seem from the right side. You just need to make sure you leave enough fabric for the folds. Check out this tutorial from Colette on how to stitch a blind hem.
Continuous lap
Cut on the straight grain, a piece of fabric is used like a facing to bind the edge of a placket opening such as a skirt slit or bodice neckline (when a simple hem just can’t do it).
Lapped or flat-felled seams
Ideal for fabrics that don’t fray. You will often see lapped seams on yokes or in modern patterns they are used in sportswear and jean patterns. One side of the seam allowance is trimmed, folded under and then held in place with a second row of stitching. Read this tutorial from Colette on how to stitch a flat-felled seam.
Pintuck
These are very small tucks used to shape garments and add design detail. Learn how to sew pintucks with this photo guide from Burdastyle.
Shirring or ruching
This is created by sewing row(s) of parallel gathering stitches to add design detail. Check out this tutorial from The Sewing Directory on shirring your fabric.
Slider fastener
A zip! For tips on sewing an invisible zip read this guide from Tilly and the Buttons.
True bias
A piece of fabric cut that is cut at a 45 degree angle to the grainline.
